background image

ENGLISH

13  

BasiX, RubiX, RubiX XL Rev. 2

0806/1/ST-000690646.EMS

Options – Crutch holder

Crutch Holder

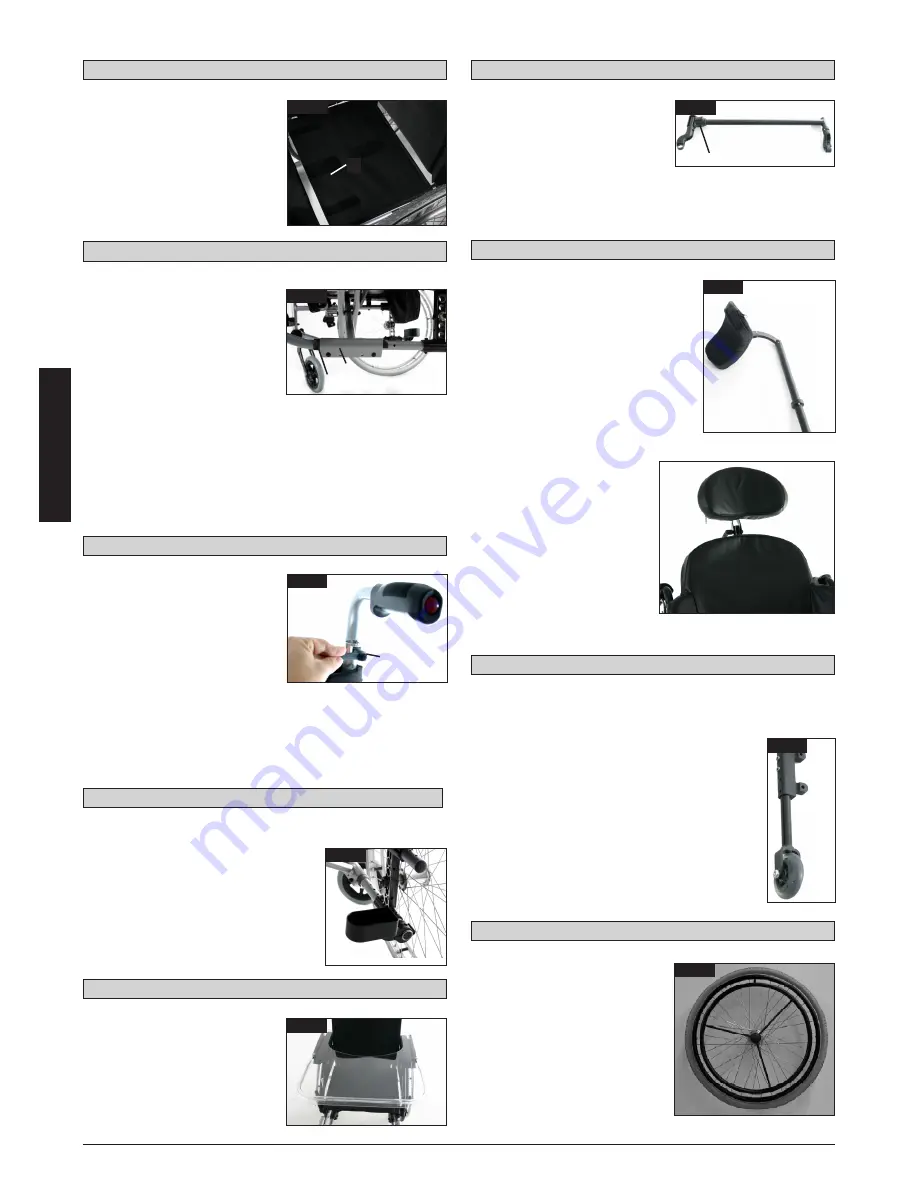
This device permits crutches to be 

transported directly on a wheelchair. It has 

a Velcro loop to fasten crutches or other 

aids (Fig. 43).

CAUTION:

Never try to use or even remove the 

crutches or other aids while moving.

Options - Therapy table

Therapy table 


The tray provides a flat surface for 

most activities. Before using a tray, 

it first has to be adjusted to the 

width of the seat by an authorised 

dealer. The user must be sitting in 

the wheelchair during this 

adjustment (Fig. 44).

Options – Stabilising bar

Folding stabilising bar 

This bar is used to stabilise the 

backrest. To be able to fold the 

wheelchair, the release lever (1) 

must be pushed inwards and the 

stabilising bar must be flipped downwards.

When unfolding the wheelchair, please make sure that the 

stabilising bar is locked into position (Fig. 45). 

Transit wheels
Transit wheels

 should be used wherever your wheelchair would be 

too wide if the rear wheels were used (e.g., in 

airplanes, buses, etc.). After the rear wheels have 

been removed with the aid of the quick-release axles, 

the 

transit wheels

 can immediately be used to 

continue riding. The 

transit wheels

 are mounted so 

that they are approx. 3 centimeters above the ground 

when not in use. They are thus out of the way when 

riding, transporting or when tipping to pass over 

obstacles (e.g., kerbs, steps, etc.) (Fig. 47).

CAUTION:

Your wheelchair does not have any wheel locks 

when the transit wheels are being used.

Options – Transit wheels

Options – One-hand operation

One-hand operation 

To move the wheelchair in a 

straight line, both hand wheels must 

be operated. If the wheelchair is to 

be folded up, remove the pull-off 

bar by pushing it inwards (Fig. 48).

CAUTION:

To avoid injury, always make 

sure that all connections are 

firmly in place.

Options – Headrests

Headrests 

The headrest can be raised and moved 

both forwards and backwards. To do this, 

simply loosen the screw, adjust the 

headrest to the desired position, and 

tighten the screw (see the section on 

torque) (Fig. 46).

Comfort headrest

For adjusting the height open 

knob and position the headrest in 

the desired height. Finally tighten 

the knob again.

Options – Push handles

Height-adjustable push handles  

These handles are secured with 

pins to prevent them from sliding 

out unintentionally. By releasing the 

release lever (1) you can adjust the 

push handles to a height which 

suits you. After any adjustment to 

the height of the push handles, pull 

the release lever (1) until it is tight 

(Fig. 42). 

CAUTION:

If the lever is not secure, injuries could result when lifting over 

obstacles.

Options – Seat depth

Seat depth 

By removing the clips (1), the cross-

brace unit (2) can be pushed along 

the frame, which then alters the 

seat depth (depending on the 

position of the back tubes).
Make sure that the clips (1) snap 

into the frame holes provided.
To keep the frame as compact as possible, the seat depth can also 

be adjusted by using the back tubes (41 – 46 cm in steps of 2.5 cm). 

To do this remove the screws (1 and 2) on the back tube bracket. 

Remove the wheels and the armrests and check that the cross-

brace is in the desired position (push the cross-brace as described 

above). Move the back tubes to the desired position and re-tighten 

all screws. Move the receiver tube for the armrests to the desired 

position (Fig. 41).

1

2

1

1

Fig. 41

Fig. 42

Fig. 43

Fig. 44

Fig. 45

Fig. 46

Fig. 47

Fig. 48

Options – Seat depth growth

Seat depth growth 

You can easily alter the seat depth

by using the Velcro fastener on the 

seat sling.

Separate sling (1) from sling, set the 

desiredposition and then

push both slings back together, one 

on top of each other (Fig. 40).

1

Fig. 40

Summary of Contents for BasiX

Page 1: ...lisation Gebruikershandleiding Manual de usuario Instruções para Utilização Manuale per l uso Brukerveiledning Användarinstruktion Brugervejledning BasiX RubiX RubiX Komfort RubiX XL RubiX XL Komfort Käyttöohjeet Pokyny k použití Instrukcja użytkowania ...

Page 2: ......

Page 3: ...vice agent s address and telephone number in the space below In the event of a breakdown contact them and try to give all relevant details so they can help you quickly Foreword about wheelchairs General safety notes and driving restrictions 3 4 Warranty 4 Transportability 5 6 Wheelchair components 7 Handling Folding and unfolding 8 Options Step tubes 8 Brakes 8 Footplates 9 Castors 10 Castor adapt...

Page 4: ... may tip over Therefore please make sure that the castors are adjusted correctly see the Chapter Castors In particular do not travel on an incline without brakes travel at a reduced speed Danger Explore the effects of changing the centre of gravity on the behaviour of the wheelchair for example on inclines slopes all gradients or when overcoming obstacles Do this with the secure aid of a helper We...

Page 5: ...air on slopes 10 Do not use your wheelchair on muddy or icy ground Do not use your wheelchair where pedestrians are not allowed Note Always be careful with your fingers when working or adjusting the wheelchair The products shown and described in this manual may not be exactly the same in every detail as your own model However all instructions are still entirely relevant irrespective of detail diff...

Page 6: ...eelchair all auxiliary equipment for example Crutches Loose cushions Tray tables Alterations or substitutions must not be made to the wheelchair securement points or to structural and frame or components without consulting the manufacturer Failure to do so will invalidate the ability of the wheelchair to be transported within a vehicle The wheelchair should be inspected by a Sunrise Medical Author...

Page 7: ...use Karabiner clips S hooks and tongue and buckle attachments b Sufficient space should be available around the wheelchair to enable clear access to attach tighten and release the wheelchair and occupant tie down restraints and safety belts c The tie down restraints should be fitted to the main frame of the wheelchair and not to any attachments or accessories e g not around the spokes of wheels br...

Page 8: ...ndles 2 Backrest upholstery 3 Sideguard 4 Seat sling 5 Footrest 6 Castors 7 Footboard 8 Fork 9 Quick release axle 10 Wheel locks 11 Handrim 12 Rear wheel Wheelchair Components 7 10 9 11 2 1 3 4 5 6 7 BasiX RubiX RubiX XL Rev 2 8 12 ...

Page 9: ...ress the quick release button on the axle 1 and pull the wheel off the axle Fig 3 CAUTION Hold the quick release button on the axle depressed when inserting the axle into the frame to mount the rear wheels Release the button to lock the wheel in place The quick release button should snap back to its original position Options Step Tubes Step Tubes Tipping tubes are used by attendants to tip a wheel...

Page 10: ...ew pull it inwards set the desired angle and then push it on After making the adjustment re tighten the screw Make sure that after any adjustment work all screws are tightened correctly see the page on torque Ensure that you maintain the minimum gap to the floor 2 5 cm Fig 14 Options Footplates Footrests and latch The legrests can be swung inwards under the seat sling or outwards When fitting the ...

Page 11: ... Adjustable backrest angle 7 30 By pulling both levers together 1 you can release the backrest and then move it to the desired position On releasing the two levers 1 the backrest will automatically lock into place Fig 26 CAUTION The angle adjustable bckrest can only be used in conjunction with the wheelbase extension CAUTION It is recommended that the angle adjustable backrest is used in conjuncti...

Page 12: ...damage to property Folding the backrest The backrest can be folded to make storage of the wheelchair easier Do not operate under load as this may cause lever to break To fold the backrest stand behind the wheelchair press the two small levers Fig 27 28 positioned on each side of the backrest just above the armrests Fold the backrest down 1 2 1 2 Fig 27 Fig 28 Fig 29 Fig 31 Fig 30 3 Fig 32 Fig 33 H...

Page 13: ...just lap belt to suit the user s needs as follows To increase the belt length To reduce the belt lenght Feed free belt through slide adjust ers and male buckle to provide more belt length Feed free belt back through male buckle and slide adjusters Ensure belt is not looped at male buckle When fastened check space between the lap belt and user when correctly adjusted it should not be possible to in...

Page 14: ...t inwards Fig 48 CAUTION To avoid injury always make sure that all connections are firmly in place Options Headrests Headrests The headrest can be raised and moved both forwards and backwards To do this simply loosen the screw adjust the headrest to the desired position and tighten the screw see the section on torque Fig 46 Comfort headrest For adjusting the height open knob and position the headr...

Page 15: ...y nuts should only be used once and should be replaced after use Please use only mild household cleansers when your wheelchair is dirty Use only soap and water when cleaning the seat upholstery and lap belt If your wheelchair should ever get wet please dry it after use A small amount of sewing machine oil should be applied to quick release axles approximately every 8 weeks Depending on the frequen...

Page 16: ...th ISO 7176 9 N A d Requirements for resistance to ignition in accordance with ISO 7176 16 EN 1021 1 2 Yes Standard reference min max Standard reference min max Overall length with legrest 770 mm 12 1060 mm 24 Seat plane angle 0 6 Overall width 470 mm 790 mm Effective seat depth 410 mm 480 mm Folded length 770 mm 1060 mm Effective seat width 380 mm 600 mm Folded width 300 mm 300 mm Seat surface he...

Page 17: ...235 BasiX RubiX RubiX XL Rev 2 0806 1 ST 000690646 EMS ...

Page 18: ...BasiX RubiX RubiX XL Rev 2 236 0806 1 ST 000690646 EMS ...

Page 19: ...Srl Via Riva 20 Montale 29100 Piacenza PC Italy Tel 39 0523 573111 Fax 39 0523 570060 www sunrisemedical com Sunrise Medical A G Lückhalde 14 3074 Muri bei Bern Switzerland Tel 41 0 31 958 3838 Fax 41 0 31 958 3848 www sunrisemedical com Sunrise Medical AS Rehabsenteret 1450 Nesoddtangen Norway Tel 47 0 66963800 Faks 47 0 66963838 www sunrisemedical com Sunrise Medical AB Britta Sahlgrens gata 8A ...

Reviews: