6
3.
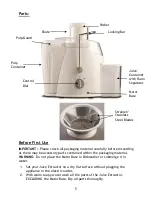
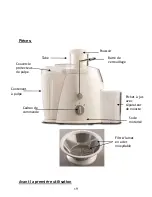
Assemble as pictured. 1
st
) Motor Base 2
nd
) Add Receptacle 3
rd
) Insert
Strainer/Blades and turn into place 4
th
) Add Pulp Container under
Receptacle 5
th
) cover with Chute and Pulp Guard 6
th
) place Juice
Container under Spout 7
th
)Lock Bar onto Pulp Guard Lid 8
th
) Insert
Pusher above Chute
4.
Make sure the appliance is in the OFF position (“O”) before plugging the
power cable into electric outlet.
Using Your Juice Extractor:
1.
Connect your Juice Extractor to the nearest electrical outlet.
2.
Prepare your fruits or vegetables by washing them thoroughly and
removing hard skins that impede the Juicing process (i.e. oranges).
3.
Your Juice Extractor features an extra wide chute, most fruits and
vegetables will fit. Cut any fruits or vegetables that do not fit in the
chute. Remove Pits from fruits like Peaches, Mangos, as they can
damage the unit.
4.
You may add a bag to the Pulp Container to make cleaning easy. Lift the
Locking bar in place.
5.
Turn the Juice Extractor on and place the fruits and vegetables in the
Chute. Use the Pusher to slowly push them through the Stainless Steel
Blades and Strainer. It is important to do this slowly to extract the
maximum juice from your fruits or vegetables.
CAUTION
: Do not insert Bananas or avocados as they do not produce
juice and will clog your Juice Extractor. You can blend these in a
Blender and later add them to your juice.
6.
Your Juice Extractor will separate the Juice from the Pulp while
operating.
7.
To empty Pulp Container or Juice Container, turn the appliance to the
“O” OFF position before removing containers. Make sure to place both
containers back before continuing to Juice.
WARNING
: Never use hands or Fingers to push food down in the Chute.
ALWAYS use the Food Pusher.
8.
Once done unplug the appliance from the electrical outlet.
9.
The detachable Juice Container makes storing and serving your fresh
juice very easy.

