background image

Features | 18

IM_5101100_de_en_BRESSER_v0816

23 / 25

18 Using the iris diaphragm

NOTICE

The iris diaphragm is used to increase the depth of focus.

With an open aperture more light is getting through but the depth of focus is less. With an partially
closed aperture the depth of focus is higher but it is neccessary to increase the brightness of the illu-
mination then.

It is recommended not to close the iris diaphragm to much when working with higher magnifications.
Otherwise the image resolution will decrease.

Move the lever for the iris diaphragm to right or left to change the aperture setting.

19 Cleaning and maintenance

– Protect the device against dust and moisture.

– Avoid putting fingerprints and equal contaminations on any optical surfaces.

– Make sure the residual moisture is fully elliminated before use.

– Disconnect the device from the power supply by pulling the power plug when it is not used or in

case of longer interruption of operation and before starting any work on maintenance and cleaning.

– Only use a dry cloth to clean the exterior of the device. To avoid damaging the electronics, do not

use any cleaning fluid.

– Do not use organic solvents (e.g. alcohol, ether, acetone, xylol or other dilutions) to clean

lacquered parts or plastic parts!

– Disassemble optical elements (e.g. objective, eyepiece, etc) before cleaning.

– Blow away loose dust from the lens surfaces first.

– Use high quality lens cleaning towels or soft cloth and moisten it with a little bit of pure alcohol

(available in a drug store). Wipe the lens surface with it.

– Pull a dust protection cover* over the microscope and store it in a closed container at a dry and

mould-free place. Store the microscope and the accessories in the relevant containers when they
are not used for a longer time. It is recommended to store also objectives and eyepieces in closed
containers with desiccant.

(*depending on the model a dust protection cover and box can be part of the content)

NOTICE

Remember:

A well maintained microscope will keep its optical quality for years and thus maintain its value.

20 Disposal

Dispose of the packaging materials properly, according to their type, such as paper or card-
board. Contact your local waste-disposal service or environmental authority for information
on the proper disposal.

Do not dispose of electronic devices in the household garbage!

As per Directive 2002/96/EC of the European Parliament on waste electrical and electronic
equipment and its adaptation into German law, used electronic devices must be collected
separately and recycled in an environmentally friendly manner.

Summary of Contents for 5101100

Page 1: ...Mikroskop Microscope Microscopio Biorit TP Art No 5101100 Bedienungsanleitung DE Instruction Manual EN 12 08 2016 ...

Page 2: ...Inhaltsverzeichnis Deutsch 3 English 14 ...

Page 3: ...erden können Irrtümer und technische Änderungen vorbehalten 2016 Bresser GmbH Alle Rechte vorbehalten Die Reproduktion dieser Dokumentation auch auszugsweise in irgendeiner Form z B Fotokopie Druck etc sowie die Verwendung und Verbreitung mittels elektronischer Systeme z B Bilddatei Website etc ohne eine vorherige schriftliche Genehmigung des Herstellers ist nicht gestattet Die in dieser Dokumenta...

Page 4: ...ang 7 8 Teileübersicht 8 9 Standortwahl 8 10 USB Stromadapter montieren 8 11 Stromversorgung herstellen 9 12 Alternative Stromversorgung 9 13 Gerät ein ausschalten 9 14 Beleuchtung einstellen 10 15 Objektträger einsetzen 10 16 Beobachtung 11 17 Verwendung des Kondensors 11 18 Verwendung der Irisblende 12 19 Reinigung und Wartung 12 20 Entsorgung 12 21 Technische Daten 13 22 Garantie 13 23 EG Konfo...

Page 5: ... ihre Sicherheit zuständige Per son beaufsichtigt oder erhielten von ihr Anweisungen wie das Gerät zu benutzen ist Dieses Produkt dient ausschließlich der privaten Nutzung Es wurde entwickelt zur vergrößerten Darstellung von Naturbeobachtungen Das Gerät ist nur für den Betrieb in Innenräumen bestimmt 5 Allgemeine Sicherheitshinweise GEFAHR Gefahr eines Stromschlags Dieses Gerät beinhaltet Elektron...

Page 6: ...gsgefahr Dieses Gerät beinhaltet Bau und oder Zubehörteile durch die bei unsachgemäßer Verwendung leich te bis schwere Verletzungen hervorgerufen werden können Beachten Sie deshalb unbedingt die nachfolgenden Sicherheitsinformationen um entsprechenden Verletzungen vorzubeugen Für die Arbeit mit diesem Gerät werden häufig scharfkantige und spitze Hilfsmittel eingesetzt Be wahren Sie deshalb dieses ...

Page 7: ... Sie es vor Wasser und hoher Luftfeuchtigkeit Setzen Sie das Gerät keinen Erschütterungen aus Verwenden Sie für dieses Gerät nur Zubehör und Ersatzteile die den technischen Angaben ent sprechen 6 Produktabbildungen 1 2 3 5 6 4 7 8 9 10 12 13 14 11 5 4 15 16 17 18 19 20 21 22 B A C D E F Abb 2 Produktabbildungen 7 Lieferumfang Mikroskop A 10x WF Okular B 3 Objektive vormontiert C Kondensor vormonti...

Page 8: ... Feinfokussierung 14 Grobfokussierung 15 Kreuztisch Querverstellung X Achse 16 Kreuztisch Längsverstellung Y Achse 17 Ein Aus Schalter 18 DC Anschlussbuchse 19 Universal USB Netzadapter 20 USB Stromkabel mit Hohlstecker 21 Netzadapteraufsatz EU 22 Netzadapteraufsatz UK 9 Standortwahl Vor dem Aufbau und der Inbetriebnahme einen geeigneten Standort wählen Gerät auf einem stabilen ebenen und erschütt...

Page 9: ...er 1 Ein Aus Schalter 2 DC Anschlussbuchse 1 DC Stecker des Stromkabels in die DC Anschlussbuchse des Gerätes stecken 2 Netzstecker des Stromkabels in die Steckdose stecken 12 Alternative Stromversorgung HINWEIS Tiefenentladung des Akkus vermeiden Fällt die Beleuchtungsstärke des Gerätes ohne ersichtlichen Grund ab ist dies ein Hinweis auf eine schwache Akkuleistung Das Gerät dann unverzüglich an ...

Page 10: ...halten 2 Dimmerregler drehen bewegen um die Helligkeit der Lichtquelle zu regulieren HINWEIS Objekt optimal ausleuchten Stellen Sie die Helligkeit der Beleuchtung stets so ein dass eine möglichst gute Ausleuchtung erreicht wird Abhängig von den äußeren Lichteinflüssen und dem zu beobachtenden Objekt muss die Be leuchtung ggf häufiger nachjustiert werden 15 Objektträger einsetzen 1 Objekttisch durc...

Page 11: ...len 4 Okular mit niedrigster Vergrößerung in den Okularstutzen einsetzen 5 Gerät und Beleuchtung einschalten 6 Durch das Okular blicken und den Objekttisch durch Drehen des Fokusrades langsam nach oben bewegen bis das Bild sichtbar wird 7 Falls erforderlich die Schärfe des Beobachtungsobjekts mittels Feinfokusrad nachjustieren HINWEIS Beschädigung des Präparats vermeiden Fokusrad nicht über den An...

Page 12: ... der Elektronik zu vermeiden Keine organischen Lösungsmittel z B Alkohol Äther Aceton Xylol oder andere Verdünner für die Reinigung von lackierten Teilen oder Kunststoffteilen verwenden Auswechselbare optische Elemente z B Objektiv Okular etc vor der Reinigung demontieren Zunächst losen Staub von den Linsenoberflächen blasen Linsentücher von guter Qualität oder weichen Stoff verwenden und leicht m...

Page 13: ...Akku vor der Entsorgung komplett entladen Schrauben am Gehäuse vollständig entfernen und Gehäuse öffnen Anschlüsse vom Akku trennen und Akku entnehmen Offene Kontakte abkleben und Akku transportsicher verpacken 21 Technische Daten Biorit TP Artikelnummer 5101100 Mikroskopkopf monokular Kreuztisch Ja mit Nonius Einstellung Okular e 1 x DIN WF 10x Objektiv e 4x 10x 40x Vergrößerung en 40x 100x 400x ...

Page 14: ...processed Errors reserved technical specifications subject to change Copyright 2016Bresser GmbH All rights reserved It is not allowed to reproduce this documentation or parts of it in any kind e g photocopying printing etc without written a permission of the manufacturer It is also prohibitted to use or transmit this docu mentation with electronic systems e g image file website etc The description...

Page 15: ...erview 18 9 Site location 19 10 Installing the USB power adapter 19 11 Setting up power supply 20 12 Optional power supply 20 13 Turning on off the device 20 14 Adjusting the lighting 21 15 Inserting slides 21 16 Observation 22 17 Using the condenser 22 18 Using the iris diaphragm 23 19 Cleaning and maintenance 23 20 Disposal 23 21 Technical data 24 22 Warranty 24 23 EC Declaration of Conformity 2...

Page 16: ...garding the use of the device This product is intended only for private use It was developed for the magnified display of things in nature The device is intended only for indoor use 5 General safety instructions DANGER Danger of an electric shock This device contains electronic components that operate via a power source power supply and or bat teries In case of any improper use of this device ther...

Page 17: ...g with this device Because there is a risk of injury from such tools store this device and all tools and accessories in a location that is out of the reach of children Children must not have access to the included chemicals and liquids Do not drink the chemicals Wash hands thoroughly with running water after using the chemicals In the event that the chemic als come into contact with your eyes or m...

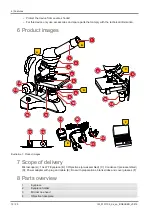
Page 18: ... images 1 2 3 5 6 4 7 8 9 10 12 13 14 11 5 4 15 16 17 18 19 20 21 22 B A C D E F Illustration 1 Product images 7 Scope of delivery Microscope A 10x WF Eyepiece B 3 Objectives pre assembled C Condenser pre assembled D Power adapter with plug and cable E Box with preparations blank slides and cover glasses F 8 Parts overview 1 Eyepiece 2 Eyepiece holder 3 Microscope head 4 Objective nosepiece ...

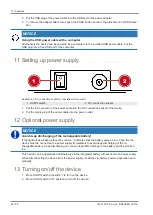
Page 19: ...th coaxial barrel connector 21 Power adapter attachment EU 22 Power adapter attachment UK 9 Site location Choose a suitable location before assembly and commissioning Place the device on a stable and flat surface free from vibrations 10 Installing the USB power adapter 1 4 2 3 Illustration 2 USB power adapter with exchangable attachment 1 USB power adapter 2 Adapter attachment EU 3 Adapter attachm...

Page 20: ... socket of the device 2 Put the mains plug of the power cable into the power outlet 12 Optional power supply NOTICE Avoid deep discharging of the rechargeable battery If the light will be weaker without any reason it indicates that the battery power is low Then the the device must be connected to a power supply immediately to avoid deep discharging of the re chargeable battery Deep discharging can...

Page 21: ...Turn on the device 2 Turn Move the dimmer control to adjust the brightness of the light source NOTICE Illuminating the object optimally Adjust the brightness of the light source so that the illumination works at its optimum Depending on light influences from outside and the object beeing observed the illumination must be adjusted more often 15 Inserting slides 1 Move the object plate downwards com...

Page 22: ... 4 Insert an eyepiece with lowest magnification in the eyepiece holder 5 Turn on the device and the illumination 6 Look through the eyepiece and move the object plate upwards by turning the focus wheel until a sharp image is visible NOTICE Avoid damages to the specimen Only turn the focus wheel until it stopps to avoid damages to the specimen throughout collision with the objective 1 If neccessary...

Page 23: ... xylol or other dilutions to clean lacquered parts or plastic parts Disassemble optical elements e g objective eyepiece etc before cleaning Blow away loose dust from the lens surfaces first Use high quality lens cleaning towels or soft cloth and moisten it with a little bit of pure alcohol available in a drug store Wipe the lens surface with it Pull a dust protection cover over the microscope and ...

Page 24: ...ice housing Remove the connections to the battery and remove the battery Cover the open contacts with tape and package the battery securely for transport 21 Technical data Biorit TP Article No 5101100 Microscope head monocular Cross table Yes with Nonius scale Eyepiece s 1 x DIN WF 10x Objective s 4x 10x 40x Magnification 40x 100x 400x Power supply DC 5V 100 mA Illumination LED The LED illuminatio...

Page 25: ......

Page 26: ......

Page 27: ......

Page 28: ...e mail e mail sav bresser fr Téléphone 00 800 6343 7000 BRESSER France SARL Pôle d Activités de Nicopolis 260 rue des Romarins 83170 Brignoles France Prix d un appel local depuis la France ou Belgique Service NL BE Als u met betrekking tot het product vragen of eventuele klachten heeft kunt u contact opnemen met het service centrum bij voorkeur per e mail e mail info folux nl Teléfono 31 528 23 24...

Reviews: