12 / 16
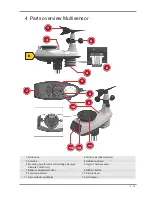
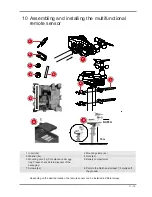
NOTICE! During the assembly make sure that the upper part of the wind vane is minimum 1.5
metres off the ground. Use the circular level in the sensor head to ensure a level installation. The
windmill must point to the North.
Assembly on a vertical or horizontal tube
1. Insert the stainless steel mounting pole into the mounting hole of the sensor and tighten the
screws firmly.
2. Attach the stainless steel pole to a post or pipe using the 2 U-bolts, mounting clamps and nuts.
11 Signal transmission
The base station will automatically connect to the multi outdoor sensor and (if available) to other wire-
less sensors. Press the SENSOR SYNC button to search for sensors directly. After successful con-
nection, the symbol for the outdoor area (OUT) and/or the channel are displayed.
Connection status display
Connection status
Screen display
Good signal
Reception icon
Searching for a sensor
Reception symbol flashes
No signal for 48 hours
'Er' (Error) is shown
Sensor low battery status, good signal
Battery symbol is shown
12 Time synchronization with the PC
Time and date are automatically synchronized for this device when it is connected to a computer* via
the supplied USB cable. Proceed as follows:
1. Put the microUSB plug of the USB cable into the USB slot of the device.
2. Put the USB-A plug of the cable into a free USB port of the computer.
3. Turn on the computer and wait approx 5 seconds.
4. Press the TIME SYNC button for approx. 8 seconds to disable or enable time synchronization.
5. Press TIME SYNC button once to initiate time synchronization again.
NOTICE! The time synchronization ensures through the time on the connected computer. Make
sure it is set correctly. Once the time has been synchronized, this will be indicated by the sync
symbol on the display.
6. *Computer with Windows 7 or higher required.
NOTICE! Once the device is connected to the computer via USB, it will be powered by the com-
puter as soon as the computer is turned on.
13 Manual time setting
To set the time / date manually, first disable the reception of the time signal by pressing the RCC but-
ton for approx. 8 seconds.
1. Press and hold CLOCK button for approx. 3 seconds to change to time setting mode.
2. Digits to be set are flashing.
3. Press UP or DOWN button to change the value.
4. Press CLOCK button to confirm and continue to the next setting.
5. Settings order: 12/24-hours mode > Hours > Minutes > Year > Month > Day > Time offset > Lan-
guage > Daylight Saving Time (DST)
6. Finally press the CLOCK button to save the settings and exit the setting mode.
Summary of Contents for 7002570
Page 1: ...Weather Station PC Weather Station with multifunction sensor EN Instruction manual...
Page 2: ......
Page 15: ......

