background image

7

DE

GB

FR

IT

ES

Gar

antie / W

arr

anty

ABOUT THIS INSTRUCTION MANUAL

These operating instructions are to be 

considered a component of the device. Please 

read the safety instructions and the operating 

instructions carefully before use. Keep these 

instructions for renewed use at a later date. When 

the device is sold or given to someone else, the 

instruction manual must be provided to the new 

owner/user of the product.
This product is intended only for private use.  

GENERAL WARNINGS

 CHOKING HAZARD!

Keep packaging material, like plastic bags and 

rubber bands, out of the reach of children, as these 

materials pose a choking hazard.

 RISK of ELECTRIC SHOCK!

This device contains electronic components that 

operate via a power source (batteries). Children 

should only use the device under adult supervision. 

Only use the device as described in the manual; 

otherwise, you run the risk of an electric shock.

 RISK of FIRE/EXPLOSION!

Do not expose the device to high temperatures. 

Use only the recommended batteries. Do not short-

circuit the device or batteries, or throw them into 

a fire. Excessive heat or improper handling could 

trigger a short-circuit, a fire or an explosion!

   NOTE!

Do not immerse the unit in water. 
Do not subject the unit to excessive force, shock, 

dust, extreme temperature or high humidity, which 

may result in malfunction, shorter electronic life 

span, damaged batteries and distorted parts.
Do not disassemble the device. In the event of a 

defect, please contact your dealer. The dealer will 

contact the Service Centre and can send the device 

in to be repaired, if necessary. 
Use only the recommended batteries. Always 

replace weak or empty batteries with a new, 

complete set of batteries at full capacity. Do not 

use batteries from different brands or with different 

capacities. Remove the batteries from the unit if it 

has not been used for a long time.
The manufacturer is not liable for damage related 

to improperly installed batteries!

GENERAL INFORMATION

This item is available in the following variants. The 

functions and technical data are the same for both 

models. They only differ in its design/in its colour.

Model 80-20210  GYE  000:

MyTime iO Wall Clock, silver/white

Model 80-20210  CM3  000:

MyTime iO Wall Clock, silver/black

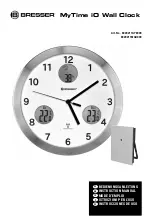
SCOPE OF DELIVERY 

(Fig. 1)

Wall clock (A), Remote sensor (B), Instruction 

manual

Required batteries: 3 x 1.5V battery (Size AA/LR6) 

and 2 x 1.5V battery (Size AAA/LR03) 

Batteries not included with purchase.

PARTS OVERVIEW

Wall clock 

(Fig. 2)

A. Locking pin

1. Dial plate

2. Clock hands (hours, minutes, seconds)

3. Humidity display (indoor)

4. Temperature display (indoor)

5. Temperature display (outdoor)

6. Wall mount             

7. Battery compartment 1 (Clock)

8.  Battery compartment 2 (Temp. and humidity 

display)

9. M.SET button

10. RESET button

11. REC button

12. °C/°F/DOWN button

13. CH/UP button

Remote sensor 

(Fig. 3)

14. Function light

15. Wall mount

16. Battery compartment

17. Table stand (fold-out)

GETTING STARTED/POWER SUPPLY

   NOTE!

Note the right order before operating the device 

for the first time or when replacing the batteries. 

Make sure to place the batteries strictly according 

to the right polarities (+/-) as shown in the battery 

compartment.

1. Remove the locking pin (A) from the clockwork. 

   The clock can be operated only after the pin has 

been removed.

Summary of Contents for 8020211GYE000

Page 1: ...DE BEDIENUNGSANLEITUNG GB INSTRUCTION MANUAL FR MODE D EMPLOI IT ISTRUZIONI PER L USO ES INSTRUCCIONES DE USO MyTime iO Wall Clock Art No 8020211GYE000 8020211MGU000...

Page 2: ...Fig 2 Fig 3 c d e f g h i 1 1 j1 1 1 1 1 1 Batterien nicht im Lieferumfang enthalten Batteries not included with purchase Piles non incluses la livraison Batterie non in dotazione Pilas no incluidas e...

Page 3: ...us souhaitez obtenir plus d informations concernant ce produit ou rechercher ce mode d emploi en d autres langues rendez vous sur notre site Internet en utilisant le code QR ou le lien correspondant N...

Page 4: ...ie sich im Falle eines Defekts an Ihren Fachh ndler Er nimmt mit dem Service Center Kontakt auf und kann das Ger t ggf zwecks Reparatur einschicken Benutzen Sie nur die empfohlenen Batterien Er setzen...

Page 5: ...e Funktion wenn z B die auto matische Sommer Winterzeitumstellung nicht erkannt wurde oder die Funk Wanduhr zeitweise keinen DCF Empfang hatte 1 Um eine manuelle Suche nach dem DCF Signal durchzuf hre...

Page 6: ...Sie die nachfolgenden Schritte aus HINWEIS Hierbei werden alle bisher empfangenen DCF Da ten gel scht 1 Dr cken Sie den RESET Druckknopf 10 mit ei nem spitzen Gegenstand z B Kugelschreiber 2 Die Zeig...

Page 7: ...d can send the device in to be repaired if necessary Use only the recommended batteries Always replace weak or empty batteries with a new complete set of batteries at full capacity Do not use batterie...

Page 8: ...signal 3 Wait approx 2 5 minutes until the current time will be displayed Manual time setting NOTE It is necessary to set the time manually in places where no radio signal is received 1 Press and hold...

Page 9: ...MAINTENANCE Before cleaning the device disconnect it from the power supply remove batteries Only use a dry cloth to clean the exterior of the device To avoid damaging the electronics do not use any cl...

Page 10: ...osants Ne pas d monter l appareil En cas de d faut veuillez vous adresser votre revendeur sp cialis Celui ci prendra contact avec le service client pour ventuellement envoyer l appareil en r paration...

Page 11: ...es aiguilles tournent plusieurs fois en marquant quelques pauses jusqu ce que l heure exacte soit atteinte D clenchement manuel de la r ception du signal horaire DCF REMARQUE Utilisez cette fonction l...

Page 12: ...adio ne r agit plus lorsqu on appuie sur les touches ou bien si d autres probl mes de fonctionnement surgissent REMARQUE Toutes les donn es DCF capt es jusque l seront effac es 1 Appuyez sur le bouton...

Page 13: ...i cortocircuiti danni alle batterie e ai componenti Non smontare l apparecchio In caso di guasto rivolgersi al proprio rivenditore specializzato Egli provveder a contattare il centro di assistenza e s...

Page 14: ...terie l ora viene impostata automaticamente mediante il segnale radio DCF Questo processo pu richiedere alcuni minuti Durante questo intervallo girare pi volte le lancette fermandosi soltanto quando v...

Page 15: ...te riprendono subito dopo l eliminazione della sorgente di interferenza Altre anomalie Se l orologio da parete radiocontrollato non reagisce pi alla pressione dei tasti o se si verificano problemi di...

Page 16: ...piezas No desmonte el aparato En caso de que exista alg n defecto le rogamos que se ponga en contacto con su distribuidor autorizado Este se pondr en contacto con el centro de servicio t cnico y dado...

Page 17: ...con alguna interrupci n hasta que se muestra la hora correcta Iniciar la recepci n de la se al horaria DCF manualmente NOTA Use esta funci n cuando no se reconozca el cambio horario autom tico de vera...

Page 18: ...siga los siguientes pasos NOTA A partir de este momento se borrar n todos los datos recibido mediante DCF 1 Pulse el bot n RESET 10 con un objeto punzante por eje un bol grafo 2 Las agujas se situar n...

Page 19: ...ne prolongation facultative de la garantie comme il est indiqu sur le carton d emballage vous devez vous enregistrer sur notre site Internet Vous pouvez consulter l int gralit des conditions de garant...

Page 20: ...nd technical changes reserved Sous r serve d erreurs et de modifications techniques Vergissingen en technische veranderingen voorbehouden Queda reservada la posibilidad de incluir modificaciones o de...

Reviews: