background image

7

Automatic time setting via DCF time signal

After inserting the battery the time will be set 
automatically via DCF signal. This process may take 
a few minutes. During this process the clock hands 
will turn several times with interruption until they will 
display the right time.

Initiate to receive the DCF time signal manually


 NOTE!

Use this function when e.g. automatic summer/
winter time change does not work or the wall clock 
temporarely receives no time signal.

1.  Press and hold the REC button (9) for 3 seconds to 

start manual search for the DCF signal.

2.  The clock hands will move to their start position 

(12:00 a.m.) and a the wall clock then tries to 
receive the signal.

3.  Wait approx. 2-5 minutes until the current time will 

be displayed.

Manual time setting


 NOTE!

It is necessary to set the time manually in places 
where no radio signal is received.

1.  Press and hold the M.SET button (7) for approx. 3 

seconds.

2.  When the minutes hand starts moving you can the 

set the time manually:

  •  Press the M.SET button shortly to set the time in 

minutes steps. 

  •  Press and hold the M.SET button to set the time 

continously.

3.  Release M.SET button to stop manual setting and 

save the time automatically and exit manual time 
setting mode.

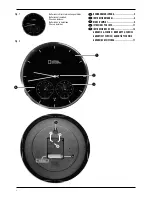
TEMPERATURE AND HUMIDITY DISPLAY

After inserting the battery indoor humidity (3) and 
indoor temperature (4) will be displayed.  

MOUNTING/POSITIONING 


 NOTE!

Make sure you have mounted or placed the device in 
a safe way. Otherwise the device may fall down and 
heavy damages can occur for which the manufacturer 
is not liable.

The wall clock can be mounted on walls with the wall 
mount (5).

TROUBLESHOOTING

Transmission collision

Signals from other household devices, such as door 
bells, home security systems and entry controls, 
may interfere with those of this product and cause 
temporarily reception failure. This is normal and does 
not affect the general performance of the product. The 
transmission and reception of temperature readings 
will resume once the interference recedes.

Other malfunctions

If there is no response from the wall clock by 
keystrokes or if any other malfunctions occur perform 
the following steps.


 NOTE!

With this procedure all received data will be deleted.

1.  Press RESET button (8) with a pointed instrument 

(e.g. pen).

2.  The clock hands will move to their start position 

(12:00 a.m.) and the wall clock then tries to receive 
the signal.

3.  Wait approx. 2-5 minutes until the current time will 

be displayed.

CLEANING AND MAINTENANCE

Before cleaning the device, disconnect it from the 
power supply (remove batteries)!

Only use a dry cloth to clean the exterior of the device. 
To avoid damaging the electronics, do not use any 
cleaning fl uid.

Protect the device from dust and moisture. The 
batteries should be removed from the unit if it has not 
been used for a long time.

DE

EN

FR

IT

ES

Garantie / W

arranty

Summary of Contents for 90-66500

Page 1: ...Art No 90 66500 WALL CLOCK RADIO CONTROLLED with Thermo Hygrometer Bedienungsanleitung Operating instructions Mode d emploi Istruzioni per l uso Instrucciones de uso DE EN FR IT ES...

Page 2: ...PER L USO 11 ES INSTRUCCIONES DE USO 14 GARANTIE SERVICE WARRANTY SERVICE GARANTIE ET SERVICE GARANT A Y SERVICIO GARANZIA E ASSISTENZA 17 Batterien nicht im Lieferumfang enthalten Batteries not incl...

Page 3: ...Wasser Setzen Sie das Ger t keinen starken St en Ersch t terungen Staub dauerhaft hohen Temperaturen oder extremer Feuchtigkeit aus Dies kann zu Fehlfunktio nen Kurzschl ssen Besch digung der Batteri...

Page 4: ...rz um die Uhr zeit in Minutenschritten einzustellen Halten Sie die M SET Taste gedr ckt um die Uhrzeit kontinuierlich zu verstellen 3 Wenn die M SET Taste nicht mehr bet tigt wird wird die eingestellt...

Page 5: ...r ordnungsgem en Entsorgung erhalten Sie beim kommunalen Entsor gungsdienstleister oder Umweltamt Werfen Sie Elektroger te nicht in den Hausm ll Gem der Europ ischen Richtlinie 2002 96 EG ber Elektro...

Page 6: ...Do not disassemble the device In the event of a defect please contact your dealer The dealer will contact the Service Centre and can send the device in to be repaired if necessary Use only the recomm...

Page 7: ...r temperature 4 will be displayed MOUNTING POSITIONING NOTE Make sure you have mounted or placed the device in a safe way Otherwise the device may fall down and heavy damages can occur for which the m...

Page 8: ...d emballage sacs plastiques bandes en caoutchouc etc RISQUE D ETOUFFEMENT RISQUE D ELECTROCUTION Cet appareil contient des pi ces lectroniques raccord es une source d alimentation lectrique batteries...

Page 9: ...r signal DCF Une fois les pile ins r es l heure est automatiquement r gl e par signal radio DCF Ce processus peut durer quelques minutes Pendant ce temps les aiguilles tournent plusieurs fois en marqu...

Page 10: ...s aiguilles se placent en position de r ception 12 h 00 et l horloge murale radio entreprend une tentative de r ception du signal DCF 3 Attendez environ 2 5 minutes jusqu ce que l heure actuelle soit...

Page 11: ...parecchio in acqua Non esporre l apparecchio a urti e vibrazioni violente polvere temperature elevate per lunghi periodi o umidit estrema Si possono causare malfunzionamenti cortocircuiti danni alle b...

Page 12: ...to M SET per impostare l ora in passaggi da un minuto Tenere premuto il tasto M SET per continuare a modi care l ora 3 Rilasciando il tasto M SET l ora impostata viene acquisita automaticamente e si e...

Page 13: ...no smaltimento conforme sono disponibili presso il servizio di smaltimento comunale o l Agenzia per l ambiente locale Non smaltire gli apparecchi elettronici con i ri uti domestici Secondo la Direttiv...

Page 14: ...as indicaciones de seguridad y el manual de instrucciones Guarde el presente manual de instrucciones por si necesita volver a utilizarlo m s tarde En caso de venta o entrega a terceros del aparato se...

Page 15: ...Pulse el bot n M SET 7 durante unos 3 segundos 2 Cuando el minutero empiece a moverse podr con gurar la hora manualmante Presione el bot n M SET durante un instante para con gurar la hora minuto a mi...

Page 16: ...las del aparato si no se va a usar durante un periodo prolongado ELIMINACI N Elimine los materiales de embalaje separados por tipos Obtendr informaci n sobre la eliminaci n reglamentaria en los provee...

Page 17: ...garantie ainsi que les informations concernant la prolongation de la garantie et les prestations de service sur www bresser de warranty_terms Vous souhaitez un mode d emploi d taill pour ce produit da...

Page 18: ......

Page 19: ......

Page 20: ...ergstr 2 DE 46414 Rhede www bresser de info bresser de 2016 National Geographic Partners LLC All rights reserved NATIONAL GEOGRAPHIC and Yellow Border Design are trademarks of the National Geographic...

Reviews: