background image

Imprint | 4

QS_7007310000000_de_en_BRESSER_v1116

11 / 15

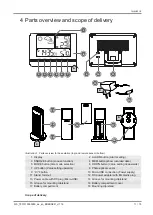
4 Parts overview and scope of delivery

A

C

9

2

10

11

8

3

4

5

6

7

16

18

17

14

15

1

15

B

12

13

D

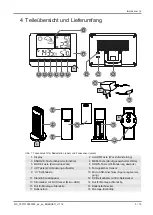
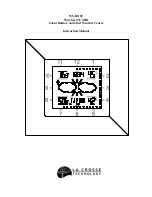
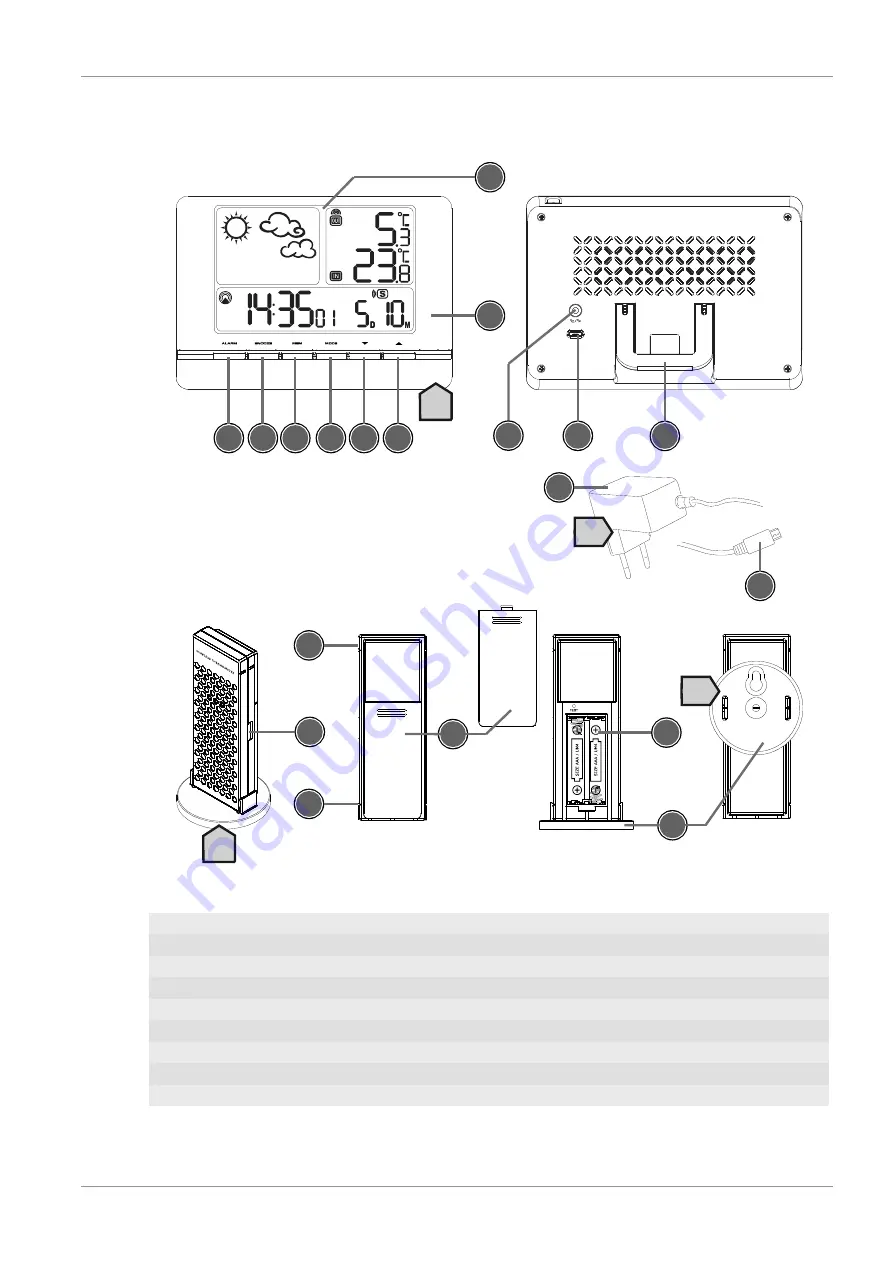
Illustration 1: 

Parts overview for base station (top) and remote sensor (bottom)

1 Display

2 ALARM button (Alarm setting)

3 SNOOZE button (snooze function)

4 MEM button (show recorded data)

5 MODE button (time mode selection)

6 DOWN button (Value setting downwards)

7 UP button (Value setting upwards)

8 Photo-optical sensor

9 °C/°F button

10 Micro-USB connection (Power supply)

11 Stand, fold-out

12 DC power adapter with EU mains plug.

13 Power cable with DC plug (Micro-USB)

14 Groove for mounting clip/stand

15 Groove for mounting clip/stand

16 Battery compartment cover

17 Battery compartment

18 Mounting clip/stand

Scope of delivery

Summary of Contents for MeteoTrend Colour

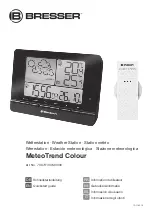
Page 1: ...tion Estación meteorológica Stazione meteorologica MeteoTrend Colour Art No 7007310CM3000 10 11 2016 Schnellstartanleitung DE Information d utilisateur FR Gebruikersinformatie NL Información de usuario ES Informazione degli utenti IT Quickstart guide EN ...

Page 2: ...t le code QR ou le lien correspondant NL Bezoek onze internetpagina via de volgende QR code of weblink voor meer informatie over dit product of de beschikbare vertalingen van deze gebruiksaanwijzing ES Desearía recibir unas instrucciones de uso completas sobre este producto en un idioma determinado Entonces visite nuestra página web utilizando el siguiente enlace código QR para ver las versiones d...

Page 3: ...Genehmigung des Herstellers ist nicht gestattet Die in dieser Dokumentation verwendeten Bezeichnungen und Markennamen der jeweiligen Firmen sind im Allgemeinen in Deutschland der Europäischen Union und oder weiteren Ländern waren mar ken und oder patentrechtlich geschützt 2 Zu dieser Anleitung HINWEIS Diese Schnellstart Anleitung ersetzt nicht die ausführliche Bedienungsanleitung Lesen Sie vor Ben...

Page 4: ...äße Handhabung können Kurzschlüsse Brände und sogar Explosionen ausgelöst werden HINWEIS Gefahr von Sachschäden Bei unsachgemäßer Handhabung können das Gerät und oder die Zubehörteile beschädigt werden Verwenden Sie das Gerät deshalb nur entsprechend den nachfolgenden Sicherheitsinformationen Bauen Sie das Gerät nicht auseinander Wenden Sie sich im Falle eines Defekts an Ihren Fach händler Er nimm...

Page 5: ...E Taste Schlummerfunktion 4 MEM Taste Abruf gespeicherter Werte 5 MODE Taste Zeitmodus Wahl 6 DOWN Taste Wertänderung abwärts 7 UP Taste Wertänderung aufwärts 8 Foto optischer Sensor 9 C F Wahltaste 10 Micro USB Anschluss Spannungsversor gung 11 Standfuß ausklappbar 12 DC Netzadapter mit EU Netzstecker 13 Stromkabel mit DC Stecker Micro USB 14 Nut für Montage Standclip 15 Nut für Montage Standclip...

Page 6: ...eraturwert Funksensor Außentem peratur 5 Symbol Höchst MAX oder Tiefsttempe ratur MIN 6 Temperaturwert Basisstation Innenteme pratur 7 Symbol Temperaturbereich Basisstation 8 Datumsanzeige Monat 9 Datumsanzeige Tag 10 Alarm Symbole PRE AL S oder W 11 Uhrzeit Sekunden 12 Uhrzeit Minuten 13 Uhrzeit Stunden 14 AM PM Information im 12 Stunden Zeit modus 15 Symbol Zeitsignal Übertragung 16 Batteriestat...

Page 7: ...ksender und andere Störquellen kann die mögliche Distanz stark reduzieren In solchen Fällen empfehlen wir sowohl für das Basisgerät als auch den Außensensor andere Standorte zu suchen Manchmal reicht schon ein Verschieben um wenige Zentimeter Obwohl der Außensensor wetterfest ist sollte er nicht an Orten mit Einfall von direkter Sonneneinstrahlung Regen oder Schnee platziert werden 7 Stromversorgu...

Page 8: ...n auf Seite 2 10 EG Konformitätserklärung Eine Konformitätserklärung in Übereinstimmung mit den anwendbaren Richtlinien und ent sprechenden Normen ist von der Bresser GmbH erstellt worden Diese kann auf Anfrage je derzeit eingesehen werden 11 Garantie Die reguläre Garantiezeit beträgt 2 Jahre und beginnt am Tag des Kaufs Um von einer verlängerten freiwilligen Garantiezeit wie auf dem Geschenkkarto...

Page 9: ...tected under trademark brand and or patent law for Germany for the European Union and or other countries 2 About this Instruction Manual NOTICE This Quick Start guide is not intended to replace the more detailed user manual Please read the safety instructions and the operating instructions carefully before use 3 General safety instructions DANGER Danger of choking In case of any improper use of th...

Page 10: ...cessories there is a risk of property damage Therefore only use the device according to the safety instructions below Do not disassemble the device In the event of a defect please contact your dealer The dealer will contact the Service Centre and can send the device in to be repaired if necessary Do not immerse the unit in water Do not subject the unit to excessive force shock dust extreme tempera...

Page 11: ...nooze function 4 MEM button show recorded data 5 MODE button time mode selection 6 DOWN button Value setting downwards 7 UP button Value setting upwards 8 Photo optical sensor 9 C F button 10 Micro USB connection Power supply 11 Stand fold out 12 DC power adapter with EU mains plug 13 Power cable with DC plug Micro USB 14 Groove for mounting clip stand 15 Groove for mounting clip stand 16 Battery ...

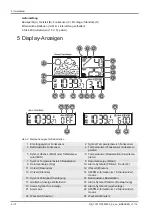
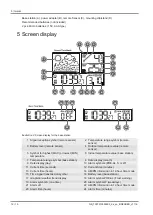
Page 12: ...utdoor temperature value remote sensor 5 Symbol for highest MAX or lowest MIN temperature 6 Indoor temperature value base station 7 Temperature range symbol base station 8 Date display month 9 Date display day 10 Alarm symbols PRE AL S or W 11 Current time seconds 12 Current time minutes 13 Current time hours 14 AM PM information in 12 hour time mode 15 Time signal transmission symbol 16 Battery l...

Page 13: ...unit and the remote sensor at other places Sometimes all it takes is a relocation of one of these components of a few inches Though the remote unit is weather proof it should be placed away from direct sunlight rain or snow 7 Setting up power supply Base station 1 Put the DC connector into the connection socket of the base station 2 Put the mains plug into the power outlet 3 The device is energize...

Page 14: ...in accordance with applicable guidelines and corresponding standards 11 Warranty The regular guarantee period is 2 years and begins on the day of purchase To benefit from an exten ded voluntary guarantee period as stated on the gift box registration on our website is required You can consult the full guarantee terms as well as information on extending the guarantee period and details of our servic...

Page 15: ......
Page 16: ...e mail e mail sav bresser fr Téléphone 00 800 6343 7000 BRESSER France SARL Pôle d Activités de Nicopolis 260 rue des Romarins 83170 Brignoles France Prix d un appel local depuis la France ou Belgique Service NL BE Als u met betrekking tot het product vragen of eventuele klachten heeft kunt u contact opnemen met het service centrum bij voorkeur per e mail e mail info folux nl Teléfono 31 528 23 24...

Reviews: