background image

- 14 -

With the eyepieces, you can decide which magnification 

you want for your telescope. 

Before you insert the eyepiece and the star diagonal prism, 

you must remove the dust-protection-cap from the eyepiece 

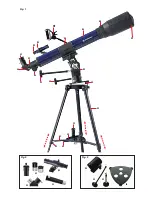
 connection tube (Fig. 1, 6).

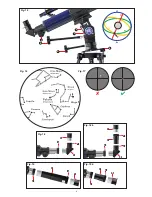
Loosen the screw (Fig. 8, X) on the eyepiece connection 

tube and insert the star diagonal prism. Retighten the screw 

(Fig. 8, X) on the eyepiece connection tube.
Repeat the same process on the star diagonal screw (Fig. 

9, X) and insert 20mm eyepiece in the star diagonal prism 

and   retighted. 
Make sure that the eyepiece is pointing vertically upwards. 

Otherwise loosen the screw (Fig. 8, X) on the eyepiece 

 connection tube and rotate the star diagonal prism into the 

 vertical  position.

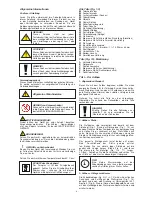
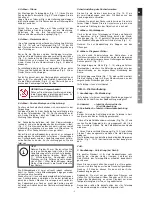
RISK of bodily injury!

Never use this device to look directly at the 

sun or in the direct proximity of the sun. 

There is a RISK OF BLINDNESS!

6. Setup  – viewfinder assembly and alignment:

The view finder and its holding device are pre-assembled 

and included in the packaging. 

Push the foot of the viewfinder holding device completely 

into the telescope barrel base (illustration 10). The holding 

device will click into place.  Make sure that the viewfinder 

lens faces the barrel opening. 
There are two clamping screws (black) on the holding device 

(illustration 1, 3) plus a spring-loaded counter screw (silver). 

The black clamping screws are now to be screwed in until 

resistance is felt. This affixes the viewfinder barrel in place. 
Before you start any observation it is essential the finder-

scope be adjusted. The finderscope and main telescope 

must have identical positioning.  

HINT!

To align them proceed as follows: 

take the 20 mm eyepiece, insert it in the 

zenith mirror and align the main telescope 

with an easily found and identified earthly 

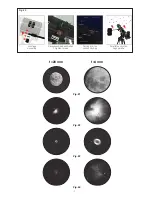
object such (illustration 11, church tower 

top, house gable). The distance should be at 

least 200m – 300m meters. Place the object 

dead centre of the eyepiece vision field. 

i

The image is vertical but inverted. The image reproduction in 

the viewfinder is neither perpendicular nor true to side. Turn 

(right/left) one of the two finderscope adjustment screws 

whilst looking through the finderscope. Continue until the 

finderscope hairlines are at exactly the position that cor-

responds to the view through the main telescope eyepiece. 

Focusing the finderscope:

Turn the rear lens mount (Fig. 10, X) one to two turns to the 

left.You can then set the counterring separately. 
Look through the finderscope and focus on a distant object.  

Turn the lens mount in one direction or the other until the 

object appears sharpest.

7. Setup – protection-caps:

In order to protect the inside of your telescope from dust and 

filth, the tube opening is protected by a dust-protection-cap  

(Fig. 12, X).  For observation remove the cap from the 

opening.

8. Setup - flexible shafts 

To ease precise adjustment of the declination and right ascen-

sion axes flexible shafts are installed in the holding devices of 

both axes provided for the purpose (illustration 13, X).
The long flexible shaft is mounted parallel to the telescope 

barrel (illustration 1, 14). It is secured in place with a clamp-

ing screw in the axis notch provided.  

The short flexible shaft (illustration 1, 15) is mounted later-

ally. It is secured in place with a clamping screw in the axis 

notch provided.

Your telescope is now ready for use.

Part II – Handling

1. Handling – telescope mount:

Your telescope mount is of a new type allowing you to make 

two different types of observation.

A: Azimuth = ideal for terrestrial use.

B: Parallactic = ideal for celestial observation.
Re A.

In azimuth use the telescope is moved horizontally and vertically. 


1. Undo the polar vertical clamping screw (illustration 14a, 

X) and lower the incline plate until it is horizontal (to the 

stop). Retighten the polar height fastening screw. 
2. Undo the vertical clamp (illustration 15 A) and move the 

main tube to a horizontal position. The re-tighten the clamps.

The telescope can now be moved horizontally and vertically 

using the flexible shafts (illustration 1, 14+15). 

Re B.
2. Handling. Night use.

A dark site is very important at night as light would interfere 

with observation focus and detail visibility.  
Allow your eyes to adjust to the darkness after leaving a 

lighted room. After about 20 minutes you can begin celestial 

observation.  
Do not use the telescope from within enclosed spaces. 

Position your telescope and accessories about 30 minutes 

before observing to ensure temperature compensation in the 

main tube. Make sure the telescope is on a flat stable surface. 

3. Setup - alignment - basic siting.

Undo the polar height clamping screw (illustration 14a X) 

and move the inclined plate (illustration 15 B) to the latitude 

of your location using the holding rod table as a rough 

guide. Turn the 

tripod so that the N mark faces north. The top of the inclined 

plate should also face north (illustration 14b). The latitude 

setting rod (illustration 14a Y) points south. 

4. Setting latitude.

Determine latitude of your location using a street map, atlas 

or the Internet. Germany is between 54° (Flensburg) and 

48° (Munich) degrees of latitude.   
Undo the polar height adjustment clamping (illustration 14 X) 

and set the angled plate until the figure on the latitude adjust-

ment rod (illustration 14 Y) is that of your location, e.g. 51°)

5.  Turn the declination axis (illustration 15 C)  

incl. telescope mount 90°.

Set the tube the right way round (see illustration / marking) in 

the mounting and tighten the clamping screw. The telescope 

eyepiece projection now points to the ground and the lens 

to the polar star. Undo the latitude setting clamping and the 

DEC axis in that sequence and get the polar star in the middle 

of the eyepiece field of vision. Then re-tighten the clamping. 

The tripod may not now be moved or adjusted again as this 

would misalign it. The telescope is now correctly aligned. This 

procedure is essential so that celestial objects are tracked.

6. Tracking and observation positioning

Tilt the main telescope (main tube) 90° (illustration 15 C). 

Turn it 180° to the right or left until the objective lens shows 

skywards.  
Tighten all clamping (illustration 13 Y + illustration 15 A) so 

that tracking can be done using the flexible shaft.  

Manual use of the hours axis (R.A. axis) via the flexible 

shaft (illustration 15 D) compensates for the earth‘s rotation 

so that objects remain always in the eyepiece visual field. 

If you want to move to another object undo the clamping 

(illustration 13 Y + illustration 15 A), rotate the main tube 

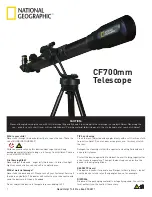
Summary of Contents for Skylux 70/700

Page 1: ...anleitung GB Instruction Manual FR Mode d emploi IT Istruzioni per l uso NL Gebruiksaanwijzing PL Instrukcja Obs ugi CZ N vod k pou it SK N vod na pou vanie HU Haszn lati tas t s RO Manual de utilizar...

Page 2: ...K VAROVANIE S t mto optick m pr strojom sa nikdy nepozerajte priamo alebo do bl zkosti slnka Dajte pozor zvl na to ak ho pou vaj deti Existuje tu RIZIKO OSLEPNUTIA Obalov materi l plastikov obaly gumo...

Page 3: ...stwa kraju CZ Pozor Pokud m te dotazy nebo p padn reklamace spojte se nejprve telefonicky s p slu n m servisn m st ediskem pro va i zemi SK Pozor Ak m te dotazy alebo pr padn reklam cie spojte sa najp...

Page 4: ...Fig 3 Fig 1 Fig 2...

Page 5: ...Fig 4 Fig 7 X Fig 10 Fig 12 B Fig 11 Fig 6 X Fig 5 Fig 13 X Fig 9 Fig 8 X X X Fig 14a X Y Fig 14b X Y A 11 Fig 25...

Page 6: ...6 Fig 16 Fig 15 C A D E F B Fig 17 Fig 18 X X Fig 18b 1 1 2 O X O X O X Fig 19b X X Fig 19 X X...

Page 7: ...7 Fig 21 Fig 22 Fig 23 f 20 mm f 4 mm Fig 24 Montage Assembly Gewindeschraube anziehen Thighten thread SkyApp starten Launch SkyApp Parallel ausrichten Align parallel Fig 20...

Page 8: ...tativkopf Montierung 1 Zubeh r Ablage 1 Feststellclips Stativ 1 Fixierhalterung Ablage 1 Stativbeine 1 Biegsame Welle f r die H hen Einstellung Elevation 1 Biegsame Welle f r die Azimutal Einstellung...

Page 9: ...instellschrauben vom Sucherfernrohr und blicken Sie dabei fortw hrend durch den Sucher Machen Sie solange damit weiter bis das Fadenkreuz des Suchers exakt die Position erreicht hat die dem Anblick du...

Page 10: ...ne oder in die N he der Sonne Es besteht ERBLINDUNGSGEFAHR 7 Handhabung Sucher Ihr Teleskop ist nun grob ausgerichtet und eingestellt Um eine bequeme Beobachtungs position zu erreichen l sen Sie vorsi...

Page 11: ...weichen Tuch auf das Sie vorher etwas Reinigungs alkohol aus der Apotheke gegeben haben Reinigen Sie Ihr Ger t nicht zu h ufig Der Einsatz von Reinigungsalkohol und oder pinseln in hohem Ma e kann Bes...

Page 12: ...nalen Entsorgungs dienstleistern oder dem Umweltamt 4 SERVICE UND GARANTIE F r dieses Ger t bernehmen wir eine Garantie von 5 Jahren ab Kaufdatum Bitte bewahren Sie den Kaufbeleg als Nachweis auf Unse...

Page 13: ...Parts Fig 15 Mounting A Vertical clamp B Incline plate C Declination axis D Flexible adjustment shaft E Flexible shaft declination axis F Focussing wheel Part I Setup 1 General Location Before you be...

Page 14: ...provided The short flexible shaft illustration 1 15 is mounted later ally It is secured in place with a clamping screw in the axis notch provided Your telescope is now ready for use Part II Handling 1...

Page 15: ...with two eyepieces Fig 2 18 as part of the basic equipment By interchanging the eye pieces you can alter the magnification of your telescope Focal length telescope Focal length Eyepiece Magnification...

Page 16: ...at low magnifications 2 Technical data Focal length 700 mm Objective diameter 70 mm Article number Optical design achromatic refractor 2 lenses Magnification 35 or 175x depending on the eyepiece with...

Page 17: ...ur accessoires 1 Clips de fixation tr pied 1 Support de fixation plateau 1 Pieds du tr pied 1 Axe flexible pour la mise au point de la hauteur l vation 1 Axe flexible pour la mise au point azimutale 1...

Page 18: ...l objet apparaisse bien net Vissez main tenant le contre anneau en direction du support de la lentille 7 Montage capuchons de protection Afin de prot ger l int rieur de votre t lescope contre la pous...

Page 19: ...illustration 15 E RISQUE de dommages corporels Ne jamais regarder directement le soleil travers cet appareil en le pointant directe ment en sa direction L observateur court un RISQUE DE CECITE 8 Mani...

Page 20: ...lus brillant dans le ciel Comme la lune fait le tour de la terre une fois par mois l angle entre la terre la lune et le soleil se modifie en permanence on s en aper oit dans les cycles des quartiers d...

Page 21: ...us modernes et il a subi un contr le de qualit approfondi Centre de services Si vous avez des questions concernant ce produit ou en cas de r clamations veuillez prendre contact avec notre centre de se...

Page 22: ...supporto per treppiede Fig Nr 1 3 10 viene inserito introducendolo con l estremit piatta rivolta verso il basso nel mezzo dello stabilizzatore fig 1 16 e fissato giran dolo in senso orario 60 fig 5 I...

Page 23: ...azione finch la croce di collimazione del cercatore non avr raggiunto esat tamente la posizione che corrisponde all immagine visibile nell oculare del telescopio Messa a fuoco del cercatore Ruotare la...

Page 24: ...bo fig 1 8 cos da poter ruotare il tubo del telescopio Portare l oculare e il cercato re in una posizione dalla quale si pu osservare comodamente L allineamento di precisione avviene con il cercatore...

Page 25: ...glia di non cercare di pulirlo da soli ma di rivolgersi in questo caso a un rivenditore specializzato o al BRESSER Service Center del Suo paese indicato nelle presenti istruzioni Appendice 1 Possibili...

Page 26: ...recchio viene concessa una garanzia di 5 anni dalla data d acquisto Si raccomanda di conservare lo scontrino fiscale come prova d acquisto Il nostro prodotto stato realizzato secondo i metodi di fabbr...

Page 27: ...elevatie 1 Buigzame as voor azimutale instelling 1 Statiefspin 1 Instelling breedtegraad 1 3 oculairen 31 7 mm 1 f 20mm f 12mm f 4mm 1 Diagonal spiegel 2 Omkeerlens 1 5x 2 Barlow lens 3x 2 Smartphone...

Page 28: ...en Om de binnenkant van de telescoop tegen stof e d te beschermen is de tube opening door een stofbeschermkap beschermd Neem de kap ter observatie van de opening 8 Montage Buigzame assen Om de exacte...

Page 29: ...rijwel niet waar te nemen is TIP Het oculair is de lens die zich het dichtst bij het oog bevindt Met het oculair wordt het brandpunt van het door de lenzen onstane beeld ingesteld het beeld wordt zich...

Page 30: ...van een nog veel grotere wolk van waterstofgas en stof die zich met meer dan 10 graden over ruim de helft van het sterrenbeeld Orion uit strekt Deze enorme wolk heeft een omvang van meerdere honderde...

Page 31: ...ermeld Indien een garantiehandeling reparatie of ruil nodig is zal de servicemedewerker een retouradres aan u verstrekken Servicelijn 00 800 6343 7000 Reparatie en omruil Gedurende de looptijd van de...

Page 32: ...y przy pomocy tego urz dzenia zagl da do mieszka Wszystkie cz ci rys 1 3 B Tubus teleskopu C Szukacz teleskopu D Pokr t a reguluj ce szukacz E Wej cie tubusu F Obiektyw G Nasadka okulara H Stopie ust...

Page 33: ...e y r wnie zatroszczy si o to aby teleskop by usta wiony na r wnym i twardym gruncie DE GB FR IT NL PL CZ SK HU RO SE ES przylega strzemi czkami do rozdzielacza statywu i by unieruchomione 4 Monta tub...

Page 34: ...two jako Anonymous user Se lect wybra Pa stwa kraj Pa stwa dane zo stan wtedy wy wietlone i NIEBEZPIECZE STWO odniesienia obra e Nigdy nie patrze przez urz dzenie bez po rednio w kierunku s o ca Istni...

Page 35: ...etrze Nast pnie prosz oczy ci zanieczysz czone miejsce mi kk niestrz pi c si cierk Odciski palc w na optycznych p aszczyznach usun Pa stwo naj atwiej przy pomocy mi kkiej niestrz pi cej si cierki kt r...

Page 36: ...ej wysoko ci Achrom Refraktor Achromatic Refractor Art No 96 18750 f 700 mm d 70 mm 2 Dane techniczne 3 Usuwanie b d w B d pomoc Brak obrazu zdj pokryw przeciwpy ow z wlotu obiektywu Nieostry obraz ur...

Page 37: ...ie wad oraz zwroty W okresie obowi zywania gwarancji usuwamy bezp atnie wszystkie ewentualne wady materia owe oraz produkcyj ne Z gwarancji wy czone s wady kt re powsta y z winy u ytkownika lub w wyni...

Page 38: ...tativu mont 1 Poli ka pro p slu enstv 1 Zaji ovac rouby stativ 1 Upev ovac rouby odkl dac poli ka 1 Nohy stativu 1 Ohebn h del pro nastaven v ky elevace 1 Ohebn h del pro nastaven azimutu 1 V ztuhy no...

Page 39: ...dalekohledu Oto te zadn obrou ku o ky obr 10 X o jednu nebo dv ot ky doleva Nyn m ete jednotliv nastavit kontrakrou ek Pohl dn te do hled ku a zaost ete na n jak vzd len objekt Ot ejte obrou kou o ky...

Page 40: ...le d cek do takov pozice ze kter mu ete objekt pohodlne pozorovat Jemn nastaven se uskute n pomoc hled ku dalekohledu Pozorujte hled kem Pol rku obr 16 a nastavte ji do st edu z m rn ho k e Obr 17 P i...

Page 41: ...nformace o n kter ch velmi zaj mav ch nebesk ch t lesech a hv zdo kup ch Na p ilo en ch vyobrazen ch na konci n vodu je uvedeno jak m ete p i dobr ch podm nk ch viditelnosti vid t objekty prost ednict...

Page 42: ...u n ln organizace slu eb pro likvidaci a nebo na ad pro ivotn prost ed 4 SERVIS A Z RUKA Za tento p stroj p eb r me z ruku na 5 let ode dne koup Uschovejte si pros m doklad o koupi jako d kaz N produk...

Page 43: ...Poli ka pre pr slu enstvo 1 Nastavovacie skrutky stat vu 1 Upev ovacie skrutky odkladacej poli ky 1 Nohy stat vu 1 Ohybn hriade na v kov nastavenie Elevation 1 Ohybn hriade na azimut lne nastavenie 1...

Page 44: ...teleskopu Zaostrenie h ad ika Oto te zadn uchopenie objekt vu obr 10 X o jedno a dve oto enia do ava Teraz m ete protikr ok regulova samostatne Pozerajte cez h ad ik a zaostrite na alek objekt Ot ajt...

Page 45: ...siahli pohodln poz ciu pre pozorovanie uvo nite opatrne skrutky dr iaka tubusu obr 16 A tak e je mo n tubusom to i Dajte okul r a h ad ik do jednej poz cie z ktorej m ete pohodlne pozorova Jemn nastav...

Page 46: ...ostala vlhkos nepok ajte sa ho o isti sami ale v takomto pr pa de vyu ite na ich odborn ch predajcov pr padne servis Lidl Service Center uveden v tomto n vode Dodatok 1 Mo n objekty pozorovania Tu je...

Page 47: ...poskytne miestny odvoz ca odpadu alebo rad ivotn ho prostredia 4 SERVIS A Z RUKA Za tento pr stroj preber me z ruku na 5 rokov odo d a k py Uschovajte si pros m doklad o k pe ako d kaz N produkt bol v...

Page 48: ...ok stat v 1 R gz t feler s t s t lca 1 Stat v l bak 1 Hajl kony tengely a magass g be ll t s hoz elev ci 1 Hajl kony tengely az azimut lis be ll t s hoz 1 Stat v r gz t 1 A sz less gi fok be ll t sa 1...

Page 49: ...ket egyes vel tudja be ll tani N zzen t a keres n s f kusz ljon egy t voli objektumra Ford tsa el a lencsefoglalatot egyik vagy m sik ir nyba am g az objektum lesen l that 7 Fel p t s V d sapk k Az r...

Page 50: ...t ha tn z az okul ron a teleszk pban l that a sarkcsillag Adott esetben a hajl that karok seg ts g vel a csillagot pontosabban be tudja ll tani valamint a k p less g be ll t s t is elv gezheti az less...

Page 51: ...at v g n l thatja hogy ezek a t rgyak teleszk pj n kereszt l a mell kelt okul rokkal j l t si viszonyok mellett hogyan l that k Hold 21 bra A Hold a F ld egyetlen term szetes szatellit ja Kering si p...

Page 52: ...4 SZERV Z S GARANCIA Ez rt a k sz l k rt a v s rl s id pontj t l sz m tva 5 v garanci t v llalunk K rj k igazol sul rizze meg a v s r l si bizonylatot Term k nket a leg jabb gy rt si m dszerek szerint...

Page 53: ...ur 1 Tav pentru accesorii 1 uruburi de reglare stativ 1 Consol de prindere tav accesorii 1 Picioare stativ 1 Tij flexibil pentru reglarea eleva iei 1 Tij flexibil pentru reglarea azimutului 1 Suport s...

Page 54: ...buri de reglare st nga dreapta ale lunetei c ut toare Continua i p n c nd liniile de vizare ale lunetei c ut toare se afl exact n pozi ia care corespunde imaginii v zute prin ocularul telescopului pri...

Page 55: ...Polaris fig 16 n mijlocul lunetei c ut toare fig 17 Pentru ajustarea fin utiliza i manetele flexibile ale axei orare fig 15 D i ale axei de declina ie fig 15 E RISC de r nire Nu utiliza i acest dispo...

Page 56: ...eavoastr local sau centrul BRESSER din ara dumneavoastr Anex 1 Obiecte posibile pentru observa ii n cele ce urmeaz dorim s v prezent m o serie de cor puri cere ti foarte interesante i u or de g sit Pe...

Page 57: ...ma ii lua i leg tura cu centrul nostru de service Colaboratorii no tri instrui i v vor ndruma cu pl cere Mai jos pute i g si linia noastr de asisten telefonic pentru service Dac este necesar acordarea...

Page 58: ...g av breddgrad 1 2 okular 31 7 mm resp 1 f 20mm f 4mm 1 Zenitspegel 2 Omv ndningslins 1 5x 2 Barlow lins 3x 2 Smartphone H llare Delar bild 15 Montering A Vertikal kl mning B Lutningsplatta C Deklinat...

Page 59: ...p axeln Den korta b jliga axeln bild 1 15 monteras p sidan Fasts ttningen sker med en kl mskruv vid h rf r avsett sp r p axeln Teleskopet r nu klart f r anv ndning DEL II Anv ndningen 1 Anv ndning Mon...

Page 60: ...artor P ritningen ser du n gra k nda stj rnbilder och stj rnformationer som r synliga ret runt Himlakropparnas formationer r emellertid beroende p datum och klockslag N r du har riktat in ditt telesko...

Page 61: ...nisk data Br nnvidd 700 mm Objektivdiameter 70 mm Artikelnummer Optisk design akromatisk refraktor 2 linser F rstoring 35x eller 175x beroende p okular med snabb montering lins 1 5x 52 5x eller 262x b...

Page 62: ...para el ajuste de elevaci n 1 Eje flexible para el ajuste del acimut 1 Abrazadera del tr pode 1 Ajuste de la latitud 1 2 Oculares 31 7 mm bzw 1 f 20mm f 4mm 1 Prisma diagonal 2 Lente inversa 1 5 x 2 L...

Page 63: ...bjeto se perciba bien definido 7 Instalaci n Tapas de protecci nn Con el fin de proteger el interior de su telescopio del polvo y la suciedad la abertura del tubo est protegido por una tapa anti polvo...

Page 64: ...visible Si es necesario con la ayuda de los mandos flexibles puede alinear con m s exactitud las estrellas del mismo modo que puede mejorar la definici n mediante el uso de la rueda de enfoque Fig 15...

Page 65: ...lestes y constelaciones que puede observar con el telescopio En las ilustraciones que se incluyen al principio de este manual se presenta la forma en la que estos objetos se ver n a trav s del telesco...

Page 66: ...cha de compra Por favor conserve el ticket de compra como justificante Nuestro producto ha sido elaborado seg n los m todos de fabricaci n m s recientes y ha sido sometido a un estricto control de cal...

Page 67: ...67 DE GB FR IT NL PL CZ SK HU RO SE ES...

Page 68: ...n en technische veranderingen voorbehouden Zastrzegamy sobie mo liwo pomy ek i zmian technicznych Omyly a technick zm ny vyhrazeny Omyly a technick zmeny vyhraden T ved sek s m szaki m dos t sok joga...

Reviews: