


13 / 28
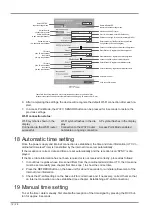
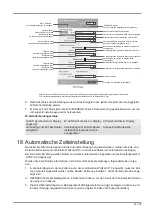
1. Press and hold CLOCK SET button for approx. 3 seconds to change to time setting mode.
2. Digits to be set are flashing.
3. Press UP or DOWN button to change the value.
4. Press CLOCK SET button to confirm and continue to the next setting.
5. Settings order: time offset > daylight saving time on/off > hours > minutes > 12/24 hours mode >
year > month > day > day/month display change > time synchronization on/off > language
NOTICE! When time is set manually, the time synchronization must be deactivated.
6. Finally press the CLOCK SET button to save the settings and exit the setting mode.
NOTICE! In normal display mode, press CLOCK SET button to switch between year display and
date display. In setting mode, press CLOCK SET button for about 2 seconds to return to the nor-
mal display mode.
20 Time zone setting
To set a different time zone, proceed as follows:
1. Press and hold CLOCK SET button for approx. 3 seconds to change to time setting mode. The
current value fore the time offset flashes.
2. Press up or DOWN button to set the desired hour value (0 to 10 hours) for the time offset.
3. Finally press the CLOCK SET button for approx. 3 seconds to save the settings and exit the set-
ting mode.
21 Manual measurement display
1. Press MAX/MIN button several times to display the stored values one after another.
2. Display order: Current values > MAX (highest values) > MIN (lowest values)
3. When highest or lowest values are dsiplayed, press and hold MAX/MIN button for approx. 3
seconds to switch temperature unit display from °C to °F or reverse.
NOTICE! Saved highest and lowest values will be deleted automatically every day on 0:00!
22 Technical data
Base station
Power supply
DC 5V 1A mains adapter
Type: YLJXC-050100
Temperature measuring range
-5°C – 50°C
Dimensions
79 x 157 x 41 mm (W x H x D)
Weight
130 g
Multisensor
Batteries
3x AA, 1.5V
Emergency power supply
Solar panel
Maximum number of sensors
1x wireless multisensor
1x wireless indoor sensor (optional)
RF Transmission frequency
868Mhz
RF Transmission range
150 m
Maximum transmission power
< 25mW
Temperature measuring range
-40°C – 60°C (-40°F – 140°F)