background image

9

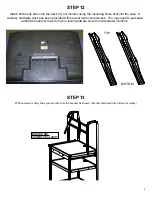
TOP

BOTTOM

Attach both hook bars onto the back of your monitor using the mounting holes built into the case.  A 

courtesy hardware pack has been provided with several metric screw sizes.  You may need to purchase 

additional metric screws from your local hardware store for odd shaped monitors.

STEP 12

With someone’s help, hook your monitor onto the bracket as shown.  (Monitor removed from picture for clarity.)

MONITOR NOT 

SHOWN FOR CLARITY

STEP 13

Summary of Contents for FP42MUL

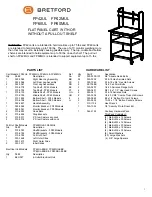
Page 1: ...E6 UNIT 6 Outlet Electrical Unit HARDWARE LIST Ref Qty Part Description AA 22 030 0300 10T 5 8 Square Head Bolts BB 24 030 0002 5 16 18 Hex Serrated Nuts CC 2 030 1349 5 16 18 x 3 4 Hex Hd Screws DD...

Page 2: ...d for installing the handle Leave one of the sides open to install the handle STEP 1 Position the top shelf onto the rear legs making sure the leg brackets are to inside of the shelf LOOSELY secure th...

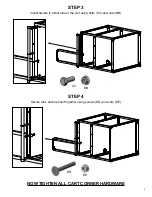
Page 3: ...EP 2 Slide the middle and bottom shelves onto the rear legs Slide the front legs on LOOSELY install hardware to each corner remembering to leave access for the handle AA BB INSTALL HARDWARE TO EACH CO...

Page 4: ...4 CC BB STEP 3 Install handle to either side of the cart using bolts CC and nuts BB STEP 4 Secure tube and top shelf together using screws DD and nuts EE NOW TIGHTEN ALL CART CORNER HARDWARE DD EE...

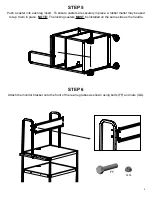
Page 5: ...s are securely in place a rubber mallet may be used to tap them in place NOTE The locking casters MUST be installed on the same side as the handle STEP 6 Attach the monitor bracket onto the front of t...

Page 6: ...ndle NOTE Some bend in the bracket is ok as the slides and shelf will take care of that once they are installed TAB 1 TAB 2 CUTOUT A CUTOUT B This tab determines where the shelf will slide out from Ea...

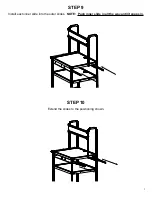
Page 7: ...7 STEP 9 Install each inner slide into the outer slides NOTE Push inner slide in all the way until it snaps in Extend the slides to the positioning shown STEP 10...

Page 8: ...8 TAB 1 CUTOUT 1 TAB 2 CUTOUT 2 STEP 11 Install the pull out shelf by sliding CUTOUT 1 into TAB 1 and CUTOUT 2 into TAB 2...

Page 9: ...hardware pack has been provided with several metric screw sizes You may need to purchase additional metric screws from your local hardware store for odd shaped monitors STEP 12 With someone s help ho...

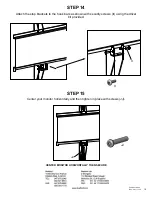
Page 10: ...your monitor horizontally and then tighten in place with screws JJ Attach the stop brackets to the hook bars as shown with security screws II using the driver bit provided II JJ CENTER MONITOR HORIZON...

Reviews: