22
PAge heAder.....
BASIC FOOd PROCESSING TECHNIQUES
If using oil, with the motor running, add the
oil through the small feed chute and process
until the mixture forms a soft, elastic ball of
dough. Do not over process.
Transfer the dough to a lightly floured
surface and knead for a further 5 minutes if
necessary until soft and pliable. Place dough
into large, greased mixing bowl and stand
covered in a warm place until doubled in
size. Turn the dough onto a lightly floured
surface and knead again until smooth and
elastic. Shape the dough, allow to rise in a
warm area then bake in a hot oven.
NOTE
The dough blade should be used
for yeast doughs and doughs that
require kneading.
MINI-BOWL FUNCTION
The mini processing bowl can be positioned
inside the main processing bowl and is
used for processing small food quantities.
A mini processing blade is provided which
fits inside the mini bowl and can be used for
chopping, mixing, whipping and blending a
variety of foods.
SLICING, SHREddING ANd
GRATING WITH THE dISCS
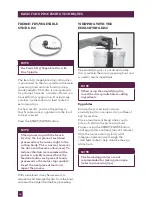
Slicing with the Adjustable Slicing disc
NOTE
Use Adjustable Slicing Disc with Disc
Spindle.
The adjustable slicer disc slices raw fruit
and vegetables to a consistent thickness,
with 24 settings from fine (0.33mm) to thick
(8.0mm).
For many large processing tasks, the
adjustable slicing disc will cut the
processing time needed to achieve the
desired results. The result depends on the
type of food and how the food is positioned
into the feed chute.
For smaller foods, the small feed chute
provides greater control for adjustable slicing.
To adjust slicing height, hold the adjustable
slicing disc outer edge with one hand, turn
the adjustment dial on the underside of the
disc to set the height. An arrow graphic
indicates the height to which the blade is
set. Place the adjustable slicer on the disc
spindle in the processing bowl. Close the
lid and insert the large pusher to operate.
NOTE
There may be slight variation in slice
thickness depending on the food
being processed and force applied
with the feed chute pusher.
Summary of Contents for BFP800A
Page 8: ...KNOW your Breville product...
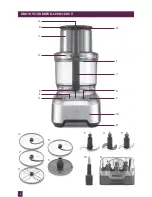
Page 9: ...8 KNOW your Breville PRODUCT A E F C D G L K H J I M N O R T X W U V P Q S B...
Page 11: ...ASSEMBLING your Breville product...
Page 16: ...BASIC FOOD PROCESSING TECHNIQUES for your Breville product...
Page 29: ...FOOD PROCESSING AT A GLANCE for your Breville product...
Page 34: ...CARE CLEANING STORAGE of your Breville product...
Page 37: ...TROUBLESHOOTING...
Page 40: ...RECIPES...
Page 58: ...FAITES LA CONNAISSANCE de votre produit Breville...
Page 61: ...ASSEMBLAGE de votre produit Breville...
Page 66: ...TECHNIQUES DE TRANSFORMATION DE BASE de votre produit Breville...
Page 79: ...TRANSFORMATION DES ALIMENTS EN UN CLIN D OEIL de votre produit Breville...
Page 85: ...ENTRETIEN NETTOYAGE RANGEMENT de votre produit Breville...
Page 88: ...GUIDE DE D PANNAGE...
Page 91: ...RECETTES...

