5
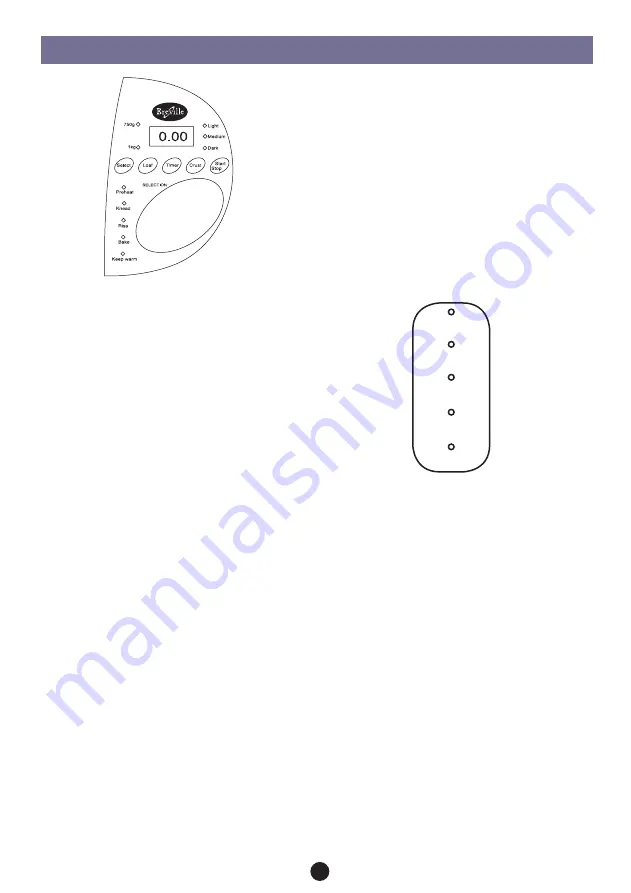
MaIn FEaturEs oF tHE control panEl
The control panel is designed to perform several
functions. The illuminated Display Window indicates
the setting number selected, then when the Start/
Stop button is pressed the completion time for the
setting. Illuminated indicator lights show the bread
loaf size and crust colour selected and the cycle
progress of the setting selected.
1. Display Window
The illuminated Display Window shows the
setting number selected (Settings 1 to 13 will
appear in the window). When the Start/Stop
button is pressed the time displayed (in hours
and minutes) is the time remaining until the
selected setting is completed.
2. select
Press the Select button to select the 13
automatic settings available. These settings
are listed on Pages 5 and 6 ‘Bread and Dough
Setting Selections’. Each time the Select button
is pressed the setting is changed. The setting
selected is shown on the Display Window as a
number between 1 to 13.
3. loaf
Press the Loaf button to select the size of the
loaf you require. A red light will light against the
selected size.
notE:
Press the Loaf button to extend the final
rising cycle (up to 20 minutes). (Refer to
‘how to increase the Final Rising Time’ Page 8).
4. timer
For use when setting the Smart/Preset Timer to
delay the program. (Refer Page 7).
5. crust
Press the Crust button to select the 3 crust
colour settings - Light, Medium or Dark,
available for the bread settings only. A red light
will light against the selected colour.
notE:
Press the Crust button to extend
the baking cycle (up to 20 minutes). (Refer to
‘how to Increase the Baking Time’ Page 8).
6. start/stop
The bread machine features a combined Start/
Stop button to operate your machine.
to start:
Press the Start/Stop button to
commence the selected setting or begin timer
countdown for the Preset Timer.
to stop:
To stop and cancel the bread machine
in mid-cycle the Start/Stop button must be
pressed down and held for 5-10 seconds until
the machine beeps and the Display Window is
reset to ‘0:00’. This will result in the program
being cancelled. (When the setting is completed
the bread machine automatically stops and
sounds 3 double beeps. The time display will
indicate ‘0:00’).
Do not prEss tHE start/
stop
button when checking the dough as this
will cancel the setting. The machine will not
continue operation.
cyclE progrEss InDIcator panEl
The cycle progress indicator panel is a series of five
red lights on the left-hand side of the control panel.
These lights indicate the cycle progress for the
setting selected.
1. preheat
Illuminates on Wholewheat, Wholewheat Rapid
and Jam settings only. This indicates that the
bread machine is pre-warming ingredients
before commencing kneading. The kneading
blade will not operate during this period. The
Preheat light will flash when the Preset Timer
is set.
2. knead
Indicates the bread machine is in the kneading
cycle.
3. rise
Indicates the bread machine is in one of
the several rising stages. Low heat from the
element is generated to aid the rising process.
4. Bake
Indicates the bread machine is in the bake
cycle. high heat from the element is generated
to bake the bread.
5. Warm
Indicates the bread making cycle has completed
and the bread is being kept warm for up to 60
minutes.
Preheat
Knead
Rise
Bake
Keep Warm
1. BASIC
2. BASIC RAPID
3. WhOLE WhEAT
4. WhOLE WhEAT RAPID
5. SWEET
6. FRENCh
7. YEAST FREE
8. JAM
9. BAKE ONLY
10. CONTINENTAL
11. PASTA DOUGh
12. PIzzA DOUGh
13. DOUGh


