38
OPERATING yOUR BREVILLE SMART OVEN™ - COOKIE
10.
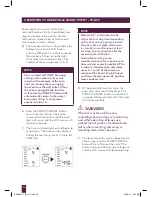
The pizza cycle can be stopped at any
time by pressing the START/CANCEL
button. This will cancel the cycle. The
button surround illumination will go out
and the LCD screen will illuminate blue.
A note on pizza stones
When using a pizza stone, it is necessary
to first heat the stone (without a pizza) for
optimum results.
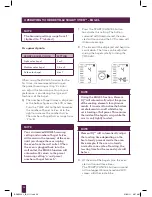
1.
Insert the wire rack into the middle rack
height position. The wire rack should be
positioned with the spokes facing upwards.
2.
Place the pizza stone on the center of the
wire rack so air flows around the sides of
the stone.
3.
Close the oven door.
4.
Turn the bottom dial to the 6 pizza size.
The top figure on the LCD screen
indicates the preset temperature of
‘450°F’, while the bottom figure on the
LCD screen indicates the ‘6 SIZE’. The
preset CONVECTION setting and
preset FROZEN FOODS setting will
also be displayed.
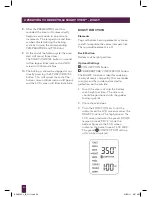
5.
Press the START/CANCEL button
to activate this setting. The button
surround will illuminate red, the oven
alert will sound and the LCD screen will
illuminate orange.
6.
The LCD screen will indicate a blinking
‘PREHEATING’. Once the oven has
reached the set temperature, the
temperature alert will sound.
7.
The timer will be displayed and
automatically begin to count down in
one minute increments.
8.
At the end of the pizza stone heating
cycle, the oven alert will sound three
times. The START/CANCEL button
surround will no longer illuminate red
and LCD screen will illuminate blue.
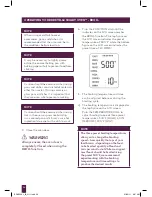
9.
Now carefully place the frozen pizza on
the heated pizza stone.
NOTE
If cooking a fresh pizza, we
recommend using protective hot pads
or insulated oven mitts to remove
the entire wire rack with pizza stone,
and place on the open oven door or
bench. This will assist in transferring
the fresh pizza dough onto the heated
pizza stone. Always use protective hot
pads or insulated oven mitts to re-
insert the wire rack with pizza stone
and pizza, inside the oven.
10.
Select the desired pizza setting and
press the START/CANCEL button to
restart the pizza cycle.
BOV800XL_IB_H11.indd 38
21/03/11 9:57 AM
Summary of Contents for THE SMART OVEN BOV800XL /A
Page 7: ...KNOW your Breville Smart Oven BOV800XL_IB_H11 indd 7 21 03 11 9 57 AM...
Page 14: ...BEFORE FIRST USE of your Breville Smart Oven BOV800XL_IB_H11 indd 14 21 03 11 9 57 AM...
Page 21: ...21 BOV800XL_IB_H11 indd 21 21 03 11 9 57 AM...
Page 22: ...OPERATING your Breville Smart Oven BOV800XL_IB_H11 indd 22 21 03 11 9 57 AM...
Page 48: ...CARE CLEANING STORAGE of your Breville Smart Oven BOV800XL_IB_H11 indd 48 21 03 11 9 57 AM...
Page 51: ...51 BOV800XL_IB_H11 indd 51 21 03 11 9 57 AM...
Page 52: ...TROUBLESHOOTING BOV800XL_IB_H11 indd 52 21 03 11 9 57 AM...
Page 55: ...55 BOV800XL_IB_H11 indd 55 21 03 11 9 57 AM...
Page 56: ...RECIPES BOV800XL_IB_H11 indd 56 21 03 11 9 57 AM...
Page 100: ...FONCTIONNEMENT de votre Smart OvenMC de Breville BOV800XL_IB_H11 indd 100 21 03 11 9 58 AM...
Page 125: ...125 BOV800XL_IB_H11 indd 125 21 03 11 9 58 AM...
Page 131: ...131 BOV800XL_IB_H11 indd 131 21 03 11 9 58 AM...
Page 132: ...GUIDE DE D PANNAGE BOV800XL_IB_H11 indd 132 21 03 11 9 58 AM...
Page 135: ...135 BOV800XL_IB_H11 indd 135 21 03 11 9 58 AM...
Page 136: ...RECETTES BOV800XL_IB_H11 indd 136 21 03 11 9 58 AM...

