background image

6

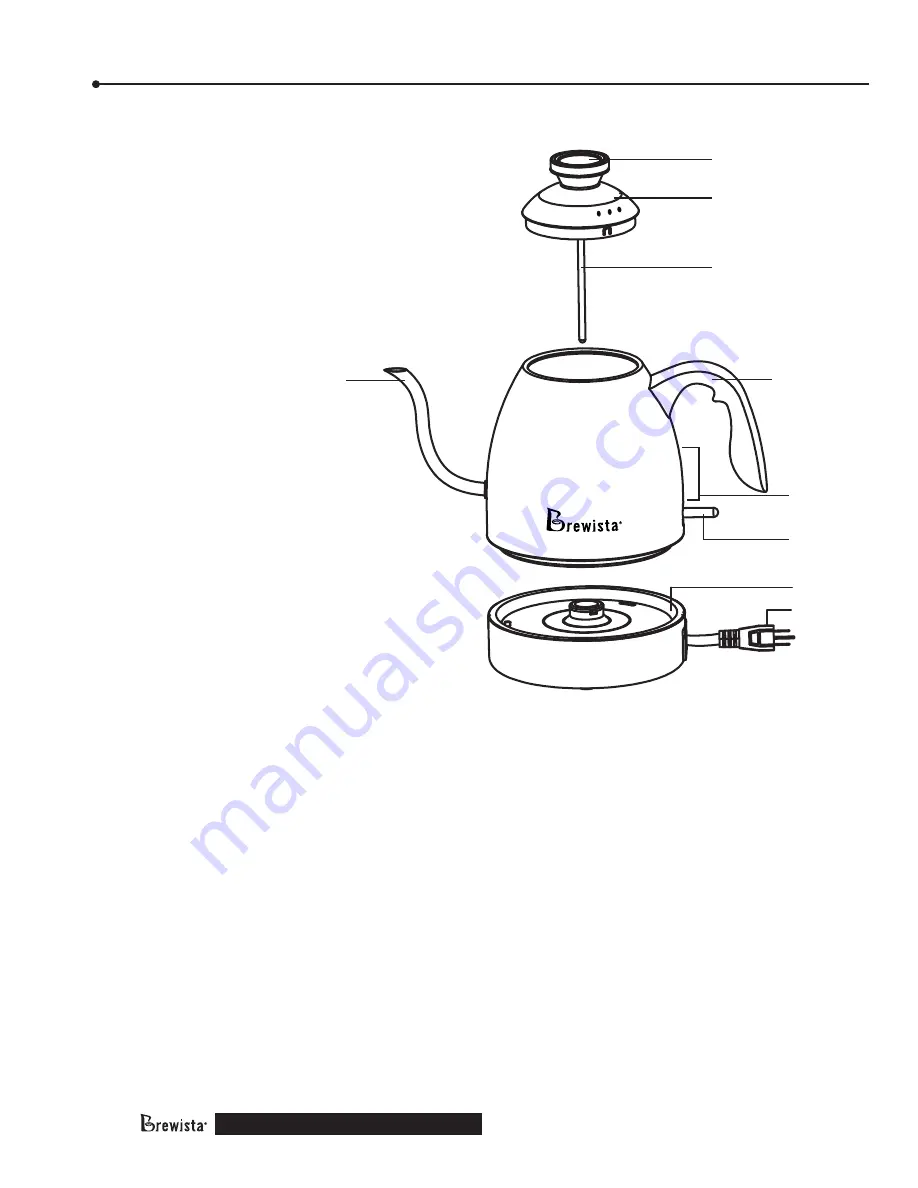
Smart Pour™ Electric Switch Kettle

1) 

Spout

2) 

Temperature Gauge

3) 

Lid

4) 

Thermometer

5) 

Handle

6)  Max and Min water level indicators

7)  On/Off Switch with Indicator Light

8) 

Base 

9)  Power Plug with Power Cord


Kettles sold outside of North America 

include removable power cords to  

accommodate electrical outlets in  

those markets. 

Electric Switch Kettle Components

1

2

3

4

5

7

9

8

6

Summary of Contents for Smart Pour

Page 1: ... 222 6086 Email help mybrewista com READ THIS MANUAL PRIOR TO FIRST USE AND SAVE FOR FUTURE REFERENCE Household Use Only 1 year Limited Warranty Product appearance varies slightly between North American and all other markets Smart Pour Electric Switch Kettle with temperature gauge BKS12S02 Series ...

Page 2: ... cord hang over edge of table or counter or touch hot surfaces Always store excess portion of the power cord in the compartment of the base unit Electric kettle must be operated on a flat surface Do not place on or near a hot gas or electric burner or in a heated oven or on the top of other electric appliances Always attach plug to appliance first then plug cord into the wall outlet To disconnect tu...

Page 3: ...erience and knowledge if they have been given supervision or instruction concerning the use of the appliance in a safe way and understand the hazards involved Cleaning and user maintenance shall not be made by children unless they are older than 8 and supervised Keep the appliance and its cord out of reach of children less than 8 years old WARNING Do not remove the lid while water is boiling WARNI...

Page 4: ...utlets only GROUNDING INSTRUCTIONS In North American markets the appliance has a plug that looks like Figure A Kettles sold outside of North America include removable power cords for use with electrical outlets in those markets DO NOT attempt to insert a power cord into an incompatible outlet Appliance damage electrical system damage or physical harm may result An adaptor as shown in Figure B shou...

Page 5: ... Illustrations 7 Operation Instructions 8 Before First Use 8 Kettle Operation 9 Adjusting Kettle Lid Tension 9 Changing Temperature Gauge 10 Maintenance and Cleaning 10 Storage 10 Decalcifying 11 Brewista recommends Cafetto Descaler 11 Preparing Coffee 12 High Altitude Users 13 Warnings and Technical Data 14 Correct Disposal of this Product 14 1 year Limited Warranty Information 15 ...

Page 6: ...Handle 6 Max and Min water level indicators 7 On Off Switch with Indicator Light 8 Base 9 Power Plug with Power Cord Kettles sold outside of North America include removable power cords to accommodate electrical outlets in those markets Electric Switch Kettle Components 1 2 3 4 5 7 9 8 6 ...

Page 7: ...7 Smart Pour Electric Switch Kettle Operation Illustrations A B C D E F G H I ...

Page 8: ...andle Connect the power plug 9 to a wall outlet ill C Press down the On Off switch 7 to the On position to start boiling the water ill D If your kettle includes a removable power cord insert the female end of that cord into the base first The indicator light illuminates After boiling is finished the kettle turns off automatically Dispose of the hot water in the sink WARNING Be careful when handlin...

Page 9: ... a heat resistant container ill E Manually interrupt the boiling process by lifting up the On Off switch 7 to off position After each use remove the power plug 9 from the wall outlet ill C WARNING The appliance is very hot during use Do not touch ill G Danger of burns WARNING Never leave the kettle unattended while boiling water Especially when there are children nearby WARNING Do not open the lid...

Page 10: ...ttle with a damp soft cloth Clean the inside of the kettle with dish detergent and rinse thoroughly with water Do not use abrasive cleaners After cleaning dry the kettle and the base thoroughly WARNING Never immerse the kettle or the base in water or other liquids Storage Clean and dry all parts before storing Store the kettle in its box or in a clean dry place Never wrap the power cord 9 around t...

Page 11: ... the kettle Note Vinegar may not effectively descale the kettle and can be difficult to thoroughly rinse Vinegar may also leave behind an odor that could affect future use Brewista recommends using Cafetto Descaler How to use Cafetto Descaler 1 Mix 1 packet Cafetto Descaler with 40 oz of lukewarm water 2 Pour the solution into the kettle 3 Bring the solution to a boil 4 Let the vessel cool for 15 ...

Page 12: ...the water to the desired temperature Grind two tablespoons of beans per cup of coffee Rinse the filter dripper and glass server or whatever you are brewing into in hot water to preheat them Assemble the filter dripper and vessel and dump the ground coffee into the filter When the water reaches a boil take the kettle off the heat source and wait about five to fifteen seconds The desired coffee brew...

Page 13: ...13 Smart Pour Electric Switch Kettle High Altitude Users Athigherelevationswaterboilsatlowertemperatures Usethegraphbelowtodetermine your kettle s boiling temperature ...

Page 14: ...safe recycling WARNING The appliance is very hot during use Do not touch the surface of the kettle Danger of burns WARNING Never leave the kettle unattended while boiling water especially if there are children nearby WARNING Do not open the lid while boiling water WARNING Do not immerse the base or the kettle in water or any other liquid This may cause electric shock or damage the appliance WARNIN...

Page 15: ...r parts e g seals and valves permanent filter and fragile parts like glass are excluded from the warranty 4 Damages which are not under responsibility of the manufacturer are not covered by the warranty This is valid especially for claims arising from improper use e g operation with wrong type of current or voltage 5 The guarantee becomes void if repairs are carried out by third parties who are no...

Page 16: ...1133 W 27th Street Cheyenne WY 82001 USA www mybrewista com Toll Free in North America 888 538 8683 Local 307 222 6086 Smart Pour Electric Switch Kettle with temperature gauge BKS12S02 Series ...

Reviews: