background image

ATTACHMENT

OPERATOR’S 

MANUAL

Mfg. No. 

Description

1695596 

Triple Catcher / 44” and 50” Broadmoor, Conquest & Prestige Series

1737066 - A

Rev.: A

Turboless Triple Catcher

Not 

for  

Reproduction

Summary of Contents for 1695596

Page 1: ...ATTACHMENT OPERATOR S MANUAL Mfg No Description 1695596 Triple Catcher 44 and 50 Broadmoor Conquest Prestige Series 1737066 A Rev A Turboless Triple Catcher N o t f o r R e p r o d u c t i o n ...

Page 2: ...N o t f o r R e p r o d u c t i o n ...

Page 3: ...YT Prestige 1800 2800 GT Series 5 Remove Blowout Baffle 6 Install Baffles 6 Install Mounting Plate 7 Install Bag Cover Support 7 Install Hitch Upright Support Assembly 7 Install Cover Assembly 7 Install Collector Bags 8 Install Lower Discharge Chute 8 Install Upper Middle Tubes 8 Operation 9 Operation 9 Collector Removal 10 Storage 10 Warranty 11 N o t f o r R e p r o d u c t i o n ...

Page 4: ...ners b Reduce loads on hillsides It is recommended that the collection system be kept only half full when negotiating any slopes Start mowing on slopes when the collection system is empty c Mow up and down the face of slopes never across the face of any slope Never operate on slopes greater than 17 6 10 Safety Decals Several safety labels are installed on the unit to remind you of important inform...

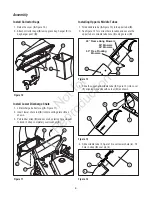
Page 5: ...me using the holes shown Secure with one 3 8 16 x 1 25 capscrew B and 3 8 16 nut C G D Figure 1 2 Install the rear spacers D Figure 2 Secure with two 1 2 13 x 2 1 2 capscrews E washers F and 1 2 13 nylock nuts G F E C A B Figure 2 Install Mounting Spacers Conquest 1700 2700 yt Prestige 1800 2800 GT Series Install Spacers 1 Install the rear spacers A Figure 3 Secure with two 1 2 13 x 2 1 2 capscrew...

Page 6: ...nto place 4 Insert carriage bolts C through left side of baffle and secure with nuts D 5 Insert carriage bolt E through right side of baffle and secure with nut 6 Position LH baffle F into place 7 Insert carriage bolts G through left side of baffle and secure with nuts 8 Insert carriage bolts H through right side of baffle and secure with nuts 44 Mower Deck 50 Mower Deck RH RH side 26 1 4 long RH ...

Page 7: ... upright support B using 3 8 16 x 1 0 carriage bolts C and 3 8 16 locknuts D A B C D Figure 7 A Install Hitch and Upright Support Assembly 1 Attach hitch and upright support assembly A Figure 8 to frame spacers B as shown Figure 8 B A B Install Cover Assembly 1 Attach cover assembly A Figure 9 to bag support bracket B using hinge pivots C Secure cover using cover hinge pins D and hair pins E Figur...

Page 8: ...tor bags B using grass bag hanger C to bag hanger post D Figure 10 A B C D Install Lower Discharge Chute 1 Lift discharge deflector up A Figure 11 2 Insert lower chute rod B into mounting plate C as shown 3 Pull rubber strap D and secure by placing hole closest to knob in strap completely over locknut E Figure 11 B D A C E Installing Upper Middle Tubes 1 Slide middle tube A Figure 12 into upper tu...

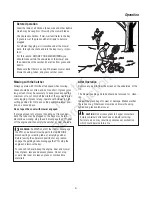
Page 9: ...d pass Do not open the cover with mower engaged If a large amount of cut grass is spilling out from under deck the tube may be plugged or the bags may be full discontinue mowing stop the unit disengage the PTO shut off the engine and then empty the catcher or clear the tube After Operation Remove any debris from the screen on the underside of the lid The blower housing and tube should be removed f...

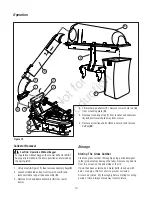
Page 10: ...nt has been scratched on metal parts touch up with paint or apply a thin film of oil to prevent corrosion Store in a dry area Dry thoroughly before storing for a long period of time Always store away from moisture Storage Collector Removal 1 Lift up cover A Figure 15 then remove and empty bags B 2 Loosen middle tube strap from lower chute C and remove middle upper tube assembly D 3 Remove hitch an...

Page 11: ...te at the time warranty service is requested the manufacturing date of the product will be used to determine warranty eligibility ABOUT YOUR WARRANTY We welcome warranty repair and apologize to you for being inconvenienced Warranty service is available only through servicing dealers authorized by Briggs Stratton or BSPPG LLC Most warranty repairs are handled routinely but sometimes requests for wa...

Page 12: ...Briggs Stratton Yard Power Products Group Copyright 2010 Briggs Stratton Corporation Milwaukee WI USA All Rights Reserved N o t f o r R e p r o d u c t i o n ...

Reviews: