16
2.
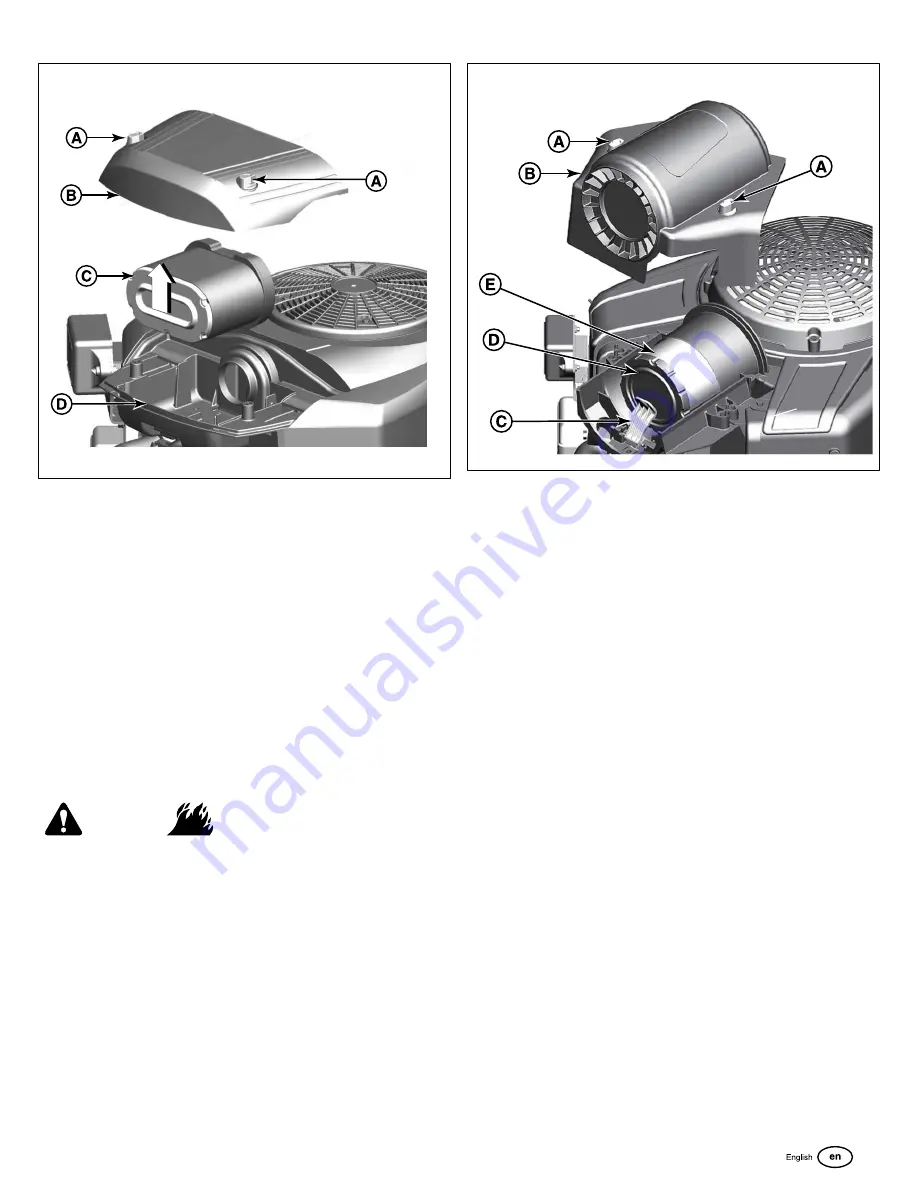
Remove the air cleaner assembly (C) and disassemble.
3.
Clean up any possible debris that might get into the
carburetor throat (D).
4.
Remove the pre-cleaner from the air filter.
5.
To loosen debris, gently tap the air filter on a hard surface.
If the air filter is excessively dirty, replace with a new air
filter.
6.
Wash the pre-cleaner in liquid detergent and water. Then
allow it to thoroughly air dry. Do not oil the pre-cleaner.
7.
Assemble the dry pre-cleaner to the air filter.
8.
Install the air filter assembly.
9.
Install the cover and secure the fasteners.
Air Filter Assembly (Cyclonic with pre-cleaner)
WARNING
Never start or run the engine with the air cleaner assembly or
air filter removed as it is a fire hazard.
NOTICE
Do not use pressurized air or solvents to clean the filter.
Pressurized air can damage the filter and solvents will dissolve
the filter.
1.
Loosen the fasteners (A, Figure 17) and remove the cover
(B).
17
2.
Open the latch (C) and remove the air filter assembly (D).
3.
Remove the pre-cleaner (E) from the air filter.
4.
To loosen debris, gently tap the air filter on a hard surface.
If the air filter is excessively dirty, replace with a new air
filter.
5.
Wash the pre-cleaner in liquid detergent and water. Then
allow it to thoroughly air dry. Do not oil the pre-cleaner.
6.
Assembly the dry pre-cleaner to the air filter.
7.
Install the air filter assembly and close the latch.
8.
Install the cover and secure the fasteners.
Service Spark Plug
See Figure: 18
Check the gap (A, Figure 18) with a wire gauge (B). If necessary,
reset the gap. Install and tighten the spark plug to the
recommended torque. For gap setting or torque, see the
Specifications section.
Note: In some areas, local law requires using a resistor spark
plug to suppress ignition signals. If this engine was originally
equipped with a resistor spark plug, use the same type for
replacement.
17
Not
For
Reproduction


