30
5HQRYHQW([FHOOHQW)
Chapter 11 Electric connections accessories
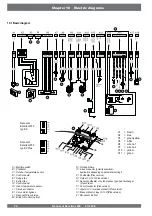
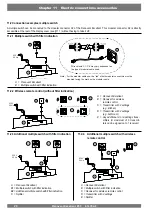
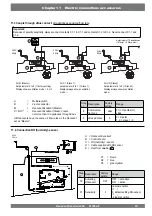
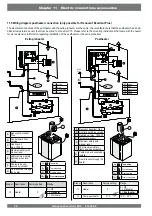
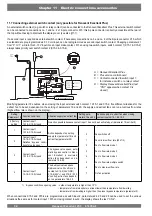
:LULQJGLDJUDPSRVWKHDWHUFRQQHFWLRQRQO\SRVVLEOHIRU5HQRYHQW([FHOOHQW3OXV
7KHHOHFWULFDOFRQQHFWLRQVRIWKHSRVWKHDWHUDQGWKHH[WUDSUHKHDWHUDUHWKHVDPHWKHRQO\GLႇHUHQFHLVWKDWWKHSRVWKHDWHUKDVDQDG
-
ditional temperature sensor that must be wired to connector X15. Please refer to the mounting instructions that came with the heater
for more extensive information regarding installation of the postheater or the extra preheater.
D
II
III
IV
I
×
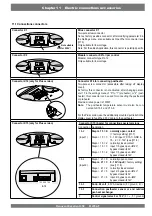
([WUDSUHKHDWHU
A Renovent Excellent
Plus
B Control board Plus
version
C Heating coil
max. 1000 W
D Maximum safety with
manual reset
E
LED maximum safety;
lights up when acti-
vated
F Cables to be con-
nected by installer
G Flow direction through
the heater
C1 brown
C2 blue
C3 green/yellow
C4 black
Step nr. Description
Factory setting
Range
13
Heater
0
2ႇ
1 = Preheater
2 = Postheater
I =
To dwelling
II =
To atmosphere
III =
From dwelling
IV
=
From atmosphere
)
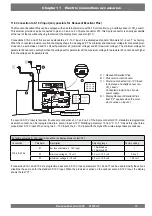
A Renovent Excellent Plus
B Control board Plus version
C Heating coil max. 1000 W
D Temperatursensor
E Maximum safety with
manual reset
F LED maximum safety;
lights up when activated
G Cables to be connected by
installer
H Flow direction through the
heater
C1 brown
C2 blue
C3 green/yellow
C4 black
C5 white
230V
50Hz
230V
50Hz
Postheater
II
III
IV
I
×
Stepnr. Description
Factory setting
Range
13
Heater
0
0 =
2ႇ
1 = Preheater
2 = Postheater
14
Temp. postheater
21°C
15°C - 30°C
)
I =
To dwelling
II =
To atmosphere
III =
From dwelling
IV =
From atmosphere
Summary of Contents for Renovent Excellent 450
Page 1: ...Renovent Excellent 450 Plus WWW BRINKAIRFORLIFE NL 614784 F INSTALLATION INSTRUCTIONS English ...
Page 2: ......
Page 8: ... 5HQRYHQW FHOOHQW ...
Page 45: ......

