background image

MATCH LIGHTING THE ROTISSERIE BURNER:

1. Open grill hood before lighting rotisserie burner.

2. Make sure control knob is in the "OFF" position.

3. Strike and carefully place a match approximately 1/2" (1 to 2 cm) from the lower edge of burner.

4. Push and turn the control knob to the "HIGH" position. The burner should light within 5 seconds.

5. If the burner does not light, turn the control knob to "OFF" and wait 5 minutes for gas to dissipate and

repeat lighting procedure.

6. If the burner does not light within the first few attempts of match lighting, there is a problem with the

gas supply. Turn off the gas at the burner and cylinder. 

DO NOT

attempt to operate the grill until the

problem is found and corrected. See "Trouble Shooting" section of this manual.

Note:

On main burners and side burner,
observe flame height when lit. Flame should be a Blue/Yellow 
color between 1"–2" when burner is on "HIGH".

TURNING OFF THE GRILL:

1. Turn off the cylinder valve.
2. Turn all burner control knobs to the "OFF" position.

Note:

Turn off LP cylinder first to prevent gas from being left in the system under pressure.

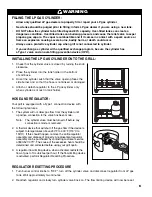
CAUTION!

The cylinder valve should always be in the off,
or closed, position when the grill is not in use.

To turn off the cylinder valve,

turn knob clockwise until it stops.

12

Summary of Contents for PRO SERIES 9620

Page 1: ...NES LEA Y SIGA TODAS LAS ADVERTENCIAS E INSTRUCCIONES EN ESTE MANUAL PARA EVITAR LESIONES PERSONALES INCLUSO LA MUERTE O LOS DA OS MATERIALES ASSEMBLY AND OPERATING INSTRUCTIONS INSTRUCCIONES DE ARMAD...

Page 2: ...Shut off gas to the appliance 2 Extinguish any open flame 3 Open Lid 4 If odor continues keep away from the appliance and immediately call your gas supplier or your fire department 1 DO NOT store or u...

Page 3: ...31 Warranty Information Back Cover TABLE OF CONTENTS DANGER Indicates an imminently hazardous situation which if not avoided will result in death or serious injury WARNING Be alert to the possibility...

Page 4: ...pets away from hot grill DO NOT allow children to use or play near this grill DO NOT leave the grill unattended while in use DO NOT allow the gas hose to come in contact with hot surfaces DO NOT allow...

Page 5: ...material or extra LP gas cylinders not attached to the appliance Not adhering to these clearances will prevent proper ventilation and may increase the risk of a fire and or property damage which coul...

Page 6: ...ore a spare LP gas cylinder under or near your grill This could cause excess pressure to be expelled through the vapor relief valve resulting in fire explosion or severe personal injury including deat...

Page 7: ...or damaged 4 Attach or detach regulator to the LP gas cylinder only when cylinder is at rest in tank holder HOSE AND REGULATOR Your grill is equipped with a Type 1 connection device with the followin...

Page 8: ...rior to connecting the LP gas cylinder to your grill Turn the valve knob clockwise to properly close the valve Read and follow all instructions and warnings on the supply hose safety tags Read and fol...

Page 9: ...re of 50 water and 50 liquid dishwashing soap 2 Open the lid 3 Ensure all control knobs are set to the OFF position 4 Turn on the fuel supply at the cylinder valve Turn the cylinder valve knob one tur...

Page 10: ...grill has been assembled and prior to each use DO NOT operate this grill until you have read and understand ALL of the warnings and instructions in this manual Ensure that the grill is properly assemb...

Page 11: ...turn control knobs to HIGH Follow Step 4 6 If burner does not ignite using the igniter wait 5 minutes see Match Lighting the Main Burners section 7 To turn off turn each control knob clockwise until i...

Page 12: ...position The burner should light within 5 seconds 5 If the burner does not light turn the control knob to OFF and wait 5 minutes for gas to dissipate and repeat lighting procedure 6 If the burner does...

Page 13: ...tch lighting there is a problem with the gas supply Turn off the gas at the burner and cylinder DO NOT attempt to operate the grill until the problem is found and corrected See Trouble Shooting sectio...

Page 14: ...your food and cause a dangerous situation for you and your grill Excessive flare ups result from the build up of grease in the bottom of your grill If this should occur DO NOT pour water onto the fla...

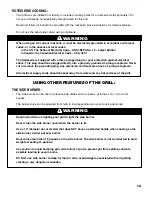
Page 15: ...ension cord must also have a 3 prong receptacle All electrical supply cords should be kept away from water and any hot surfaces of the grill USING OTHER FEATURES OF THE GRILL THE SIDE BURNER The side...

Page 16: ...round Meat 160 degrees F 71 C Pork 160 degrees F 71 C Poultry 180 degrees F 82 C Roasts 145 degrees F 62 8 C Seafood 140 degrees F 60 C Vegetables 145 degrees F 62 8 C HELPFUL HINTS If you pre cook me...

Page 17: ...T obstruct the flow of combustion and ventilation air Burner tubes can become blocked by spiders and other insects building their nests Blocked burner tubes can prevent gas flow to the burners and cou...

Page 18: ...Assembly Maintenance under Proper Care and Maintenance WARNING COOKING GRILLS Clean with mild soap detergent and water A brass bristled brush or a nylon cleaning pad can be used to remove residue from...

Page 19: ...Regulator Resetting Procedure under Connecting LP Cylinder and Hose Regulator to Grill 1 Excess grease build up causing grease fires 2 Damaged or faulty regulator Replace with factory authorized part...

Page 20: ...ur grill Open gas supply for one second to test for obstruction If no obstruction is present reconnect fuel line If the fuel line is blocked replace with a new hose regulator assembly If an obstructio...

Page 21: ...s of stainless steel as well as cooking oils and a dirty grill lid can also encourage discoloration if the lid is not cleaned prior to grill use After your grill is assembled remove the protective PVC...

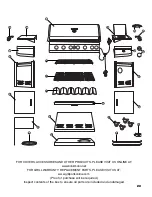
Page 22: ...ide Cart Panel 1 Left Door 1 Right Door 1 Upper Door Bracket 1 Back Panel 1 Rear Cart Brace Tank Heat Shield 4 Locking Casters 1 Grease Tray 1 Tank Holder 1 Cart Base 2 Tank Block Bars PARTS LIST 1 Gr...

Page 23: ...e all parts are included and undamaged 22 1 FOR COVERS ACCESSORIES AND OTHER PRODUCTS PLEASE VISIT US ONLINE AT www brinkmann net FOR GRILL WARRANTY REPLACEMENT PARTS PLEASE VISIT US AT www grillparts...

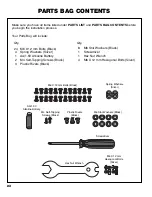
Page 24: ...LIST and PARTS BAG CONTENTS before you begin the installation process Your Parts Bag will include M6 X 12 mm Bolts Black Spring Washers Silver M6 Star Washers Black M6 X 12 mm Hexagonal Bolts Silver...

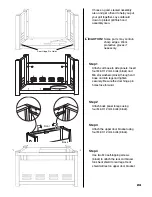
Page 25: ...four M6 X 12 mm bolts black and M6 star washers black through cart base and into legs and tighten securely Be sure the door hinge pin holes face forward Step 2 Attach back panel to legs using four M6...

Page 26: ...Note With the help of a friend turn the cart to its upright position Try to minimize the stress to the legs Step 7 Place the tank holder into the cart base and secure with 3 plastic rivets Step 8 Inse...

Page 27: ...m bolt black from side table to side table front panel Step 11 Attach hooks to side table towel rack bar Then attach towel rack bar to side table using two M6 X 12 mm hexagonal bolts silver and spring...

Page 28: ...ghten securely Fasten side table front panel to grill body with one M6 X 12mm bolt black Step 15 Attach side burner assembly to right side of cart frame assembly Place side burner assembly over pre at...

Page 29: ...ner front panel and bezel from the back of the side burner front panel Depending on the side burner valve you will be using either the outside key holes Figure 1 or the inside key holes Figure 2 Pull...

Page 30: ...illustrated Step 20 Place the heat distribution plates on lower level of grill body assembly directly above burners Step 21 Place cooking grills on support ribs directly above heat distribution plate...

Page 31: ...er battery holder is located on the control panel Remove igniter cap and insert battery with positive end of battery toward igniter cap Ensure spring is in place inside igniter cap Replace igniter cap...

Page 32: ...31 ProSeries 9620 Assembled...

Page 33: ...expuesta 3 Abra la tapa 4 Si el olor persiste subsistencia lejos de la aplicaci n y llame de inmediato a su proveedor de gas o a los bomberos 1 NO guarde ni use gasolina ni otros l quidos inflamables...

Page 34: ...de partes e instrucciones de armado 51 62 Informaci n de la garant a Cubierta trasera NDICE PELIGRO Indica una situaci n peligrosa inminente la cual si no se evita producir lesiones graves o a n la mu...

Page 35: ...i os y las mascotas alejados de la parrilla caliente NO permita que los ni os usen o jueguen cerca de esta parrilla NO deje la parrilla desatendida mientras est en uso NO permita que la manguera de ga...

Page 36: ...que no est n conectados al equipo No adherirse a estas distancias prevendr ventilaci n apropiada y puede aumentar el riesgo de da o de fuego y o a propiedad que podr a resultar tambi n en heridas pers...

Page 37: ...propano l quido de reserva debajo o cerca de la parrilla Esto puede causar una descarga de presi n excesiva a trav s de la v lvula de alivio de vapor y producir un incendio explosi n o lesiones person...

Page 38: ...o que la manguera no est doblada o da ada 4 Levante el alambre de cerradura del tanque para asegurar el cilindro en sostenedor del tanque 5 Conecte o desconecte el regulador al cilindro de gas de prop...

Page 39: ...horario para cerrarla correctamente Lea y siga todas las instrucciones y advertencias en las etiquetas de seguridad de la manguera de suministro Lea y siga todas las advertencias en este manual con r...

Page 40: ...ar platos 2 Abra la tapa 3 Aseg rese de que todas las perillas de control est n en la posici n OFF de apagado 4 Encienda el suministro de combustible en la v lvula del cilindro Gire la perilla de la v...

Page 41: ...asta que haya le do y entendido TODAS las advertencias e instrucciones en este manual Aseg rese de que la parrilla est armada correctamente Inspeccione la manguera de suministro de gas para detectar q...

Page 42: ...ras hornillas primero encienda hornillas adyacentes empujando y girando perilla de control a HIGH m ximo Siga Paso 4 6 Si no se enciende la hornilla al usar el encendedor espere 5 minutos consulte la...

Page 43: ...ncenderse en 5 segundos 5 Si la hornilla no se enciende gire la perilla de control a la posici n OFF apagado y espere 5 minutos para que se disipe el gas y repita el procedimiento de encendido 6 Si la...

Page 44: ...o de encendido 6 Si la hornilla no se enciende despu s de varios intentos con un cerillo entonces hay un problema con el suministro de gas Cierre el gas en la hornilla y en el cilindro NO trate de ope...

Page 45: ...xcesivas pueden cocinar demasiado los alimentos y producir una situaci n peligrosa para usted y la parrilla Las llamaradas excesivas son el resultado de la acumulaci n de grasa en la secci n inferior...

Page 46: ...ner un recept culo para tres clavijas Todos los cables de suministro el ctrico deben mantenerse alejados del agua y de las superficies calientes de la parrilla USO DE OTRAS FUNCIONES DE LA PARRILLA LA...

Page 47: ...rados F 62 8 C Mariscos 140 grados F 60 C Verduras 145 grados F 62 8 C RECOMENDACIONES TILES Si precocina carne o pollo h galo inmediatamente antes de cocinarlo en la parrilla Nunca descongele carne a...

Page 48: ...aire de combusti n y ventilaci n Las ara as u otros insectos pueden hacer nidos y bloquear los tubos de las hornillas Los tubos bloqueados impiden que fluya gas a las hornillas y puede producirse un...

Page 49: ...agua y detergente de jab n suave Se puede usar un cepillo con cerdas de lat n o una esponja de limpieza de nil n para quitar los residuos de las superficies de acero inoxidable No use cerdas de acero...

Page 50: ...nto de las Hornillas en la secci n de Cuidado y mantenimiento apropiados 2 La parrilla no se precalent lo suficiente 3 La hornilla est asentada incorrectamente sobre la v lvula de control 1 Se activ e...

Page 51: ...tro de gas durante un segundo para determinar si hay obstrucci n Si no hay obstrucci n reconecte la l nea de combustible Si la l nea de combustible est bloqueada reempl cela con un nuevo conjunto de m...

Page 52: ...so de fabricaci n del acero inoxidable y tambi n el aceite para cocinar y la tapa sucia de la parrilla pueden fomentar la decoloraci n de la tapa si no se limpian antes de usar la parrilla Despu s de...

Page 53: ...RTES antes de comenzar con el proceso de instalaci n La bolsa de partes incluir lo siguiente 8 Arandelas de Estrella M6 Negros 1 Destornillador 1 Llave para Tuercas Hexagonales 4 Pernos Hexagonales M6...

Page 54: ...s 1 Panel Trasero 1 Apoyo Posterior del Carro Blindaje de Calor del Tanque 4 Ruedas Trabables 1 Bandeja para la Grasa 1 Barra para Detener Tanque 1 Base del Carro 2 Manijas de la Puertas LISTA DE PART...

Page 55: ...est n incluidas e intactas PARA CUBIERTAS ACCESORIOS Y OTROS PRODUCTOS FAVOR DE VISITARNOS POR LA RED MUNDIAL EN www brinkmann net PARA PARTES DE REEMPLAZO DE PARRILLA BAJO GARANTIA FAVOR DE VISITARNO...

Page 56: ...trav s de la base del carro y en las patas y apri telos bien Asegurese de que los Agujeros de la Bisagra de Puerta esten hacia delante Paso 2 Conecte el panel trasero a las patas con cuatro pernos M6...

Page 57: ...su posici n vertical con la ayuda de un amigo Paso 7 Ate el soporte para el tanque a la base del carro con tres remaches de plastico Paso 8 Inserte el pasador del extremo inferior de la puerta derecha...

Page 58: ...zquierda Paso 11 Ate los ganchos de la rejilla para toallas a la barra de la mesa lateral Entonces conecte la barra de la toalla a la mesa lateral usando dos pernos M6 X 12 mm hexagonales plateadas y...

Page 59: ...necte el panel frontal de la mesa lateral al cuerpo de la parrilla con un perno M6 X 12 mm Paso 15 Instale el conjunto de la hornilla lateral en el lado derecho del asamblaje del carro Apriete con seg...

Page 60: ...eral de la hornilla usted utilizar los agujeros dominantes exteriores cuadro 1 o los agujeros dominantes interiores cuadro 2 Tire de la v lvula hacia abajo o hacia arriba al bloqueo en lugar Entonces...

Page 61: ...rrilla directamente sobre las hornillas Paso 21 Coloque las rejillas para cocinar de hierro fundido revestido sobre las costillas de apoyo directamente sobre las placas de distribuci n de calor Paso 2...

Page 62: ...lla Paso 24 Quite la tapa del encendedor y coloque la pila con el extremo positivo hacia la tapa Verifique que el resorte est en posici n dentro de la tapa del encendedor Coloque nuevamente la tapa y...

Page 63: ...62 ProSeries 9620 Armada...

Page 64: ...Piezas de acero inoxidable garant a de por vida Quemadores Inoxidables de acero de tubo garant a de por vida Encendedor electr nico y piezas restantes dos a os Las obligaciones de The Brinkmann Corpor...

Reviews: