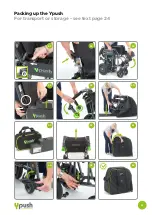
The Ypush is designed to be quickly and easily folded
up and packed for transportation or storage. The Travel
Roller Bag is the best way to keep the Ypush protected.
The following sequence will guide you through packing
up. Please refer to images on page 25.
1
Ensure there is nothing on the seat and the Ypush is on
level ground.
2
Remove the ignition key.
3
Unzip the Travel Roller Bag ready, with the flap open
on the floor.
4
Lift the right armrest,
51
disconnect the battery power
plug as shown by the white arrow, and fit the rubber
bung B into the Battery Charge Socket.
5
Pull the battery retainer knob as shown by the white
arrow,
52
and lift the battery from the compartment as
shown by the green arrow. Take care not to damage the
battery connector plug, circled, by holding it out of the way.
6
Pack the battery into the Battery Pack Carry Case
53
to protect it and store it safely.
7
Fold up both footrests
54
as shown by the green
arrow.
8
To enable the Ypush to roll freely, unlock the Override
levers circled
56
see page 15.
9
Press lever on both push handles
55
to release the
hinge catches as shown.
10
Fold both handles down
56
together as shown.
11
Grip the seat base fabric
57
at the front and pull UP
to release the seat clips. This will allow the Ypush to start
folding up narrower, then push the seat material back
down along with the seat belt and buckle.
12
Whilst squeezing the seat rails towards each other
with one hand, line up the pack-up clip
58
in position
above the
inner
chassis tube, and press down to "click"
the pack-up clip into place.
13
Pivot both footrests upwards
59
so that the footrests
slide into the "pack up" position between the inside of the
armrests and the seat base material.
14
Roll the Ypush backwards,
60
large rear wheels first,
into the Roller Bag.
Tip:
Put one foot on the Roller Bag
flap as shown to prevent it moving backwards while you
are rolling the Ypush inside.
Note:
Ensure that the Ypush is fully pushed to the rear of
the bag centrally, with the push handle hinges tucked into
the inside of the bag behind the zip before zipping up.
15
Holding the Ypush in place, carefully zip up the flap,
61
adjusting the position of the Ypush inside if necessary, to
ensure the zip is not over-stretched. Do not force the zip.
16
Connect any handles required – the Ypush is ready to
transport or store.
62
Packing up the Ypush
For transport or storage – see images page 25
Brintal Ypush
Owner’s Manual and Service Record
24
Warning!
Packing up the Ypush involves
some lifting and handling. Before lifting, check the
Technical Specifications section of this manual for the
various weights to avoid injury.
Warning!
Pinching or Crushing. Be careful to
avoid being pinched or having your hands crushed
when setting up the Ypush.
Warning!
Store the battery safely. Be sure to
observe the battery storage and charging instruc-
tions, as shown in the Technical Specifcation section
of this manual.

