Installation
Important: If the fitting is installed at low pressure (tank fed), then the minimum distance from
the underside of the water outlet to the cold water tank should be at least 5 metres to ensure
adequate performance.
This mixer should be installed in compliance with Water Regulations. For further details please
contact your local Water Authority.
1.
Identify all components are present prior to starting installation (see page 5).
2.
Install the mixer body (1) to the sink, ensuring the washer (2) is fitted between the mixer
body (1) and the sink.
3.
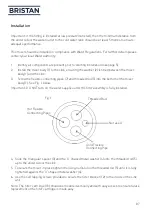
Screw the flexible connecting pipes (7) and threaded rod (5) into the bottom of the mixer
body (1). See Fig. 1 below.
Important: DO NOT turn on the water supplies until the filter assembly is fully installed.
Threaded Rod
Fig. 1
Cold Flexible
Connecting Pipe
4. Slide the triangular spacer (3) and the ‘C’ shaped metal washer (4) onto the threaded rod (5)
up to the underside of the sink.
5. To secure the mixer in place tighten the fixing nut (6) onto the threaded rod (5) until it is fully
tightened against the ‘C’ shaped metal washer (4).
6. Use the self tapping screws provided to secure the filter bracket (12) to the inside of the sink
unit.
Note: The filter cartridge (13) should be mounted vertically and with easy access to ensure future
replacement of the filter cartridge is made easy.
Hot Flexible
Connecting Pipes
07
Not used

