Maintenance
General Cleaning
Your fitting has a high quality finish
and should be treated with care to
preserve the visible surfaces. All
finishes will wear if not cleaned
correctly. The only safe way to
clean your product is to wipe with
a soft damp cloth. Stains can be
removed using washing up liquid.
All bathroom cleaning products
(powders and liquids) will damage
the surface of your fitting, even
the non-scratch cleaners.
Maintenance
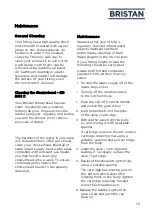
We advise that your fitting is
regularly serviced in hard water
areas to maintain optimum
performance (see map of Hard
Water Regions in the UK overleaf).
If your fitting begins to leak the
following should be carried out;
Isolate both hot and cold water
supplies to the kitchen mixer by
either:
•
Turning the water supply off at the
mains stopcock or
•
Turning off the isolation valves
to the kitchen mixer.
Cleaning the Showerhead – QD
BSM C
Your Bristan showerhead has rub-
clean nozzles for easy cleaning.
Simply rub your fingers across the
rubber spray jets regularly and before
you turn the shower on to remove
any scale or debris.
The hardness of the water in your area
will determine how often you should
clean your showerhead. Build up of
scale in particularly hard water areas
combined with constant use means
you may need to clean your
showerhead once a week. To ensure
continued performance the
showerhead needs to be regularly
descaled.
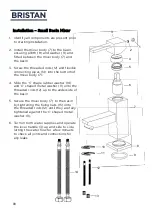
1. Prise the cap off from the handle
and loosen the grub screw.
2. Pull the handle from the spline
of the valve / cartridge.
3. Remove the valve from the body
by unscrewing it with a suitable
spanner.
If cartridge unscrew shroud, remove
cartridge retaining nut using a
suitable spanner and pull cartridge
from the body.
3. Clean the valve / cartridge and
seating, if necessary replace the
valve / cartridge.
4. Replace the valve and tighten fully
using a suitable spanner.
The cartridge has locating pins on
the bottom which align with
locating holes in the body. Tighten
the cartridge retaining nut and
screw the shroud back on.
6. Replace the handle, tighten the
grub screw and push the cap
back on.
13
Summary of Contents for QD 1/2 C
Page 15: ...15...


