Installation - Eco Basin Mixer & Eco Basin Mixer (No Waste)
1.
Identify all components are present prior to starting installation.
2.
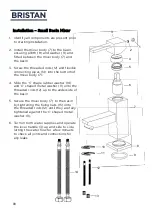
Fit the mixer body to the basin/bidet using the 'C' plate fixing kit. The full
rubber washer (8) goes between the fitting and the basin and the 'C' shaped
rubber (9) and metal washers (10) on the underside of the basin to be secured
by the nuts (12) and threaded rods (11).
3.
Fit the flexible tail pipes (13) by (HAND
ONLY) (DO NOT OVERTIGHTEN) inside
of the fitting and connect the hot and cold
supplies using washers (14) and suitable
fittings. (Not Supplied).
(See ADDITIONAL
SAFETY FEATURE)
4.
Fit the pop up waste (if applicable) washer
(16) above and washer (18) below the
basin/bidet.
It is recommended that a silicone sealant be
applied to both sealing faces of washers 16
and 18. The plug height can be set by,
adjusting the waste rod (6) and operating
rod (19) connecting bracket(15), and the
screw in the base of the plug. Friction for
the waste mechanism can be adjusted using
the waste cap (20) (DO NOT OVER-
TIGHTEN).
5.
Fully open the mixer in the mid position,
letting it run for a few minutes and check
all joints and connections for leaks.
09
Summary of Contents for QD 1/2 C
Page 15: ...15...


