background image

48

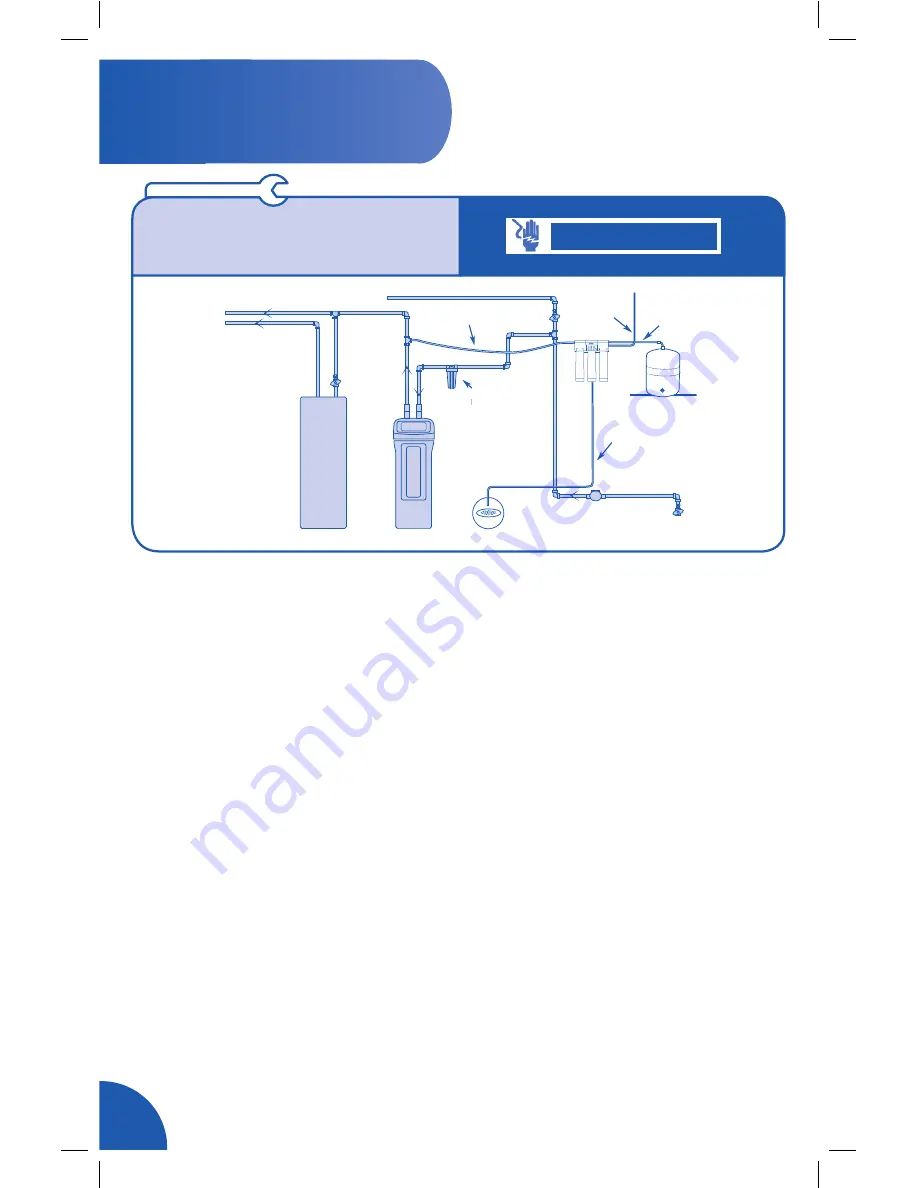
HOT

COLD

Packaged Items

Shown in White

Storage Tank

1/4” line to Tank

1/4” line to Faucet

3/8” line to Drain

1/4” line to Filter

Kitchen

Faucet 

Adapter

1/4" white tubing t

ter

1/4" red tubing to 

membrane drain

3/8" red tubing 

to drain

3/8" white tubing to faucet

3/8" white tubing 

to tank

Drain 

Connector

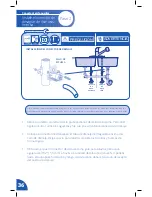
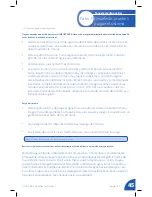
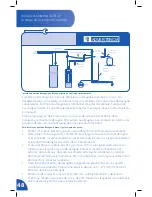
También puede dirigir la tubería de drenaje a un desagüe existente en la casa. Un 

desagüe de piso, un lavadero, un tubo vertical, un sumidero, etc. son puntos de desagüe 

convenientes. Este tipo de desagüe es preferible al conector del drenaje. Compruebe 

sus códigos locales. Es posible que necesite tuberías más largas (véase la lista de piezas 

en manual).
Esté siempre seguro de proporcionar un espacio de aire entre el extremo de la 

manguera y el punto de desagüe. Esto evitará que el agua se acumule en el sistema. Los 

espacios de aire son normativa exigida en la mayoría de las áreas.

Instale un punto de desagüe y un deje un espacio de aire (la posición remota)

Instale el sistema del RO/

drenaje en la posición remota

• 

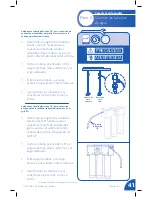
Retire 1/4" tubería plástica roja del cuerpo del grifo del RO halando suavemente.

• 

Determine si esta longitud es suficientemente larga alcanzar el punto de desagüe.   


Si es suficiente, inserte el reductor en el extremo de la tubería y luego este extremo  


en el puerto de desagüe en el filtro de la membrana RO. 

• 

Si no, substituya la tubería plástica roja de un 1/4" una longitud adecuada de la 


tubería para alcanzar el punto de desagüe. Entonces inserte el reductor en el  


extremo de la tubería y después inserte este extremo de la tubería en el puerto  


de drenaje del filtro de la membrana RO. Consulte el paso 6 en manual sobre cómo  


desconectar y conectar la tubería.

• 

Lleve la tubería al punto de desagüe y asegúrela en el extremo con un soporte  


(comprado localmente). Proporcione espacio de aire un 1-1/2" (3.8 cm) entre el  


extremo del tubo y el desagüe.

• 

Retire la tubería plástica roja de 3/8" deñ cier´p deñ grofp de RO y deséchela.

• 

El grifo no tendrá una tubería de 1/4" o de 3/8" fijada a las lengüetas de la distancia  


en el cuerpo de grifo RO para instalación remota.

Para instalar un punto de desagüe remoto, siga los siguientes pasos:

CALIENTE

FRÍA

Grifo externo

Calentador  de 

agua

Ablandador 

de agua

Agua blanda al sistema de RO

Sistema de 

filtración

Drenaje

Hacia adentro desde el exterior

Tubería roja de 

1/4" hacia el 

desagüe

Válvula 

principal de 

corte

Tubería de 3/8" 

hacia el tanque

Tubería de 

3/8" hacia 

el grifo

Materiales e implementos necesarios

ADVERTENCIA

Summary of Contents for Redi-Twist USS-335

Page 1: ...r the reduction of Cysts Pentavalent Arsenic Barium Cadmium Copper Hexavalent Chromium Lead Nitrates Nitrites Radium 226 228 Selenium Trivalent Chromium Turbidity andTotal Dissolved Solids TDS SystemTested and Certified by NSF International against NSF ANSI Standard 372 for low lead content and compliance Please refer to Performance Data Sheet for complete reduction data Redi Twist Reverse Osmosis...

Page 2: ... neck and body faucet base water storage tank and base drain connector tank connector restrictor elbow fitting main filter system head Redi Twist filters 1st 2nd and 3rd stage air gap faucet water storage tank white tubing 3 8 and 1 4 red tubing 3 8 and 1 4 faucet base nitrate test strip drain connector eye dropper compression cap for kitchen faucet spray hose connector drill with 1 8 drill bit ho...

Page 3: ...RO Filter System Assembly connect to auxiliary faucet Step 3 Install Water Storage Tank connect to auxiliary faucet Step 4 Step 5 InstallROFaucet connect to auxiliary faucet Connect Water Lines connect to auxiliary faucet Step 6 Internet Mobile 866 709 2086 Free Installation Video Manufactured for Protect Plus LLC 420 3rd Avenue NW Hickory NC 28601 USA WARNING This product will not work without pr...

Page 4: ...ust be drilled make certain that the area below the drilling location is free of wiring and pipes Also make sure that there is sufficient room to make the proper connections to the bottom of the faucet mount DO NOT DRILL THROUGH COUNTER TOPS MORE THAN 1 IN THICKNESS OR COUNTERTOPS MADE OF TILE MARBLE GRANITE OR SIMILAR SUBSTANCE Consult with a plumber or the countertop manufacturer for assistance ...

Page 5: ...k Location The Reverse Osmosis Filter Assembly and storage tank are normally installed in a kitchen or bathroom sink cabinet See top diagram A suitable drain point is needed for reject water from the Reverse Osmosis Filter Remote Location You can also locate the Reverse Osmosis Filter Assembly and storage tank in a remote location away from the Reverse Osmosis Faucet You will need a nearby water s...

Page 6: ...system also comes with two carbon block filters to help improve the taste of water as well The system once properly installed is fully automatic It continues to filter water until the tank is full As the tank is drained from use it again starts to filter water to fill the tank There is also another automatic function of this filter a back flush The membrane uses a cross flow to sweep away rejected...

Page 7: ...g Kitchen Faucet Adapter in an upright position see diagram screw onto threaded faucet stem Connect the cold water supply line to the Kitchen Faucet Adapter Firmly tighten the nut Note If rigid plumbing pipe metal or plastic is used you may need to shorten supply pipe using a hacksaw or pipe cutter to accomodate the Kitchen Faucet Adapter materials and tools needed CAUTION safety glasses Step 1 In...

Page 8: ... drill guide drill a 7 32 hole through the wall of the drain pipe DO NOT penetrate the opposite side of the pipe and be careful not to damage the side of the drain port fitting Note Extra care should be taken when entering drains near dishwashers or food waste disposals as backflow may occur through the air gap and cause flooding materials and tools needed safety glasses drill DRAIN CONNECTOR INST...

Page 9: ...anges allow a minimum clearance of 4 to 6 below the filter to the floor The filter System Assembly must be mounted in a vertical position Note Mount Filter System Head to a solid cabinet wall or wall If a solid surface is not available use hollow wall anchor bolts or toggle bolts not included to secure to the wall Mount the Reverse Osmosis Filter System Assembly Head using the two mounting screws ...

Page 10: ...Water Storage Tank nipple 3 4 turns being careful not to cross thread or over tighten Do not connect the tube at this time This will occur later in the assembly Place the Water Storage Tank next to the Reverse Osmosis Filter System Assembly The Water Storage Tank can be placed upright or on its side Use provided mount stand materials and tools needed Note The Tank Ball Valve fitting on the Water S...

Page 11: ...l mount flat against the mounting surface Visually review the routing of the tubes from the RO System Head to the RO Faucet Body Check to ensure there is adequate tube routing space between the RO Faucet Body and RO System Head If drilling is needed drill a 1 3 8 diameter hole in the mounting surface Step 5 Install RO Faucet connect to auxiliary faucet Select Location of Reverse Osmosis Faucet Mou...

Page 12: ...ighten the toggle bolts until the RO Faucet Base is mounted loosely to the surface TIP Make sure to keep the wings of the toggle bolts free to allow all tubing and faucet stem room Install the faucet base with the bolts at 5 11 o clock positions to have the handle positioned at 90 degrees to the right Firmly mount the RO Faucet Body to the RO Faucet Base by turning 1 4 clockwise to lock Ensure the...

Page 13: ...ated materials and tools needed CAUTION safety glasses Install 1 4 Plastic Tubing for Water Supply Line from Kitchen Faucet Adapter to System Head Inlet Determine lengths of 3 8 plastic tubing needed to connect to both inlet port of Auxiliary Faucet and outlet port of System Head labeled FAUCET Cut 3 8 plastic tubing squarely on both ends to length Avoid extra long lengths that may create kinks in...

Page 14: ...r appearance it may be necessary to keep the assembly on the mounting screws for service Note Codes in the state of Massachusetts require installation by a licensed plumber and do not permit the use of saddle valves If you live in the state of Massachusetts review plumbing code 248 CMR of the Commonwealth of Massachusetts before proceeding with the installation Note System will NOT operate without...

Page 15: ...on the top of the tank DO NOT REMOVE Wet end of tubing and insert into compression nut of Tank Connector fitting which was connected to tank previously Tighten compression nut to secure tubing to Tank Connector Insert other end of 3 8 White Plastic Tubing into outlet of RO System Head labeled TANK approximately 5 8 until it stops WARNING CAUTION HOT COLD Packaged Items Shown in White Storage Tank ...

Page 16: ...ubing to Tank Connector fitting Sanitizing RO Filter System Assembly will be completed during pressure test and purging following steps on Page 17 materials and tools needed Sanitizing is recommended immediately after installation of the RO Filter System Assembly It s also recommended after servicing inner parts It is important that the person installing or servicing the system have clean hands wh...

Page 17: ... a scratch dent or notch at the end If so cut 1 off squarely and re insert If problems exist refer to the troubleshooting chart or call the toll free number Purge the System Open the RO Faucet and let water flow through the system for a 24 hour period Water will flow heavily until tank becomes empty and then it will be a slow drip for the balance of 24 hours Close RO Faucet after 24 hour purge is ...

Page 18: ...first from the system to relieve pressure on the RO filter Remove the 3rd Stage filter cartridge Discard all of the Redi Twist filters in a proper manner Install new filters in reverse order 1 3rd Stage filter 2 Membrane filter 3 1st Stage filter Check tank pressure and purge the Reverse Osmosis System Step 7 A E A 1st Stage Carbon Filter 2nd Stage Membrane Filter 3rd Stage Carbon Filter LOCK LOCK...

Page 19: ...E PLACE EVERY SIX MONT H S LOCK 1 4 turn Remove the Redi Twist pre filter cartridge from the system by turning it to the left Remove the Redi Twist post filter cartridge from the system by turning it to the left Disconnect the red tubing from the Elbow Fitting then remove the restrictor from the tubing and replace with new restrictor Disconnect the Elbow Fitting from the membrane drain port Remove...

Page 20: ...this end of tubing into drain port on RO Membrane Filter If not replace 1 4 Red Plastic Tubing with an adequate length of tubing to reach drain point Then insert Restrictor in end of tubing and then insert this end of tubing into drain port on RO Membrane Filter Refer to Step 6 in manual on how to disconnect and connect tubing Run tubing to drain point and secure at end with a bracket purchased lo...

Page 21: ...s system Nitrate Nitrite Test Kit This system is acceptable for treatment of influent concentrations of no more than 27 mg L nitrate and 3 mg L nitrite in combination measured as N It is certified for nitrate nitrite reduction only for water supplies with a pressure of 280 kPa 40psig or greater This sytem is supplied with a nitrate nitrite test kit Product water should be monitored periodically ac...

Page 22: ...slower flow rate All Reverse Osmosis membranes are tested at 77 Fahrenheit However incoming water should not exceed 100 Fahrenheit You need to ensure that the Reverse Osmosis system is placed in a climate controlled area and does not have the potential to freeze 2 TDS total dissolved solids present in the incoming water More TDS requires more time for the membrane to filter and remove Ensure incom...

Page 23: ...limits Make sure drain line is not clogged Correct cause of fouling or replace RO membrane Empty water from holding tank Air pressure in valve stem should be between 5 7 PSI Increase PSI similar to adding air to bicycle tire Replace holding tank Call Customer Service for replacement Remove tubing from membrane drain port cut 1 length off end of tubing and add new restrictor Remove faucet body from...

Page 24: ... faucet base and disconnect drain 3 8 tubing Ensure the drain connector is properly aligned with the hole in the drain pipe Ensure there are no obstructions clear them out Repair or replace automatic shut off valve Refer to maintenance section Drain holding tank twice to rinse new carbon post filter An increase in feed water TDS will also give an increase in Product Water TDS Product Water is High...

Page 25: ...to use side cutting or diagonal cutting pliers Wet the tubing end and insert 5 8 until fully inserted Re route tubing to allow it to enter fitting at a straight 90 angle If not enough tubing to allow remove tubing and use a longer piece Remove by pressing in the white collar while pulling the Plastic Tubing out with your other hand Replace o ring by removing collet with smal screwdriver Be careful...

Page 26: ... 201 Carbon Filter Operating pressure 30 100 psi 207 690 kPa Stage 2 USF 205 RO Membrane Filter Operating pressure 30 100 psi 207 690 kPa Description WFBAS 300 Mounting Screws Package of 2 WFBAS 200 Eyedropper WFBAS 400 Nitrate Test Strip WFBAF 400 Kitchen Faucet Adapter Replacement Parts Part Number WFBAF 500 RO Air Gap Faucet no tubing attached Replace membrane every 12 months or sooner Brita Re...

Page 27: ...27 Version 2 1I ...

Page 28: ...28 ...

Page 29: ...tificado por NSF international contra NSF ANSI según la norma 58 para la reducción de quistes arsénico pentavalente bario cadmio cobre cromo hexavalente plomo nitratos nitritos radio 226 228 selenio cromo trivalente turbidez y sólidos totales disueltos TDS Sistema probado y certificado por NSF internacional según la norma NSF ANSI 372 para la conformidad y bajo contenido de plomo Refiérase a la Ho...

Page 30: ...d hueca Segueta para los tubos de metal Cinta de plomería acoples que debe adquirir Conector del tanque Reductor Sello de espuma Tornillos y tuercas Punzón 000 00 Indicador digital de presión de aire Lima Implementos y materiales necesarios Componentes principales Componentes secundarios Contenido del paquete implementos necesarios para la instalación Cabezal del sistema de filtración Filtro Redi ...

Page 31: ...iar Paso 6 Sistema de filtración My Brita Redi Twist Reemplazo del sistema cada 5 años Número de modelo del cartucho del sistema Fecha de compra Fecha de cambio Para recordatorios GRATIS de cambio del filtro ingrese a www protectplus com 1 4 turn LOCK LOCK LOCK Desinfecte pruebey purgueel sistema Instalación del grifo auxiliar Paso 7 Instale el filtro Redi Twist y pruebe si hay fugas Instalación d...

Page 32: ... donde va a taladrar no tenga cableado ni tubos Asimismo compruebe que exista suficiente espacio para hacer las conexiones adecuadas a la parte inferior del soporte del fregadero NO PERFORE ENCIMERAS QUE TENGAN MÁS DE UNA PULGADA 2 5 cm DE ESPESOR NI LAS DE BALDOSAS MÁRMOL GRANITO O MATERIALES SIMILARES Consulte con un plomero o con el fabricante de la encimera para obtener asistencia AVISO Este f...

Page 33: ...amble del filtro por ósmosis inversa y el tanque de almacenaje en un lugar a distancia del grifo de ósmosis inversa Necesitará disponer de suministro de agua y punto de drenaje Consulte la parte inferior del diagrama Nota Cerciórese de que la ubicación disponga de calefacción El agua fría entrante afectará negativamente el índice de flujo RO Verifique los requisitos relacionados con el espacio Rev...

Page 34: ...én viene con dos filtros de bloque de carbón para contribuir a mejorar el sabor del agua Una vez que se instala adecuadamente el sistema es totalmente automático Continúa filtrando agua hasta que el tanque se llene A medida que el tanque se vacía con el uso comienza a filtrar agua nuevamente para llenar el tanque El filtro también realiza otra función automática la circulación de retorno La membra...

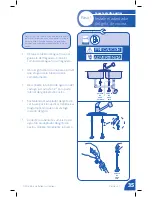
Page 35: ...fiérase al diagrama enrosque en el vástago roscado del grifo Conecte la tubería de suministro de agua fría al adaptador del grifo de cocina Apriete firmemente la tuerca Nota Si se utiliza tubería rígida de plomería metal o plástico es posible que necesite acortar el tubo de suministro utilizando una segueta o cortador de tubos para acomodar el adaptador del grifo de cocina Paso 1 Instale el adapta...

Page 36: ...la pared del tubo de drenaje NO penetre hasta el lado opuesto del tubo y tenga cuidado de no dañar el costado del acople del puerto de drenaje Nota Se debe tener mucho cuidado al ingresar a los desagües que estén cerca de las máquinas lavaplatos o de los trituradores de desperdicios ya que puede ocurrir flujo de retorno a través del espacio de aire y ocasionar inundación INSTALACIÓN DEL CONECTOR D...

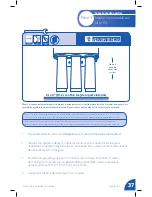
Page 37: ...nima de 4 a 6 10 2 cm a 15 2 cm desde la parte inferior del filtro hasta el piso El sistema del filtro deberá montarse en posición vertical Nota Monte el sistema del filtro en la pared sólida de un gabinete o en la pared Si no existe una superficie sólida utilice los pernos de anclaje para pared hueca o pernos acodados no se incluyen para fijarlo a la pared Monte el cabezal del ensamble del sistem...

Page 38: ...vueltas el conector del tanque en el empalme del tanque cuidando de no forzar la rosca ni apretar demasiado No conecte el tubo en este momento Lo hará posteriormente Coloque el tanque de almacenaje al lado del ensamble de ósmosis inversa El tanque puede colocarse verticalmente o de costado Utilice el soporte de montaje que se suministra Nota Es posible que el acople del tanque de suministro deba a...

Page 39: ...evo agujero en el fregadero Perfore un nuevo agujero en la encimera próximo al fregadero Paso 5 continúa en la página siguiente Tubería blanca de 1 4 hacia el filtro Tubería roja de 1 4 hacia la membrana de drenaje Tubería roja de 3 8 hacia el desagüe Tubería blanca de 3 8 hacia el vástago del grifo Tubería blanca de 3 8 hacia el tanque Conector de drenaje NO TALADRE EN UN FREGADERO TOTALMENTE ELA...

Page 40: ...erficie Consejo Práctico Cerciórese de conservar libres las mariposas de los pernos acodados para permitir que quede espacio en toda la tubería y el vástago del grifo Instale la base del grifo con los pernos en las posiciones de 5 y 11 en punto para tener la manija ubicada a 90 grados a la derecha Sostenga la base del grifo firmemente y monte el cuerpo del grifo en la base girando 1 4 de vuelta en...

Page 41: ...adaptador del grifo de la cocina hasta la entrada del cabezal del sistema Coloque una tubería plástica de 1 4 para suministro de agua desde la salida del cabezal del sistema hasta el grifo RO El paso 6 continúa en la página siguiente Determine la longitud de la tubería plástica de 3 8 necesaria para conectar el puerto de entrada del grifo auxiliar y el puerto de salida cabezal del sistema etiqueta...

Page 42: ...na mejor apariencia es posible que sea necesario conservar el ensamble en los tornillos de montaje para prestar servicio Nota La normativa del estado de Massachusetts exige que la instalación la efectúe un plomero con licencia y no se permite el uso de válvulas tipo montura Si vive en el estado de Massachusetts revise la normativa de plomería 248 CMR de la Comunidad de Massachusetts antes de proce...

Page 43: ...gulo recto con una cuchilla multiuso afilada Afloje la tuerca de compresión en la parte superior del tanque no lo quite Humedezca el extremo de la tubería Fría Caliente Adaptador de grifo de cocina Tubería blanca de 1 4 hacia el filtro Tubería roja de 1 4 hacia la membrana Tubería roja de 3 8 hacia el desague Conector de drenaje Tubería blanca de 3 8 hacia el grifo Tubería blanca de 3 8 hacia el t...

Page 44: ...esinfección del sistema finalizará durante la prueba de presión y la purga a continuación de los pasos de la página 17 Se recomienda desinfectar inmediatamente después de la instalación del sistema de ósmosis inversa También se recomienda después de prestarle servicio a las partes internas Es importante que la persona que instala o presta servicio al sistema tenga las manos limpias cuando manipula...

Page 45: ...el extremo En ese caso corte 1 2 5 cm a escuadra y vuelva a insertarla Si encuentra dificultades refiérase a la tabla de solución de problemas o llame al número gratis Purga del sistema Abra el grifo de RO y deje que el agua fluya a través del sistema durante 24 horas El agua fluirá intensamente hasta que el tanque se vacíe y luego se convertirá en un goteo lento por el resto de las 24 horas Cierr...

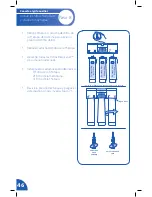
Page 46: ... la 1ª etapa del sistema para aliviar la presión del filtro de RO Retire el cartucho del filtro de la 3ª etapa Deseche todos los filtros Redi Twist de la manera adecuada Instalenuevoscartuchosenelordeninverso 1 Filtro de la 3ª etapa 2 Filtro de la membrana 3 Filtro de la 1ª etapa Revise la presión del tanque y purgue el sistema de ósmosis inversa paso 7 VÁLVULA DE AGUA CALIENTE VÁLVULA DE AGUA FRÍ...

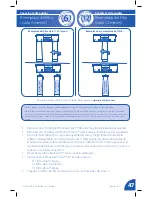
Page 47: ...ist del sistema girándolo hacia la izquierda Desconecte el tubo de rojo del empalme del codo y luego retire la brida de la tubería y reemplácelo con restrictor de nuevo Desconecte el codo conexión desde el puerto de drenaje de la membrana Eliminar la membrana del sistema girando a la izquierda Reemplazar la membrana y vuelva a colocar el accesorio de codo y volver a conectar a la tubería roja de D...

Page 48: ...temente larga alcanzar el punto de desagüe Si es suficiente inserte el reductor en el extremo de la tubería y luego este extremo en el puerto de desagüe en el filtro de la membrana RO Si no substituya la tubería plástica roja de un 1 4 una longitud adecuada de la tubería para alcanzar el punto de desagüe Entonces inserte el reductor en el extremo de la tubería y después inserte este extremo de la ...

Page 49: ...sistema de RO Kit de prueba de nitrato nitrito Este sistema es aceptable para tratamiento de concentraciones afluentes de no más de 27 mg L de nitrato y 3 mg L de nitrito en combinaciones medidos como N Está certificado para la disminución de nitrato nitrito sólo para suministro de agua con una presión de 280 kPa 40 psig o mayor Este sistema se suministra con un kit de prueba de nitrato nitrito El...

Page 50: ...77 Fahrenheit 25 C Sin embargo el agua que ingresa no debe exceder de 100 Fahrenheit 37 8 C Debe cerciorase de que el sistema de RO se coloque en un área de clima controlado y no tenga el potencial de sufrir congelamiento 2 TDS sólidos totales disueltos presentes en el agua que ingresa Cuando están presentes más TDS se necesita más tiempo para que la membrana los filtre y los elimine Cerciórese de...

Page 51: ...drenaje no esté obstruida Corrija la causa de la suciendad o reemplace la membrana RO Vacíe el agua del tanque de almacenaje La presión de aire en el vástago de la válvula debe estar entre 5 y 7 psi Aumente las psi de la misma forma que añade aire a un neumático de bicicleta Reemplace el tanque de almacenaje Llame al servicio al cliente para obtener un reemplazo Retire la tubería del puerto de la ...

Page 52: ...erpo del grifo la base del grifo y desconecte tubería del dren 3 8 Asegúrese que el conector del desagüe esté alineado correctamente con el agujero en el tubo de desagüe Asegúrese que no haya obstrucciones elimínelas Repare o reemplace la válvula de corte automático Refiérase a la sección de mantenimiento Vacíe el tanque de almacenaje dos veces para enjuagar el nuevo postfiltro de carbono Un aumen...

Page 53: ... recomienda utilizar alicate de corte lateral o diagonal Humedezca el extremo de la tubería e inserte 5 8 1 6 cm hasta que quede totalmente insertado Redireccione la tubería para permitir que entre al acople a un ángulo recto de 90 Si no hay suficiente tubería para permitirlo retire la tubería y utilice uno más largo Retire presionando en la anilla gris mientras hala la tubería de plástico hacia f...

Page 54: ...eración 30 100 psi 207 690 kPa Etapas 2 USF 205 membrana de RO Presion de operación 30 100 psi 207 690 kPa Número de pieza Descripción Piezas de repuesto Sistema de filtración por ósmosis inversa RO Brita USS 335 Uso y cuidado Conecte al grifo auxiliar WFBAS 300 Tornillos de montaje paquete de 2 WFBAS 200 Gotero WFBAS 400 Banda para prueba de nitrato WFBAF 400 Adaptador de grifo de cocina WFBAF 30...

Page 55: ...55 Version 2 1I USS 335 installation instructions ...

Page 56: ...eyversusbottledwater 1Mejorencomparaciónconelaguadelgrifo Sinbotellasquedesechar 2Lassustanciasquedisminuyepuedequenoesténenelaguade todoslosusuarios 3Sepuedeahorrardineroencomparaciónconelaguaembotellada Great Tasting Water that s better for the environment1 Gran degustación de agua que es mejor para el medio ambiente1 Better for the environment and your wallet3 Visit Brita online at www Brita co...

Reviews: