background image

20

Warranty

This product is distributed by Britax Child Safety, Inc . Britax Child Safety, Inc . (“Britax”) warrants 

this product to the original retail purchaser as follows:

Limited.Two-Year.Warranty

This  product  is  warranted  against  defective  materials  or  workmanship  for  two  years  from 

the  date  of  original  purchase .  Proof  of  purchase  is  required .  Your  exclusive  remedy  for 

this  warranty  is  that  Britax  will,  at  its  option,  provide  repair  or  replacement  components  to 

the  original  purchaser  for  this  product  or  replace  the  product .  Britax  reserves  the  right  to 

discontinue or change fabrics, parts, models or products, or to make substitutions . Labor and 

shipping costs for returns are not included . 
To make a claim under this Warranty, you must contact Britax Customer Services Department 

at  1-888-4BRITAX  or  write  to  13501  South  Ridge  Drive,  Charlotte,  NC  28273 .  Proof  of 

purchase is required .

PLEASE COMPLETE AND MAIL THE REGISTRATION CARD WITHIN 30 DAYS OF PURCHASE, 

OR VISIT WWW.BRITAXUSA.COM/REGISTRATION.

Warranty.Limitations

This warranty does not include damages which arise from negligence, misuse, corrosion, or 

use not in accordance with the user guide .
The use of non-Britax Child Safety, Inc . accessories is not approved by Britax . The use of 

unapproved accessories could cause this product to become damaged or dangerous . Their 

use automatically voids the Britax warranty . 

Limitations.of.Damages

The warranty and remedies as set forth above are exclusive and in lieu of all others, oral or 

written, express or implied . In no event will Britax or the retailer selling this product be liable 

for any damages, including incidental or consequential damages, arising out of the use or 

inability to use this product .

Limitations.of.Warranties.and.Other.Warranty.Terms.and.State.Law.Rights

Any  implied  warranties,  including  implied  warranties  of  merchantability  and  fitness  for  a 

particular purpose, shall be limited to the duration and terms of the express written warranty . 

Some states do not allow limitations on how long an implied warranty lasts or the exclusion or 

limitation of incidental or consequential damages, so the above limitations may not apply to 

you . This warranty gives you specific legal rights, and you may have other rights, which vary 

from state to state . Neither Britax, nor the retailer selling this product, authorizes any person to 

create for it any other warranty, obligation, or liability in connection with this product .

Summary of Contents for B-NIMBLE

Page 1: ...B NIMBLE Stroller User Guide IMPORTANT To ensure your child is as safe as possible read all instructions thoroughly before using this stroller Store this manual for future reference...

Page 2: ......

Page 3: ...6 Operating Instructions Parking Brake 10 Leg Rest Adjustment 10 Recline Adjustment 11 Swivel Wheels 11 Folding the Stroller 12 Securing Your Child 14 Infant Carrier Mode Attaching Britax Infant Car...

Page 4: ...e stroller to become unstable Do not overload the storage pouch Maximum weight in storage pouch is 1 lb 0 45 kg Do not overload the cup holder Maximum weight in cup holder is 1 lb 0 45 kg Always make...

Page 5: ...oduct To ensure proper use store this user guide in a convenient place so it can be consulted often Failure to follow all warnings and instructions could result in serious injury or death Infant Car S...

Page 6: ...opy with Sun Visor Chassis Lock On right side of frame Harness Buckle Leg Rest Front Wheels Rear Wheels Frame Release Lever Infant Car Seat Adapter Handles Carry Strap Frame Release Lever Under Seat S...

Page 7: ...5 B NIMBLE Stroller Canopy with Sun Visor Front Wheels Rain Cover Cup Holder Infant Car Seat Receivers Britax Infant Car Seat Adapters L R In the Box...

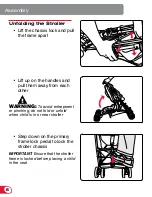
Page 8: ...each other Step down on the primary frame lock pedal to lock the stroller chassis IMPORTANT Ensure that the stroller frame is locked before placing a child in the seat Unfolding the Stroller WARNING T...

Page 9: ...nto place as shown before placing wheels on stroller Press the wheel assembly onto the mount at the front of the stroller NOTE Pull down on wheel assembly to ensure that it is locked Line up the canop...

Page 10: ...inting upward and the raised lines Fig A should be on the inside Slide the tab on the cup holder into the slot in the cup holder bracket Slide and hold the top bracket up while closing the receiver ar...

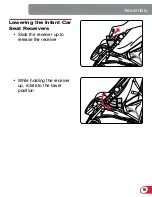
Page 11: ...9 Lowering the Infant Car Seat Receivers Slide the receiver up to release the receiver While holding the receiver up rotate to the lower position Assembly...

Page 12: ...n either side of the stroller until the wheels lock Lift either brake pedal to release the brake Lift leg rest to raise it or press and hold both leg rest levers to lower Parking Brake Leg Rest Adjust...

Page 13: ...ne adjuster and pull away from the seat back Raising Hold the adjuster strap and slide the recline adjuster to the desired position Move the swivel wheel lock up to lock wheels in place or down to all...

Page 14: ...Pull up on the carry strap to release the primary frame lock If infant car seat receivers are attached you must first rotate them to the lower position Page 9 Folding the Stroller Operating Instructio...

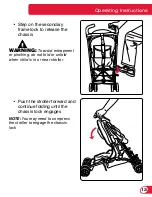
Page 15: ...the stroller forward and continue folding until the chassis lock engages NOTE You may need to compress the stroller to engage the chassis lock WARNING To avoid entrapment or pinching do not fold or u...

Page 16: ...e buckle assembly To raise or lower the harness height disconnect the buckle tongues and pull the harness strap out from the back of the seat Rethread the strap at the desired height and reconnect the...

Page 17: ...rness by inserting the tongues on the harness straps into the buckle assembly NOTE Ensure the straps are not twisted as they may become uncomfortable for the child To reconnect buckle tongues line up...

Page 18: ...e shell until they click into place NOTE There is a left and right adapter and orientation should be as shown Pull downward on the adapter to ensure that it is secure Removing Britax Infant Car Seat A...

Page 19: ...e up the locking latches on the infant car seat with the sockets on the infant car seat receivers Press down until the adapters lock into place Lift the release levers on both adapters and lift the in...

Page 20: ...18 Rain Cover...

Page 21: ...Plastic Parts Wipe with a damp cloth and mild soap Use clean dry cloth or towel to wipe away excess water and soap Maintenance If stroller gets wet dry with a clean cloth or towel to prevent corrosio...

Page 22: ...in accordance with the user guide The use of non Britax Child Safety Inc accessories is not approved by Britax The use of unapproved accessories could cause this product to become damaged or dangerous...

Page 23: ......

Page 24: ...ritax Child Safety Inc 13501 South Ridge Drive Charlotte NC 28273 USA A Britax Childcare Group Limited company Tel 1 888 427 4829 www Britax com Visit our website at www Britax com for more informatio...

Reviews: