background image

46

HOW TO USE

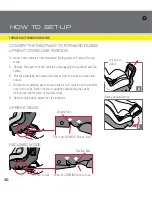
STEPS IN CHANGING SHOULDER STRAP SLOTS

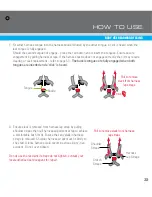
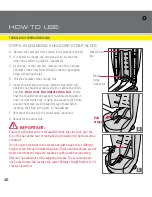
A.  Remove the restraint from vehicle, if not already removed.
B.  It is better to change one strap at a time, so that the 

other strap will be a guide for reassembly.

C.  At the rear of the restraint, remove one of the harness 

shoulder straps from Metal Strap Connector by slipping 
strap through open slot. 

D.  Pull the shoulder strap through slot.
E.  Insert shoulder strap through restraint slot which will 

position the shoulder strap level with or above the child’s 
shoulder, 

then over the metal cross bar

. Ensure 

that the shoulder strap passes through matching slots in 
cover and restraint body. If using an accessory with slots, 
ensure the straps are threaded through these before 
inserting the strap in the slots in the backrest.

F.  Reconnect the strap to the metal strap connector.
G. Repeat for the other side.


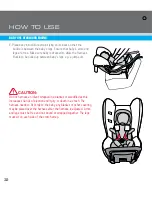
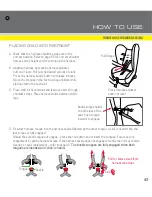
          IMPORTANT:

Ensure the shoulder strap is threaded through the slot, then over the 
top of the bar at the rear of restraint and connected to the metal strap 
connector.
Do not use the restraint with harness shoulder straps set at different 
heights or fed through mismatching slots. Ensure harness straps are not 
twisted and that all straps are secure by pulling each harness strap.
Remove the accessories while adjusting harness. The accessories are 
not be used once child reaches the Lower Shoulder Height Marker or if it 
creates discomfort. 

Metal 
Strap 
Connector

Metal Cross 
Bar

Pull 
straps

D

E

TODDLER USE FORWARD FACING

Summary of Contents for CONVERTIBLE CHILDRESTRAINT

Page 1: ...1 IMPORTANT KEEP THIS BOOKLET IN THE PLACE PROVIDED ON THE CHILD RESTRAINT Series No JS72 K 2013 CONVERTIBLE CHILD RESTRAINT INSTRUCTION BOOK ...

Page 2: ...2 2 1 SEATBELT QUICK SETUP REARWARD FACING 1 2 4 6 7 3 5 ...

Page 3: ...3 SEATBELT QUICK SETUP REARWARD FACING 8 9 11 10 ...

Page 4: ...4 SEATBELT QUICK SETUP FORWARD FACING 2 3 4 1 ...

Page 5: ...5 SEATBELT QUICK SETUP FORWARD FACING 5 6 2 5 m m ...

Page 6: ...री रखें शिशु के मुँह सामने की दिशा की ओर तब तक न करें जबतक कि शिशु का कन धा कन धे के निचले भाग के चिन ह को पार न करे शिशुओं को समय से पहले सामने की ओर बैठाए जाने पर उन हें गम भीर चोट का खतरा होता है बूस टर सीट को समय से पहले प रयोग किए जाने पर शिशुओं को गम भीर चोट का खतरा होता है जो शिशु इस प रतिबन ध के लिए अनुकूल आयु से बढ़े हो चुके हों वे एक बडे आकार के प रतिबन ध में सबसे अधिक सुरक षित होते है जि...

Page 7: ...akhan na ang pampigil na ito ay pinakaligtas sa isang mas malaking pampigil sa bata na may kasamang guwarnisyon o isang upuang booster hanggang sa maabot ng kanilang mga balikat ang itaas na marka ng taas ng balikat ng pampigil همادختسا طقف يف ةيعضولا ةهجاوملا ىلإ فلخلا ىتح لصي يفتك عيضرلا ىلإ ةمالع عافترا فاتكألا ةيلفسلا ًبيرقت ا يف رمع 12 رهش نمو ّمث متي همادختسا يف ةيعضولا ةهجاوملا ىلإ مامألا ى...

Page 8: ...no fino a quando le spalle raggiungono il marcatore di altezza superiore della spalla del sistema di ritenuta Να χρησιμοποιείται μόνο σε θέση στραμμένο προς τα πίσω μέχρι οι ώμοι του βρέφους να φτάνουν τον χαμηλότερο δείκτη ύψους ώμου περίπου 12 μηνών Στη συνέχεια να χρησιμοποιείται σε θέση στραμμένο προς τα εμπρός μέχρι οι ώμοι του παιδιού να φθάνουν τον ανώτερο δείκτη ύψους ώμου περίπου 4 ετών Σ...

Page 9: ...de tiempo El niño corre el riesgo de sufrir lesiones graves si se lo traslada antes de tiempo a un asiento elevador El niño que ya no quepa en este sistema de seguridad estará más seguro en un asiento para niños más grande con un arnés incorporado o un asiento elevador hasta que sus hombros alcancen el marcador de altura superior del sistema de seguridad 只用于后向式安装 直到婴儿肩膀达到靠下的肩高标记 大约12个月的宝宝 然后用于前 向式...

Page 10: ... recommends that you keep your child in a rearward facing restraint for as long as possible or until the lower shoulder height marker is reached approximately 12 months Carefully read all the instructions for installation in this book If in doubt about the method of installation consult Babylove or agent or a child restraint fitter or in New Zealand consult the agent for the vehicle Regional Road ...

Page 11: ...S 19 SUITABLE FOR USE 20 HOW TO INSTALL 28 HOW TO SET UP 31 HOW TO USE 35 HOW TO REMOVE FOR TODDLER USE FORWARD FACING 37 FEATURES 39 SUITABLE FOR USE 40 HOW TO SET UP 45 HOW TO USE 49 HOW TO REMOVE 50 HOW TO INSTALL IN AN AIRCRAFT GENERAL INSTRUCTIONS 54 CARE MAINTENANCE 59 ACCESSORIES FEATURES 62 INSTALLATION OF CAR ANCHOR FITTING 66 TRAVELLING TIPS 67 IN CASE OF CRASH ...

Page 12: ...oy the restraint if it has been in a severe crash even if no damage is visible See page 67 DO NOT USE THIS RESTRAINT WITHOUT THE COVER Always secure the loose end of the top tether strap Do not use the child restraint where this strap may fall into a split in the seat back or off the side of the seat To ensure infant s back is evenly supported do not put more than one nappy on the baby and make su...

Page 13: ...d not to use child restraints older than 10 years as the protection in an accident may be reduced THIS RESTRAINT IS NOT SUITABLE FOR USE WHERE THE TOP TETHER STRAP MAY FALL INTO A SPLIT IN THE SEAT BACK OR OFF THE SIDE OF THE SEAT Seatbelt extenders are not recommended to be used if the seatbelt is not long enough to secure the child restraint If seatbelts are too short then seek advice from a chi...

Page 14: ...g Lower Shoulder Height Marker A Lower Shoulder Height Marker A Turn to forward facing when the child s shoulders reach the lower shoulder height marker Forward Facing Shoulder Height Label Marker A Shoulder Height Label Marker B Move to the next form of child restraint when the child s shoulders reach the Upper Shoulder Height Marker ...

Page 15: ...raint must be turned to face towards the front of the vehicle or move the child to another forward facing seat with in built harness Approximately 12 months of age MARKER B UPPER SHOULDER HEIGHT MARKER When the child s shoulders reach this upper marker the child is now too big for the child restraint It is now time to move to the next child restraint Approximately 4 years of age IMPORTANT FOLLOW T...

Page 16: ...ge Or you can use a dedicated booster seat with vehicle lap sash seatbelt or seatbelt and compatible child harness until 6 to 8 years of age or until 8 to 10 years of age Or a harnessed child restraint suitable for children approximately 6 months to 8 years old Next type of restraint that can be used in the car for your child When your child has outgrown this seat you can use SHOULDER HEIGHT MARKE...

Page 17: ...ds if supplied 4 Harness Tongue Holders 5 Harness Tongues and Buckle Red button 6 Harness Adjuster Harness Tongues Harness Buckle 7 Harness Adjustment Strap 8 Stabilising Bar for Rearward Facing 9 Padded Insert if supplied 10 Slots for Harness 11 Shoulder Height Markers 2 3 4 1 5 8 9 10 11 6 7 BABY USE REARWARD FACING ...

Page 18: ...r Fitting 13 Vehicle lap sash seatbelt 14 Blue REARWARD FACING BELT PATH label 15 Top Tether Storage Pocket 16 Top Tether Adjuster 17 Top Tether Strap Adjuster 18 Adjustable Top Tether Strap 19 Attachment Clip 8 12 13 14 15 16 17 18 19 BABY USE REARWARD FACING 4 ...

Page 19: ...orage fitting in the seating position that you intend to use Refer to the car owner s handbook The upper anchorage fitting is required for attaching the top tether in both rear facing mode and forward facing mode covered later in the these instructions If no upper anchorage fitting is provided then you will need to install an upper anchorage fitting Refer to pages 62 to 65 BABY USE REARWARD FACING...

Page 20: ...ACING MODE PREPARING FOR INSTALLING INTO VEHICLE REARWARD FACING Fully press Adjuster Button A while pulling Upper Anchorage Strap B to lengthen B A The restraint is normally packaged in the fully upright forward facing mode If you need to use it rearward facing you must first fully convert the restraint to rearward facing mode as shown below If upper anchorage strap is folded up for storage undo ...

Page 21: ...atback but must be extended in position and latched Some vehicle seat fabrics particularly velours may be damaged by a child restraint used continuously We recommend the use of a seat protector or thick towel to keep the vehicle seat in good condition B Undo the buckle and place buckle tongues in the Buckle Tongue Holders on each side of the cover C Remove baby insert if fitted Lift the centre pan...

Page 22: ...l make the lap belt very tight across the restraint Whilst holding the seatbelt tension ensure to remove all slack from lap part of seatbelt by pulling sash belt For retractor seatbelts allow excess belt to feed back into retractor Push down on seat NOTE Seatbelt buckle and tongue must not rest between restraint cover and restraint If seatbelt buckle is adjustable adjust buckle as low as possible ...

Page 23: ...lder height marker or the child no longer fits the insert See page 28 for advice on positioning the shoulder straps NOTE Seatbelt extenders should not be used if the seatbelt is not long enough to secure the child restraint If they are used then the buckle must not enter the seating zone G Fit the attachment clip to the car s anchor fitting as shown right Make sure to remove as many twists as poss...

Page 24: ...he baby has been harnessed into the seat I Remove the slack from the adjustable top tether strap by pulling adjustment strap 3 After the baby is fitted in to the harness remove all slack in the top tether strap and roll up excess strap and place in the pocket provided Do not tighten the top tether strap such that the restraint is lifted up Remove slack only Pull Adjustment Strap to remove slack Fu...

Page 25: ...y adjusted with the baby Top tether strap slack Pull sash portion of seatbelt to remove slack DO NOT USE RESTRAINT IN REARWARD FACING MODE WITHOUT STABILISING BAR FULLY EXTENDED THE TOP TETHER STRAP MUST ALWAYS BE FITTED WHEN THE CHILD RESTRAINT IS USED IN A VEHICLE ALWAYS ATTACH THE HOOK AND REMOVE THE SLACK FITTING SUMMARY Hook Attachment Clip to the car s anchor fitting BABY USE REARWARD FACING...

Page 26: ...ident therefore make sure that the attachment clip is not positioned in front of the vehicle seat Use a shorter extension strap or no extension strap Attachment Clip Extension Strap Attachment Clip should not be in front of the vehicle seat front Attachment Clip should be behind the front of the vehicle seat BABY USE REARWARD FACING ...

Page 27: ... and the underside of the base Packing can be a firmly rolled up towel If the car s seat is too flat some packing may be required at the front edge of the base to achieve the recline angle Do not remove all of the installation angle by over packing Always leave an angle of approximately 10 15 The stabilising bar does not need to contact the back of the car s seat provided the seatbelt is tight If ...

Page 28: ...move the child and move the shoulder straps to the desired position using the methods on the next two pages E Repeat steps A C to confirm the correct set up of the built in harness 1 Upper shoulder strap slots Forward facing 2 Middle Upper shoulder strap slots Forward facing 3 Middle Lower shoulder strap slots 4 Lower shoulder strap slots 5 Shoulder harness strap 6 Harness tongues and buckle 7 Cro...

Page 29: ...lways adjust the harness slot position as the child grows If your child has reached the upper shoulder height marker then the restraint must be converted to Forward Facing mode refer to Forward Facing section starting on page 37 REARWARD FACING The shoulder straps must be in the slots which are nearest to the child s shoulders but not lower than the child s shoulders Strap Connector Shoulder strap...

Page 30: ...t body If using an accessory with slots ensure the straps are threaded through these before inserting the strap in the slots in the backrest F Reconnect the strap to the metal strap connector G Repeat for the other side IMPORTANT Ensure the shoulder strap is threaded through the slot then over the top of the bar at the rear of restraint and connected to the metal strap connector Do not use the res...

Page 31: ...for correct shoulder harness strap height and for setting up the harness B Slacken the top tether strap if not already slack and allow the straps to fall to the sides of the restraint for easy access to the child C Loosen shoulder straps by operating the harness adjuster button or lever and pull both shoulder straps evenly Pull out the desired amount of slack D Store buckle tongues on the buckle t...

Page 32: ...aby s legs e g a jump suit CAUTION Do not harness an infant wrapped in a blanket or swaddled as this increases the risk of ejection and injury or death in a crash The harness needs to fit firmly to the baby any blanket or other covering may be placed over the harness after the harness is adjusted Arms and legs must be free and not bound or wrapped together The legs must sit on each side of the cro...

Page 33: ...Tongue Buckle Harness Lap Straps Shoulder Straps Crotch Straps Pull to remove slack from harness lap straps F Fit either harness tongue into the harness buckle followed by the other tongue A click is heard when the last tongue is fully engaged Should the second tongue not engage press the red button and reinsert the tongues Ensure secure engagement by pulling harness straps If the harness buckle d...

Page 34: ...e slack from the top tether strap by pulling adjustment strap as shown Ensure the strap is not so tight as to lift the seat or deform the headrest I Always roll up excess strap and place in the pocket provided attached to the cover Press Pull Adjustment Strap to remove slack Roll up excess strap and store in the pocket attached to the cover to avoid tripping when moving the restraint BABY USE REAR...

Page 35: ...ntinue use when Baby Padded insert is a tight fit creates discomfort for larger children or the child s shoulder reach the lower shoulder height marker Always secure the loose end of the top tether strap to prevent it hanging out of the car or being accessible by the child Store in the top tether pocket provided Store instruction manual in pocket provided and tuck pocket under trim cover CAUTION A...

Page 36: ...icle seat back or slightly lifting the restraint to release the tension C Disengage the attachment clip from upper anchorage fitting The child restraint is now disconnected D Roll up and store the loose top tether strap in the pocket provided to avoid tripping E To convert the restraint from Rearward Facing mode to Forward Facing mode follow instructions on page 55 F Disengage seatbelt tongue from...

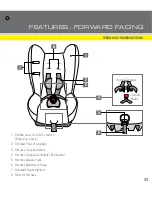
Page 37: ...in style 2 Shoulder Pads if supplied 3 Harness Tongues Holders 4 Harness Tongues and Buckle Red button 5 Harness Adjuster Lock 6 Harness Adjustment Strap 7 Shoulder Height Markers 8 Slots for Harness TODDLER USE FORWARD FACING 8 1 2 3 7 Harness Tongues Harness Buckle 4 5 6 ...

Page 38: ... labels 10 Vehicle Lap sash seatbelt 11 Car s Upper Anchorage Fitting 12 Attachment Clip 13 Top Tether Strap Adjuster 14 Top Tether Strap shown with loose end stored in pocket SEATBELT ONL Y VERSION Front of Vehicle TODDLER USE FORWARD FACING 9 11 10 10 12 13 14 ...

Page 39: ...the vehicle until the child is 4 years of age Check your Regional Road Rules for exemptions DO NOT USE RESTRAINT IN FORWARD FACING MODE WITH THE REAR FACING MODE STABILISING BAR PULLED OUT Do not use the restraint without the top tether strap correctly attached If your vehicle is not fitted with an anchor point please contact a Safety Restraint Fitting Station authorised by the relevant State Gove...

Page 40: ...ising bar upward and away from the seat to unlock and rotate C Rotate the stabilising bar around so that it is in position at the bottom rear of the seat Either recline or upright position may be set by locking into the forward or rearward slot D Refer to illustration below for slot locations UPRIGHT MODE RECLINED MODE Rotate stabilising bar TODDLER USE FORWARD FACING Push to lock Upright Slot Rec...
Page 41: ...engthen Fully press adjuster button A while pulling upper anchorage strap B to lengthen INSTALLING INTO VEHICLE FORWARD FACING DO NOT USE RESTRAINT IN FORWARD FACING POSITION WITH THE STABILISING BAR DEPLOYED Do not recline into rearward facing position when using restraint in forward facing mode Ensure harness are in the correct position Refer to page 45 If changing from rearward facing to forwar...

Page 42: ...low path ensuring that the seatbelt is behind the harness straps and that the lap part of the seatbelt is below the hooks as shown on page 44 D Engage seatbelt buckle tongue Push down on the seat whilst pulling the sash belt firmly This should make the lap belt tight across the restraint Whilst holding the seatbelt tension ensure to remove all slack from the lap part of the seatbelt 1 by pulling s...

Page 43: ...s strap and use pocket to store excess strap behind seat away from child s reach Pull Adjustment Strap to remove slack Press Roll up excess strap and store in the pocket attached to the cover CAUTION CHILDREN CAN BE INJURED OR RESTRAINTS AND TOP TETHER STRAP DAMAGED BY UNSECURED CARGO IN A COLLISION SECURE OR REMOVE HAZARDOUS CARGO BEFORE USING THIS CHILD RESTRAINT Always secure the loose end of t...

Page 44: ...INTO A SPLIT IN THE SEAT BACK OR OFF THE SIDE OF THE SEAT FITTING SUMMARY FORWARD FACING BELT PATH marked in yellow FORWARD FACING BELT PATH marked in yellow Car s Upper Anchorage Fitting Attachment Clip Top tether strap Pull to remove slack then store the strap as shown Top Tether Adjustment Strap Front of Vehicle Top tether storage pocket Pull to tighten belt Forward facing seatbelt path Hook TO...
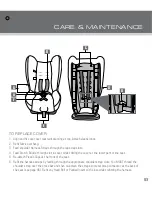
Page 45: ...fer to page 16 for next type of restraint Disconnect the shoulder straps from the strap connector see page 30 one at a time and re thread the strap to the next slot Remove the accessories if fitted when adjusting the straps FORWARD FACING The shoulder straps must be in the slots which are nearest to the child s shoulders but not more than 25mm below the child s shoulders IMPORTANT Padded Insert is...

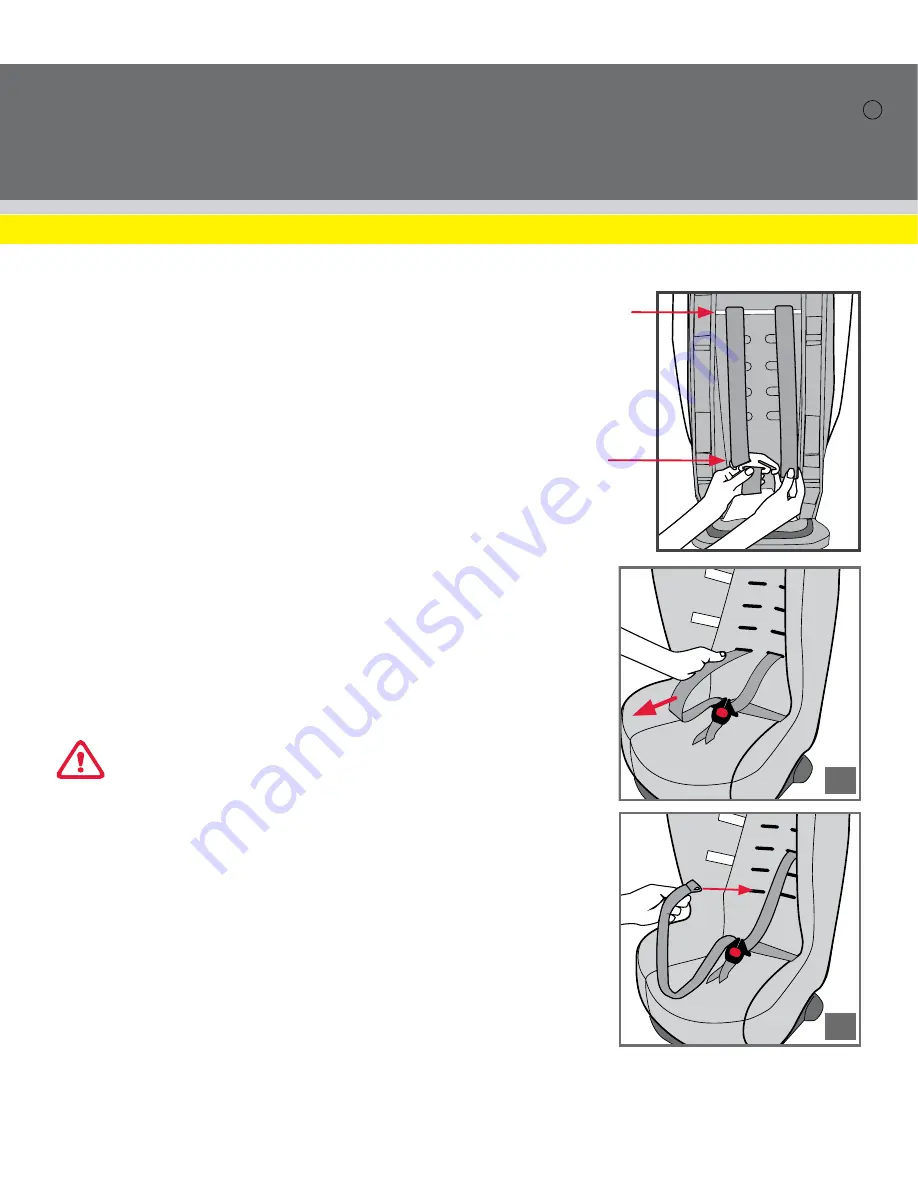
Page 46: ...body If using an accessory with slots ensure the straps are threaded through these before inserting the strap in the slots in the backrest F Reconnect the strap to the metal strap connector G Repeat for the other side IMPORTANT Ensure the shoulder strap is threaded through the slot then over the top of the bar at the rear of restraint and connected to the metal strap connector Do not use the restr...

Page 47: ...uckle tongues are fully engaged when both tongues are inserted and click is heard A Check that the harness shoulder straps are in the correct position Refer to page 65 for correct shoulder harness strap height and for setting up the harness B Lengthen harness by pressing harness adjuster button or lever Pull out the desired amount of slack Press the harness buckle button to release tongues Store t...

Page 48: ...r repair Harness Lap Straps Shoulder Straps Crotch Straps Pull to remove slack from harness lap straps Pull to remove slack from the harness HOW TO USE WARNING DO NOT LEAVE CHILDREN UNATTENDED IN THE CAR CAUTION A LOOSE HARNESS IS DANGEROUS Make sure that nothing is obstructing harness straps and that child s arms and legs are free with the straps in the correct location see previous page Do not u...

Page 49: ...les loosening of the top tether strap may be difficult If so try pushing the restraint against the vehicle seat back or slightly lifting the restraint to release the tension B Disengage the attachment clip from upper anchorage fitting C Store loose strap in the storage pocket provided on the cover D Disengage the seatbelt lock off devices on both sides of the restraint E Disengage seatbelt tongue ...

Page 50: ...at contain airbags unless they can be disabled Inform the aircraft operator that a child restraint is intended to be used on the aircraft when booking the flight as the child restraint may not be suitable for use in that operator s aircraft Follow the instructions of the flight crew or pilot For use of the child restraint in cars in countries other than Australia and New Zealand as follows A The c...

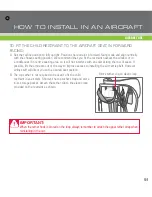
Page 51: ...ting the row of seats If possible lift the armrests out of the way to improve access to installing the aircraft lap belt However airline staff will direct you to the desired seat position B The top tether is not required to be used to fit the child restraint in an aircraft Shorten the top tether strap and store in its storage pocket Attach the tether clip to the elastic loop provided on the restra...

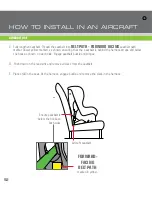
Page 52: ... the seatbelt is behind the harness straps and below the hook as shown on each side Engage seatbelt buckle and tongue D Push down on the restraint and remove all slack from the seatbelt E Place child in the seat fit the harness engage buckle and remove the slack in the harness FORWARD FACING BELT PATH marked in yellow Aircraft seatbelt Ensure seatbelt is below the hooks on both sides ...
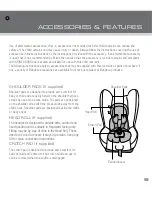
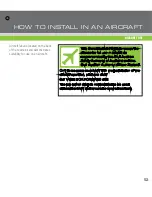
Page 53: ...53 Aircraft label is located on the back of the restraint and demonstrates suitability for use on an aircraft HOW TO INSTALL IN AN AIRCRAFT AIRCRAFT USE ...

Page 54: ...and plastic parts of your child s restraint using a damp cloth Do not use chemicals or cleaning agents Do not try and place any hardware into a washing machine STRAPS HARNESS We would only recommend that you spot clean the straps harness with a damp sponge The harness straps can be soaked however they must be thoroughly dried without excessive heat never tumble dry The harness straps should not be...

Page 55: ...raint pull each crotch 3 bar slide then turn 3 bar slide and push through each slot to remove the Harness Buckle from the restraint B Place the harness buckle under warm max 40 degrees celsius running water as shown Let the water run through the mouth of the buckle for five minutes C Engage and disengage the harness tongues and buckles several times until a strong audible click is heard D If you s...

Page 56: ...r and gently remove IMPORTANT Do not pull sticky items from covers as the cover may be damaged soak in water and gently remove TO REMOVE COVER You do not have to remove the shoulder harness assembly from the restraint However you do need to disconnect the shoulder harness straps from the metal strap connector at the back of the restraint Then follow the sequence below A to G to remove the cover A ...

Page 57: ...cover whilst fitting the cover at the lower part of the seat 5 Re attach Plastic Clips at the front of the seat 6 Refit the harness straps by feeding through the appropriate shoulder strap slots You MUST thread the shoulder strap over the cross bar and then re attach the straps to metal strap connector at the back of the seat see page 46 Refit any Head Roll or Padded Insert with slots whilst refit...

Page 58: ...8 VERY IMPORTANT Only replace the cover with Next Generation Nursery Products supplied replacement cover with identical shoulder height markers or a replacement cover meeting AS NZS 8005 CARE MAINTENANCE ...

Page 59: ...e extra comfort for baby or child and is fitted to the crotch buckle straps It can be removed when the buckle is disengaged Use of aftermarket accessories that is accessories not provided with this child restraint can reduce the safety of the child restraint and may cause injury or death Always follow the instructions covering the use of accessories in these instructions or the instructions provid...

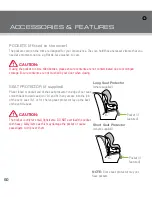
Page 60: ...damage the pocket or cause passengers to trip over them Pocket if featured Long Seat Protector where supplied NOTE Some seat protector may not have pockets Short Seat Protector where supplied A Pocket if featured A POCKETS if fitted to the cover The pockets sewn on the trim are designed for your convenience They can hold those necessary items that you need at a moments notice e g Bottle face washe...

Page 61: ...fitted onto either both side of the seat A Raise the cover and locate fixing slots in shell B Clip cup holder into position then re fit cover Ensure the cup holder and its contents cannot be crushed by the car door Remove or reposition the cup holder to the opposite side as required NOTE Only use for holding cups and bottles A B B ...

Page 62: ...CLIP COVER MUST ALWAYS BE USED AS IT PREVENTS THE RISK OF INCORRECT FITMENT OF THE ATTACHMENT CLIP TO THE ANCHOR FITTING ALWAYS ENSURE THAT THE ATTACHMENT CLIP IS CORRECTLY ENGAGED TO THE ANCHOR FITTING AND NOT HOOKED OR FITTED TO ANY OTHER OBJECT BEFORE EACH USE OF THE RESTRAINT THIS IS ESPECIALLY IMPORTANT IN VEHICLES SUCH AS STATION WAGONS VANS HATCH BACKS OR VEHICLES WITHOUT A FIXED PARCEL SHE...

Page 63: ...ch shaded area is an anchor fitting showing the correct way to install the fitting Ensure the anchor fitting is aligned as illustrated unless stated otherwise in the vehicle owner s handbook Adjustable upper Anchorage strap Front of Vehicle 45 Extension Strap distance to be measured Length 300mm Use Britax Safe n Sound part 0035 Length 600mm Use Britax Safe n Sound part 0036 Available from all maj...

Page 64: ...ing the hole check the underside for accessibility Install the attachment bolt as shown in Fig 2 For vehicles other than Sedans In Australia consult your nearest child restraint fitting station or traffic authority for vehicle inspection to find the best correct position for the placement of the anchorage point and for the correct attachment bolt length and use of spacers In New Zealand consult th...

Page 65: ... Centre line of seating position Fig 3 200mm min ONLY USE A 5 16 UNC GRADE 5 BOLT IF THE BOLT IS NOT THE CORRECT LENGTH THE CAR MANUFACTURER S HAND BOOK CAN PROVIDE ADVICE ON THE CORRECT LENGTH BOLT CHILD RESTRAINTS MUST NOT BE ATTACHED TO UNSOUND METAL OR TO WOOD OR SYNTHETIC STRUCTURES WHEN DRILLING 9 MM HOLE DO NOT DRILL THROUGH FUEL LINES FUEL TANKS ELECTRICAL WIRING OR RADIO SPEAKERS WEBBING ...

Page 66: ... children and driver Keep the car well ventilated to reduce heat stress Car windows should be kept open to maintain a good flow of fresh air Never leave babies or toddlers in a stationary car because of the risk of heat exhaustion Ensure babies and toddlers are adequately shaded from direct sunlight through side or rear windows Check the car is ventilated by use opening windows or using the car s ...

Page 67: ...ge is obvious Some insurance companies offer vehicle insurance which covers or partially covers the replacement of your child restraint Contact your insurance company for further details Your insurance company may require you to keep the child restraint for assessment but do not use the child restraint after a severe crash ...

Page 68: ...for improvement The Hipod trademark and model names are the property of Next Generation Nursery Products Pty Ltd This product is covered by Australian and Overseas patents and applications Patents Pending 2005 2015 Next Generation Nursery Products Pty Ltd CUSTOMER SERVICE P No 2202515 A ...

Reviews: