background image

Instructions for Installation & Use

Instructions for Installation & Use

54

55

CARE & MAINTENANCE

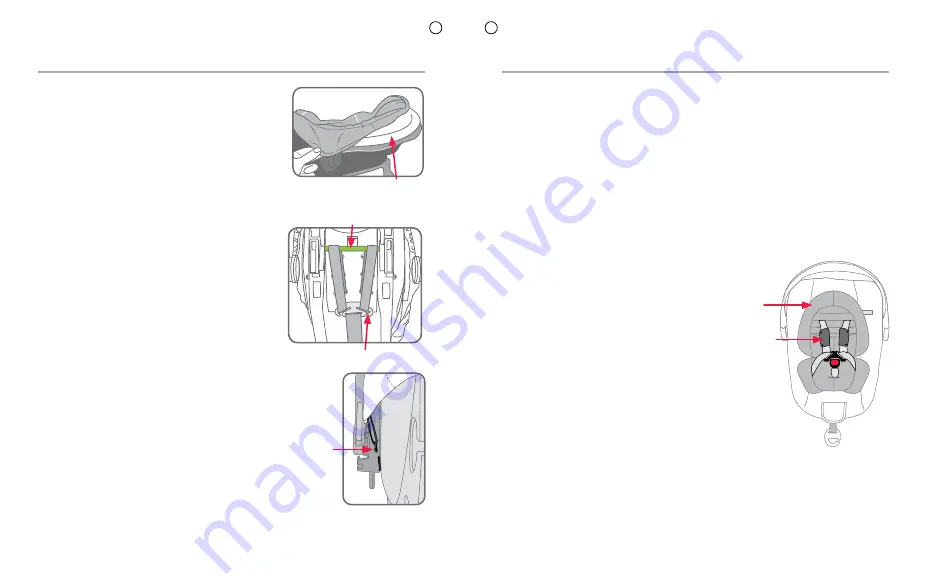
TO REPLACE THE COVER

A.  Place the cover over the Baby Capsule 

ensuring all slots in cover line up with slots in 
Baby Capsule.

B.  Ensure that there are no twists in any straps 

underneath the Baby Capsule.

C.  Feed the shoulder harness straps through lap 

strap slots in cover.

D.  Feed the shoulder harness straps through 

the shoulder strap slots in cover and then in 
through the Baby Capsule. 

You MUST thread 

the shoulder strap OVER cross bar

 and then  

re-attach the straps to metal strap connector 
at the back of the seat. Refer to page 36 to 
38 for harness setup for your baby. Attach the 
shoulder harness straps to the strap connector.

E.  Feed the crotch buckle as well as the harness 

adjuster strap through the slots in the cover.  

F.  Refit plastic hook on each side of the cover to 

Baby Capsule as shown right.

G.  Engage shoulder harness tongues and crotch 

buckle. Pull to check harness is attached.

H.  

Ensure the straps are not twisted.

Plastic 
Hooks

Pull elastic cover over Baby 
Capsule

ALWAYS OVER THE BAR

Metal Strap Connector

PADDED INSERT - Style may vary

The Padded insert is only required for supporting 
the smaller baby and must be removed once baby's 
shoulders reach the upper shoulder height marker 
to allow longer use of the Capsule.
A.  Disengage the harness buckle and feed the 

buckle out through buckle slot in the padded 
insert.

B.  Remove the insert pad by removing the 

shoulder harness straps from the metal strap 
connector and feeding the shoulder harness 
through the slots. See page 36.

C.  Discontinue using the Padded Insert when 

shoulder straps are in the top slots or if the Pad 
causes over heating, discomfort or you need 
more room for baby to grow.

Use of aftermarket accessories, that is, accessories not provided with this child restraint 
can reduce the safety of the child restraint and may cause injury or death. Always 
follow the instructions covering the use of accessories in this section or the instructions 
provided with accessory. If an aftermarket accessory is used that is not recommended 
by Britax then ensure that the accessory is for this restraint compliant with AS/NZS 8005 
and stated as suitable for use with this child restraint. 
The following instructions apply to accessories that may be supplied with this restraint 
at point of purchase. If not, a variety of Safe-n-Sound accessories are available from 
various retailers of Safe-n-Sound products.

Shoulder 
Pads

Padded 
Insert

ACCESSORIES

Summary of Contents for Safe-N-Sound BABY CAPSULE BS0040A-i20133 Series

Page 1: ...ctions for Installation Use BABY CAPSULE ISOFIX COMPATIBLE Birth to 12 months approx Series No BS0040A i20133 IMPORTANT KEEP THIS BOOKLET IN THE PLACE PROVIDED ON THE CHILD RESTRAINT BASE Suitable for...

Page 2: ...structions for Installation Use Instructions for Installation Use 2 3 QUICK SETUP ISOFLEX BASE 6 Pull 4 7 7 5 9 11 3 x2 10 6 7 Level 4 1 2 QUICK SETUP SEATBELT BASE 3 Level 1 2 Press Press Pull Pull 8...

Page 3: ...ation Use Instructions for Installation Use 4 5 10 QUICK SETUP SECURING BABY QUICK SETUP HARNESS ADJUSTMENT LARGER BABY AVERAGE SIZE BABY GROWING BABY LOW BIRTH WEIGHT INFANT 4 1 2 7 8 5 6 3 KEEP LEVE...

Page 4: ...d ng v tr h ng m t v ph a sau cho n khi vai c a b cao t i v ch ghi cao c a vai kho ng 12 th ng tu i H y ti p t c s d ng gh em b n y cho n khi em cao t i gi i h n n y B s sinh c nguy c b ch n th ng ng...

Page 5: ...ction designed into the restraint PLEASE READ AND FOLLOW THESE INSTRUCTIONS EXACTLY and use only Safe n Sound recommended parts and accessories Carefully read all the instructions for installation in...

Page 6: ...the child restraint facing forwards Do not use excessively upright or reclined This restraint must be used in conjunction with a lap or lap sash seat belt Seatbelt extenders are not recommended to be...

Page 7: ...se a child restraint that will take larger babies in rear facing DO NOT MOVE TO THE NEXT RESTRAINT UNTIL SHOULDERS REACHES THE SHOULDER HEIGHT MARKER FRONT OF VEHICLE SHOULDER HEIGHT MARKERS AND A GRO...

Page 8: ...s continue to keep your child rear facing until the shoulders reach the lower shoulder height marker Then turn to forward facing until the child reaches the upper shoulder height marker approximately...

Page 9: ...p hook disconnected 6 Harness adjustment strap 7 Cover 8 Harness Tongues and Buckle Red button 9 Shoulder Pads if fitted 1 2 5 6 7 9 4 SPECIAL FEATURES SPECIAL FEATURES BABY CAPSULE Harness Tongues Ha...

Page 10: ...NSTALLATION ISOFIX COMPATIBLE ISOFLEX Connectors are flexible attachment connectors for use in a vehicle with ISOFIX low anchorages 18 Top Tether not shown for illustration purposes 22 Car s Upper Anc...

Page 11: ...uately shaded from direct sunlight through side or rear windows Check the car is ventilated by opening windows or using the car s ventilation system taking in external air Recirculation setting is not...

Page 12: ...where it could fall off IMPORTANT 2 3 1 3 1 2 2 3 Remove all packaging from the Baby Capsule Consult the car owner s handbook for location of top tether anchorage points If there is no child restraint...

Page 13: ...are fixed standardised anchoring points for securely installing an ISOFIX compatible child restraint in a vehicle with ISOFIX low anchorages It has now become an international standard for vehicles T...

Page 14: ...of the base in the vehicle rear seat with the base against the seat back and correct installation angle is very important The vehicle seat design will determine if the stabiliser bar is in contact or...

Page 15: ...re loose strap in the storage pocket provided A ISOFLEX REARWARD FACING HOW TO REMOVE THE BASE WITH ISOFLEX CONNECTORS B A Fully press Adjuster Button A while pulling top tether strap B to lengthen Bl...

Page 16: ...in adding an anchor fitting F Connect the top tether strap attachment clip to the anchor fitting in the car as detailed on page 29 Install top tether strap to the Baby Capsule as shown on page 29 Atta...

Page 17: ...strap slot 2 Middle crotch strap slot 3 Low birth weight infant crotch strap slot 4 Outer lap strap slot 5 Low birth weight infant lap strap slot 6 Harness tongues buckle 7 Shoulder harness strap 8 L...

Page 18: ...EIGHT LAP STRAP AVERAGE BIRTH WEIGHT CROTCH STRAP BABY CAPSULE SETUP BABY CAPSULE SETUP ADJUSTMENT OF CROTCH STRAP Remove infant from the Baby Capsule prior to making adjustments A Remove the Baby Cap...

Page 19: ...straps are twisted and that all straps are secure by pulling each harness strap IMPORTANT ALWAYS OVER THE BAR SETTING UP THE HARNESS This section covers the setting up of the harness to fit the infan...

Page 20: ...t the straps over the bar otherwise the harness will not tighten IMPORTANT LARGER BABY AVERAGE SIZE BABY GROWING BABY LOW BIRTH WEIGHT INFANT HOW TO USE PLACING INFANT IN CAPSULE If your child is of l...

Page 21: ...tongues are fully engaged when both tongues are inserted and click is heard Tongue Buckle C Place baby into Baby Capsule lying on its back so that the buckle is between the baby s legs Ensure that ba...

Page 22: ...s arms and legs are free and the crotch strap is between the legs Check that the slack in straps is minimal Do not use the restraint if straps do not tighten and contact Customer Service Pull Harness...

Page 23: ...adjustment strap hook is connected to the loop Pull Catch Lift The end of the harness adjustment strap is connected to the cover to avoid tripping over the end when carrying the Capsule Ensure the har...

Page 24: ...cannot be used with aircraft seatbelts that contain airbags unless they can be disabled Inform the aircraft operator that a child restraint is intended to be used on the aircraft when booking the fli...

Page 25: ...l slack from the lap belt Pull belt strap to tighten ensure a firm fit of the Baby Capsule to the seat Do not use this restraint with aircraft seatbelt that contain airbags unless they can be disabled...

Page 26: ...luggish harness buckle is that you cannot hear a click when engaging the last harness tongues To restore the harness buckle to good working order it needs to be cleaned as follows A Remove the harness...

Page 27: ...snag VERY IMPORTANT Only replace the cover with Safe n Sound supplied replacement cover with identical shoulder height markers or a replacement cover meeting AS NZS 8005 TO REMOVE THE COVER A Remove t...

Page 28: ...insert is only required for supporting the smaller baby and must be removed once baby s shoulders reach the upper shoulder height marker to allow longer use of the Capsule A Disengage the harness buck...

Page 29: ...ded through slots in the backrest of the main moulding and tied together Head Pillow Slots for the pillow ties Shoulder harness SHOULDER PADS Style may vary The shoulder pads may require release by pr...

Page 30: ...AS IT PREVENTS THE RISK OF INCORRECT FITMENT OF THE ATTACHMENT CLIP TO THE UPPER ANCHORAGE POINT ALWAYS ENSURE THAT THE ATTACHMENT CLIP IS CORRECTLY ENGAGED TO THE UPPER ANCHORAGE POINT AND NOT HOOKED...

Page 31: ...PPER ANCHORAGE POINTS For Sedans only Drill 9mm diameter hole in the parcel shelf on the centre line of the seating position as shown in Fig 3 Before drilling the hole check the underside for accessib...

Page 32: ...ng Obtain this part from most retailers of Safe n Sound products There may be two types of Gated Slides available Curved and Flat Before using the restraint convert the lap sash seat belt by using the...

Page 33: ...SHOULD NOT BE USED IN PLACE OF AN APPROPRIATE COT THE BABY CAPSULE MUST ONLY BE USED WITH STROLLERS WITH COMPATIBLE ATTACHMENTS WE RECOMMEND SAFE N SOUND AND STEELCRAFT STROLLERS IF IN DOUBT ABOUT THE...

Page 34: ...ase hooks and remove from the car PREPARING THE STROLLER A Ensure the Stroller has been assembled correctly B Open the Stroller apply the brakes C Before fitting the Baby Capsule check and ensure all...

Page 35: ...PY WHICH CAN BE USED WHEN THE CAPSULE IS CONNECTED TO THE STROLLER THE CANOPY CAN ALSO BE USED IN THE CAR Stroller seating surface Only use Baby Capsule with compatible Britax Steelcraft Stroller or w...

Page 36: ...frame A A Rotate handle upwards Squeeze B Never fold the stroller frame with an Baby Capsule attached Remove the Baby Capsule before folding the stroller frame HOW TO REMOVE THE BRITAX CLICK GO ADAPTO...

Page 37: ...position disconnect the elastic under the handle boss and pull the trim away from the side of the Capsule to align the holes 2 Push in Locking Pin C Insert Locking Pin into hole Align both top and bot...

Page 38: ...other occupant and suffer serious injury or death When riding in a motor vehicle never nurse a baby and use the same seat belt for both of you In this position the baby or child could be crushed Never...

Page 39: ...erienced a severe crash is taken out of the market There is no method of determining if the restraint has been damaged in a severe crash so the restraint should be destroyed as the crash may reduce th...

Page 40: ...and registered address Level 4 650 Lorimer Street Port Melbourne VIC 3207 P O Box 5119 Garden City VIC 3207 Customer Service 1300 303 330 Email au custserv britax com www britax com au NEW ZEALAND Br...

Page 41: ...50 Scan QR code for installation and how to use WARRANTY Our goods come with guarantees that cannot be excluded under the Australian Consumer Law You are entitled to a replacement or refund for a majo...

Reviews: