background image

16

17

SKYLINE User Guide

Britax Child Safety, Inc.

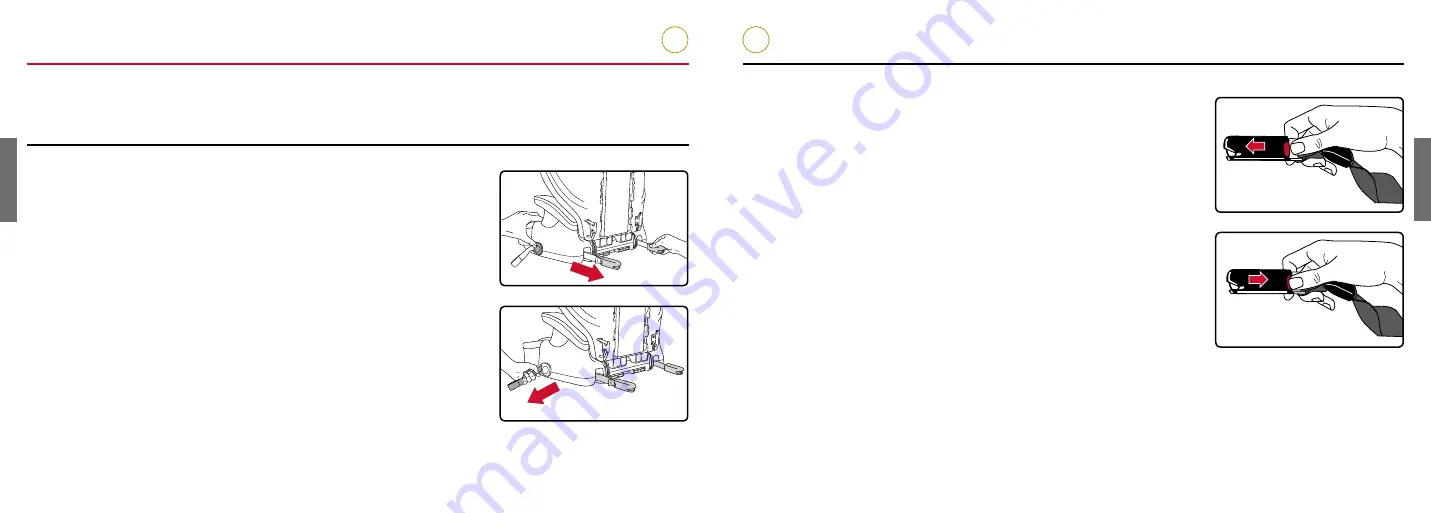
Lower Connectors

The lower connectors are located in the back of the base� Store the connectors in the slots when 

not in use�

Removing and Replacing Lower Connectors from Storage Slots

• To remove, press the lower anchor release button on the child’s 

left side of the booster base, then pull each of the connectors 

from the storage slots�

• To replace, press the lower connector adjuster button on the 

child’s left side of the booster base and then pull the lower 

connector adjuster strap until the connectors retract into the 

base� Ensure the straps are not twisted�

NOTE:

 The lower connectors may need to be turned so they 

retract into the slots with the bottom side facing down.

Attaching and Removing Lower Connector from Lower Vehicle Anchor

• To attach, remove the lower connector from the storage slot 

and firmly push down onto the lower vehicle anchor until a click 

is heard�

• To remove, push the lower connector release button on the 

child’s left side of the booster seat to loosen connector strap 

(see page 16)� Then press and hold the red lower connector  

release buttons and pull the connectors from the vehicle  

lower anchors�

Summary of Contents for SKYLINE Series

Page 1: ...SKYLINETM User Guide Gu a del usuario...

Page 2: ......

Page 3: ...at without Backrest 22 Vehicle Compatibility 24 Vehicle Seating Positions 24 Vehicle Buckle Position 25 Vehicle Seat Belts 26 Vehicle Head Restraints 26 Care and Maintenance 28 Removing Booster Covers...

Page 4: ...Base Cover 8 Cup Holders 9 Base Belt Guide 10 Lower Connector Release Button 11 Backrest Hinge Cylinder 12 Lower Anchor Adjuster Strap 13 Lower Connector Adjuster Button 14 Base 15 Head Restraint Hei...

Page 5: ...d in the rear seating positions than in the front seating positions To ensure your child s safety please study Vehicle Seating Positions on page 24 and consult your vehicle owner s manual Always make...

Page 6: ...____________________________________________________________________ Important Notes Britax strongly recommends that children should remain in a child seat with a 5 point harness until reaching the ma...

Page 7: ...n the lap belt is routed under the armrests and low across the child s upper thighs Fig C IMPORTANT Refer to Securing Your Child on pages 20 21 for additional information C B A When Using without Back...

Page 8: ...down onto base bar to connect A click will be heard 3 Rotate the backrest up toward the base until a click is heard to confirm attachment Removing the Backrest 1 Place the booster seat on a flat surf...

Page 9: ...t the first click Adjusting Head Restraint Height The head restraint can be adjusted and locked into different positions Check the fit with a child seated in the booster seat Ensure that the shoulder...

Page 10: ...NOTE Cup holders are dishwasher safe Lower Anchor System The lower anchor system helps to anchor the booster seat into the car for added stability and safety in the event of a crash The lower anchor...

Page 11: ...d then pull the lower connector adjuster strap until the connectors retract into the base Ensure the straps are not twisted NOTE The lower connectors may need to be turned so they retract into the slo...

Page 12: ...right position before placing the booster seat on the vehicle seat see page 12 3 Push the lower connector release button and pull lower connector to fully extend the lower connector adjuster strap Rep...

Page 13: ...the vehicle seat belt through the shoulder belt guide 3 Route the lap part of the vehicle seat belt under the left and right armrests and over both base belt guides NOTE The shoulder part of the vehi...

Page 14: ...page 18 2 Seat your child in the booster seat The top of the child s ears must be below the top of the vehicle head restraint 3 Pull the vehicle seat belt out then route the lap part of the vehicle s...

Page 15: ...on for the buckle then another seating position or child seat MUST be used Vehicle Compatibility Vehicle Seating Positions The back seat is the safest location for children 12 and under DO NOT place a...

Page 16: ...Restraints WITH BACKREST Proper positioning of the booster seat may require adjusting or removing the vehicle head restraint to allow the backrest to lie flat against the vehicle seat back If the veh...

Page 17: ...e check this child seat and its components to make sure they are in good condition and good working order Booster Head Restraint Cover 1 Detach the two elastic loops from the back of the headrest 2 Li...

Page 18: ...ty does not include damages that arise from negligence misuse or use not in accordance with the product instruction The use of non Britax covers inserts toys accessories or tightening devices is not a...

Page 19: ...32 Britax Child Safety Inc Notes...

Page 20: ...do 22 Compatibilidad del veh culo 24 Posiciones de los asientos en el veh culo 24 Posici n de la hebilla del veh culo 25 Cinturones de seguridad del veh culos 26 Reposacabezas del veh culos 26 Cuidado...

Page 21: ...r n de la base 10 Bot n de desbloqueo de conector inferior 11 Cilindro de la bisagra del respaldo 12 Correa de ajuste de conector inferior 13 Bot n de ajuste de conector inferior 14 Base 15 Regulador...

Page 22: ...es de los Asientos en el veh culo en la p gina 24 y consulte el manual del propietario de su veh culo Aseg rese siempre de que el sistema de seguridad para ni os est sujeto al veh culo incluso cuando...

Page 23: ...______________________________________________________ Notas importantes Britax recomienda encarecidamente dejar a los ni os en un asiento de seguridad infantil con arn s de cinco puntos hasta que alc...

Page 24: ...ebajo de los apoyabrazos cruzando la parte superior de los muslos del ni o Fig C IMPORTANT Consulta Sujeci n del ni o en las paginas 20 21 por informaci n adicional Si se usa sin respaldo Use la orien...

Page 25: ...la barra de la base para conectarlas Escuchar un clic 3 Gire el respaldo hacia arriba contra la base hasta que oiga un clic que confirme que se ha ajustado correctamente Extracci n del respaldo 1 Colo...

Page 26: ...proceso hasta que la banda transversal se descanse al centro del pecho del ni o y est colocado al nivel del hombro del ni o o por encima de este cuando se coloque en la gu a del cintur n de la banda t...

Page 27: ...sistema de anclaje inferior ayuda a fijar el asiento regulable al coche para una estabilidad y seguridad adicional en caso de accidente El sistema de anclaje inferior no asegura a su hijo de manera a...

Page 28: ...e conector inferior en la base del asiento regulable del lado izquierdo del pasajero y a continuaci n jale de la correa del ajustador hasta que los conectores queden ajustados dentro de la base Aseg r...

Page 29: ...posici n vertical antes de instalar el asiento regulable en el asiento del veh culo consulte la p gina 12 3 Pulse el bot n de desbloqueo del anclaje inferior del lado izquierdo del ni o en la base del...

Page 30: ...idad por debajo de los apoyabrazos derecho e izquierdo y por encima de ambas gu as de cintur n NOTA Debe pasar el cintur n transversal del veh culo por debajo del apoyabrazos en el lado de la hebilla...

Page 31: ...tores inferiores tal y como se muestra en la secci n Colocaci n del asiento regulable en la p gina 18 2 Siente a su hijo en el asiento regulable 3 Jale el cintur n de seguridad del veh culo y pase la...

Page 32: ...Si tiene alguna duda sobre la colocaci n del asiento regulable consulte el manual del veh culo Algunos veh culos no tienen asientos compatibles con este asiento regulable ni ning n otro asiento de seg...

Page 33: ...h culos CON RESPALDO Es posible que para colocar adecuadamente el asiento regulable sea necesario ajustar o quitar el reposacabezas del veh culo de manera que el respaldo quede plano contra el del asi...

Page 34: ...asegurarse de que est n en buenas condiciones y que funcionen correctamente Cuidado y mantenimiento Cubierta del reposacabezas del asiento regulable 1 Desenganche las dos correas el sticas situadas e...

Page 35: ...negligencia uso indebido o utilizaci n del producto de forma distinta a la indicada en las instrucciones del producto Britax no aprueba el uso de cubiertas piezas juguetes accesorios o dispositivos d...

Page 36: ...32 Britax Child Safety Inc Notas...

Page 37: ......

Page 38: ...Britax Child Safety Inc 4140 Pleasant Road Fort Mill SC 29708 USA A Britax Childcare company Tel 1 888 427 4829 Tel 1 704 409 1699...

Reviews: