background image

ZAPO

LAYBACK STROLLER

www.britax.com.au

Series SY66A

IMPORTANT: KEEP THIS BOOKLET IN A SAFE PLACE FOR FUTURE REFERENCE.

Summary of Contents for Steelcraft Zapo

Page 1: ...ZAPO LAYBACK STROLLER www britax com au Series SY66A IMPORTANT KEEP THIS BOOKLET IN A SAFE PLACE FOR FUTURE REFERENCE...

Page 2: ...S RECOMMENDED TO REMOVE THE CHILD FROM THE STROLLER BEFORE GOING UP OR DOWN STAIRS OR ESCALATORS DO NOT LIFT THE STROLLER BY THE ARM BAR BECAUSE IT MAY DISENGAGE DO NOT ALLOW CHILDREN TO STAND ON THE...

Page 3: ...ANY ACCESSORIES OTHER THAN THOSE APPROVED FOR USE WITH THIS STROLLER BY BRITAX IT IS UNSAFE TO USE ACCESSORIES NOT APPROVED FOR USE WITH THIS STROLLER THE MAXIMUM WEIGHT OF THE CHILD USING THIS STROL...

Page 4: ...and in a comfortable position Minimise lower back bending Bend knees preferable at as large an angle as possible but not at a right angle use a semi squat in preference to a full squat Raise the load...

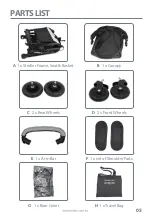
Page 5: ...05 A 1 x Stroller Frame Seat Basket B 1 x Canopy C 2 x Rear Wheels D 2 x Front Wheels E 1 x Arm Bar F 1 x set of Shoulder Pads G 1 x Rain Cover H 1 x Travel Bag PARTSLIST...

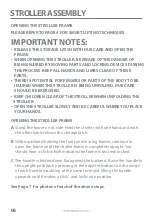
Page 6: ...E 4 FOR SMART LIFTING TECHNIQUES OPENING THE STROLLER FRAME A Stand the frame on its side Hold the stroller with one hand and with the other hand release the storage latch B With each hand holding the...

Page 7: ...07 STROLLERASSEMBLY OPENING THE STROLLER FRAME A B B B C click click click press click...

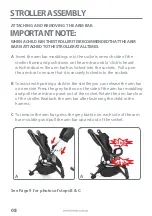
Page 8: ...y locked into the sockets B To assist with putting a child in the stroller you can release the arm bar on one side Press the grey button on the side of the arm bar moulding and pull the arm bar up and...

Page 9: ...09 STROLLERASSEMBLY B B B press C press C ATTACHING AND REMOVING THE ARM BAR...

Page 10: ...e canopy or hood on this product will not give your child total protection from the harmful rays of the sun IMPORTANTNOTE A Position the canopy side on to the stroller frame place the canopy bracket o...

Page 11: ...ide of the stroller frame by pushing the canopy bracket onto the stroller frame until the bracket clasp fastens onto the frame D Pull the canopy up the stroller frame so the canopy brackets connect wi...

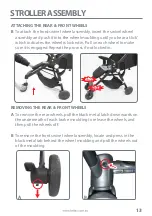
Page 12: ...Secure each side of the canopy back flap to the side of the stroller with the hook and loop tabs E E ATTACHING THE REAR FRONT WHEELS A To attach the rear wheels insert each wheel axle into the mouldin...

Page 13: ...ke sure it is engaged Repeat the process if not locked in ATTACHING THE REAR FRONT WHEELS REMOVING THE REAR FRONT WHEELS A To remove the rear wheels pull the black metal latch downwards on the underne...

Page 14: ...ENSURE YOUR CHILD IS SAFE A Pull the rain cover over extended canopy and push the back flap of rain cover through the handle opening B To secure the rain cover attach the hook and loop on the sides of...

Page 15: ...THE BRAKES A To lock the rear wheels press the red brake lever down until you hear a click Push the stroller back and forth to confirm the wheels are locked If not locked repeat this step B To unlock...

Page 16: ...his will minimise wheel wobble The swivel wheels should only be locked when the wheels are in the trailing position wheels under frame A To lock the front wheels into the fixed position press the swiv...

Page 17: ...to remove the child from the seat to allow you to raise or lower the backrest with ease A To adjust the backrest fold the canopy back flap up over the handle to gain access to the adjuster straps B To...

Page 18: ...18 STROLLEROPERATION C C Release lever B B Recline adjuster ADJUSTING THE BACKREST...

Page 19: ...O RESET LEG REST ADJUSTING THE LEG REST PLEASE NOTE There are three leg rest positions A To raise the leg rest to a higher position lift the leg rest until you reach the desired height As you reach ea...

Page 20: ...20 STROLLEROPERATION ADJUSTING THE LEG REST A B B 1 2 1 2 click...

Page 21: ...S THE ADJUSTED HARNESS SHOULD CLOSELY FIT THE CHILD NEVER LEAVE THE HARNESS BUCKLED WHEN NOT FITTED TO A CHILD IN THE STROLLER BECAUSE THE HARNESS CAN FORM LOOPS WHICH MAY POSE A STRANGULATION HAZARD...

Page 22: ...between legs Push the buckle tongues A on waist straps through the tongue guides B on shoulder straps B Hold the buckle tongue A on the waist strap tongue guides B on shoulder straps together Shoulder...

Page 23: ...ss in and hold the centre crotch buckle button and insert the waist buckle tongues into the crotch buckle assembly D Tighten or loosen the shoulder straps and crotch strap by sliding the 3 bar harness...

Page 24: ...while pulling the two waist tongues away from the buckle assembly 4 bar harness adjuster E Tighten or loosen the waist straps hold and lift the 4 bar harness adjuster and pull the harness strap to ad...

Page 25: ...the child The shoulder straps must be positioned near the child s shoulders To change the shoulder harness height push the shoulder harness tongue out of the current harness slot and through the back...

Page 26: ...STOP THE STROLLER ROLLING AWAY THE STROLLER IS DESIGNED FOR USE ON FLAT OR GENTLY SLOPING SURFACES AND MAY BE UNSTABLE ON HIGHER SLOPING AND UNEVEN SURFACES AND USERS SHOULD BE AWARE OF THE POSSIBILI...

Page 27: ...may wobble or oscillate when walking fast Locking the front swivel wheels will stop this The stroller can be taken up kerbs by either pressing down on the handles and raising the front wheels or turn...

Page 28: ...oto of this step IMPORTANTNOTES REMOVE THE CHILD FROM THE STROLLER BEFORE COMMENCING ANY FOLDING OPERATION FOLD THE STROLLER SLOWLY AND BE CAREFUL WHERE YOU PLACE YOUR HANDS WHEN FOLDING THE STROLLER...

Page 29: ...on the inside of each handle moulding at the same time and lower the handle down towards the backrest until a click is heard on both sides of the handle The handle should be folded flat against the b...

Page 30: ...up on the folding strap as shown by the arrow The stroller will now fold FOLDING THE STROLLER H Lock the frame with the storage latch H H G G PLEASE NOTE The stroller can be placed in the travel bag...

Page 31: ...ill need to remove the rear wheels Refer to Page 13 and the arm bar Refer to Page 8 After removing the wheels and arm bar place the stroller inside the travel bag and then pack the wheels and arm bar...

Page 32: ...SORIES IMPORTANTNOTES PLEASE REFER TO PAGE 4 FOR LIFTING TECHNIQUES A If the stroller is placed in the travel bag ensure you lift the travel bag by the handle When the stroller is not in the travel ba...

Page 33: ...33 NOTES...

Page 34: ...34 NOTES...

Page 35: ...ould and mildew To help prevent this occurring do not fold or store the product if it is damp or wet Always store the product in a well ventilated area When using your stroller at the beach completely...

Page 36: ...specifications color or design without any further notice The Steelcraft trademark is the property of Britax Childcare Pty Ltd Australia The Britax trademark is the property of Britax Childcare Holdi...

Reviews: