


ENGLISH
OPERATION MANUAL
JB SYSTEMS
®
3/5
BT-H2FOG
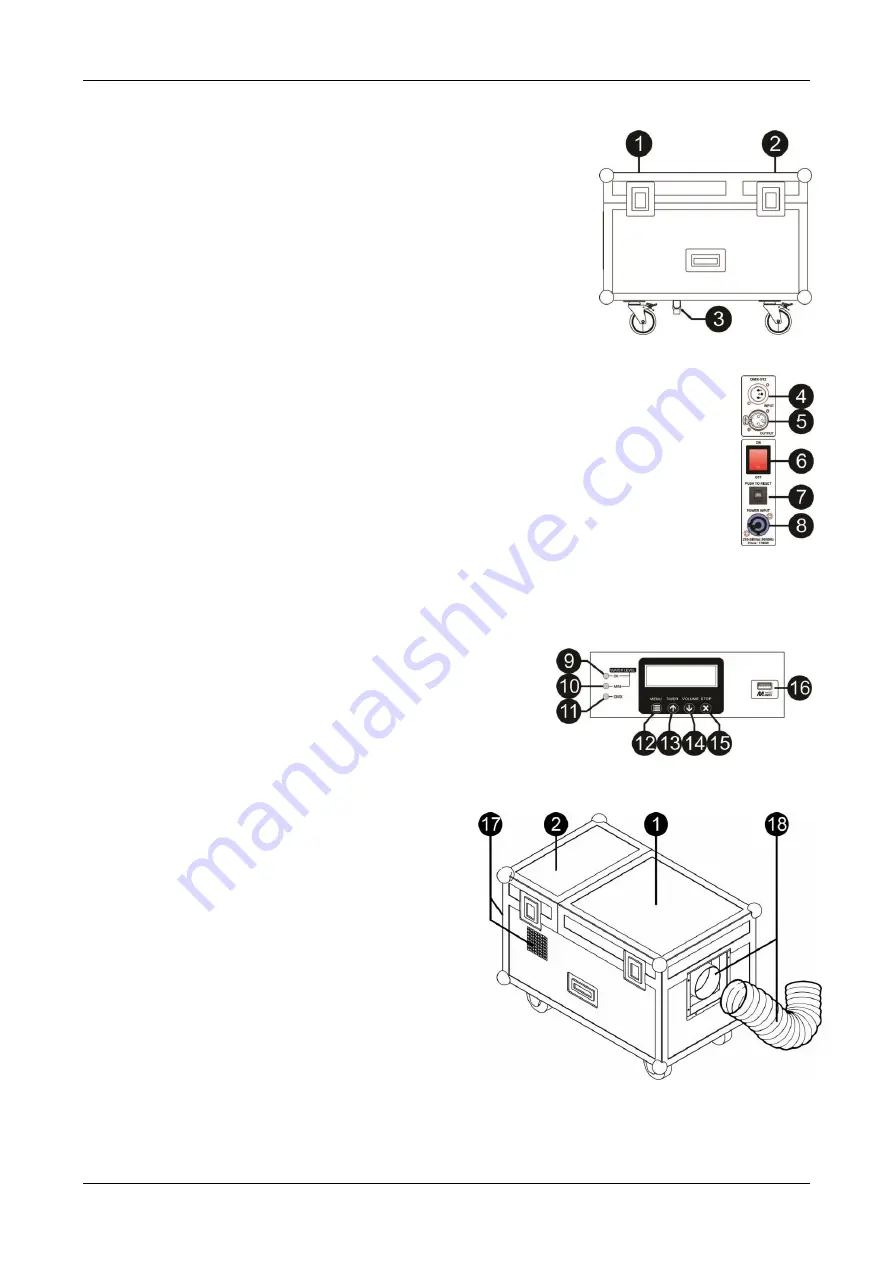
DESCRIPTION:
The BT-H2FOG comes in a flight case with an upper lid that can be opened
in 2 parts to have easy access to the 2 main compartments.
1. WATER TANK COMPARTMENT:
this is the big water tank where 2
powerful piezo elements are mounted on the bottom.
2. FOG FLUID + CONTROL COMPARTMENT:
here you can find:
•
Fog fluid tank
: The fog fluid tank should be filled up with standard
fog fluid. Attention: don
’t spill liquid in the container compartment; it
could seep through and damage the electronics.
•
Control panel:
used to set up the machine or control it manually,
see further.
3. WATER EVACUATION TAP:
used to drain the water tank. Don
’t forget
to close it when you fill up the tank
😊
4. DMX INPUT:
male 3pin XLR-connector used to connect the unit with the DMX controller or with the
previous unit in the DMX chain.
5. DMX OUTPUT:
female 3pin XLR-connector used to connect the unit with the next unit in the
DMX chain.
6. POWER SWITCH:
Used to switch the unit on/off.
7. AUTOMATIC CIRCUIT BREAKER:
if this beaker fails, please inspect the unit well before
you press the breaker to re-activate it again. If the problem occurs again, stop using the
machine and bring it in for technical repair.
8. MAINS INPUT:
connect the supplied PowerCON mains cable here. The cable should be
plugged in a mains wall socket with earth connection.
9. WATER LEVEL [OK] LED:
indicates there is still enough water in the water tank to run the
machine.
10. WATER LEVEL [MIN] LED:
indicates the water level in the tank is too low. The unit will stop working
until the tank is filled up again.
(PS: no need to add salt each time)
11. DMX LED:
this indicator is lit while a valid DMX-signal is detected. (wired or wireless DMX)
12. [MENU] Button:
used to browse the setup menu (see next chapter)
13. [TIMER/
▲] Button:
used to increase the value of the selected parameter or to activate the timer of the
unit. The fogger will work automatically.
14. [VOLUME/
▼] Button:
used to decrease the value of the
selected parameter or switch the output manually on.
15. [STOP] Button:
used to stop the timer or manual operation of
the fogger.
16. M-DMX INPUT:
Please note that this USB-connector is NOT
used for firmware updates or to connect the unit to a PC! Instead
this USB-connector makes it very easy to add wireless DMX to the unit! Just add the (optional) WTR-
DMX DONGLE from BRITEQ
®
and you will get wireless DMX! Moreover you will be able to connect other
DMX-controlled equipment to the DMX-output so you
can share the wireless DMX function with all
connected units! No extra settings to be made in the
setup menu, just follow the procedure in the user
manual supplied with the WTR-DMX DONGLE from
BRITEQ
®
. The separate WTR-DMX DONGLE is
available
from
(order code: 4645)
17. AIR INTAKE:
do not cover these air intakes. Make
sure they cannot soak up dirty or polluted air.
18. HOSE WITH FAST COUPLER:
the fogger comes
with an extendable PVC hose to evacuate the
produced low fog. The hose is fixed to the fogger
with a very easy
“twist and click” bayonet coupler.
Simply stretch the hose out and place it on the floor
so that the low fog can flow over the stage.


