//
07
//
08
© 2019 British Fires
//
8.0 INSTALLATION – OPTIONAL STOVE PIPE
///8.3 I INSTALLATION - FREESTANDING - FLUE PIPE - CONTINUED
// 16
© 2019 British Fires
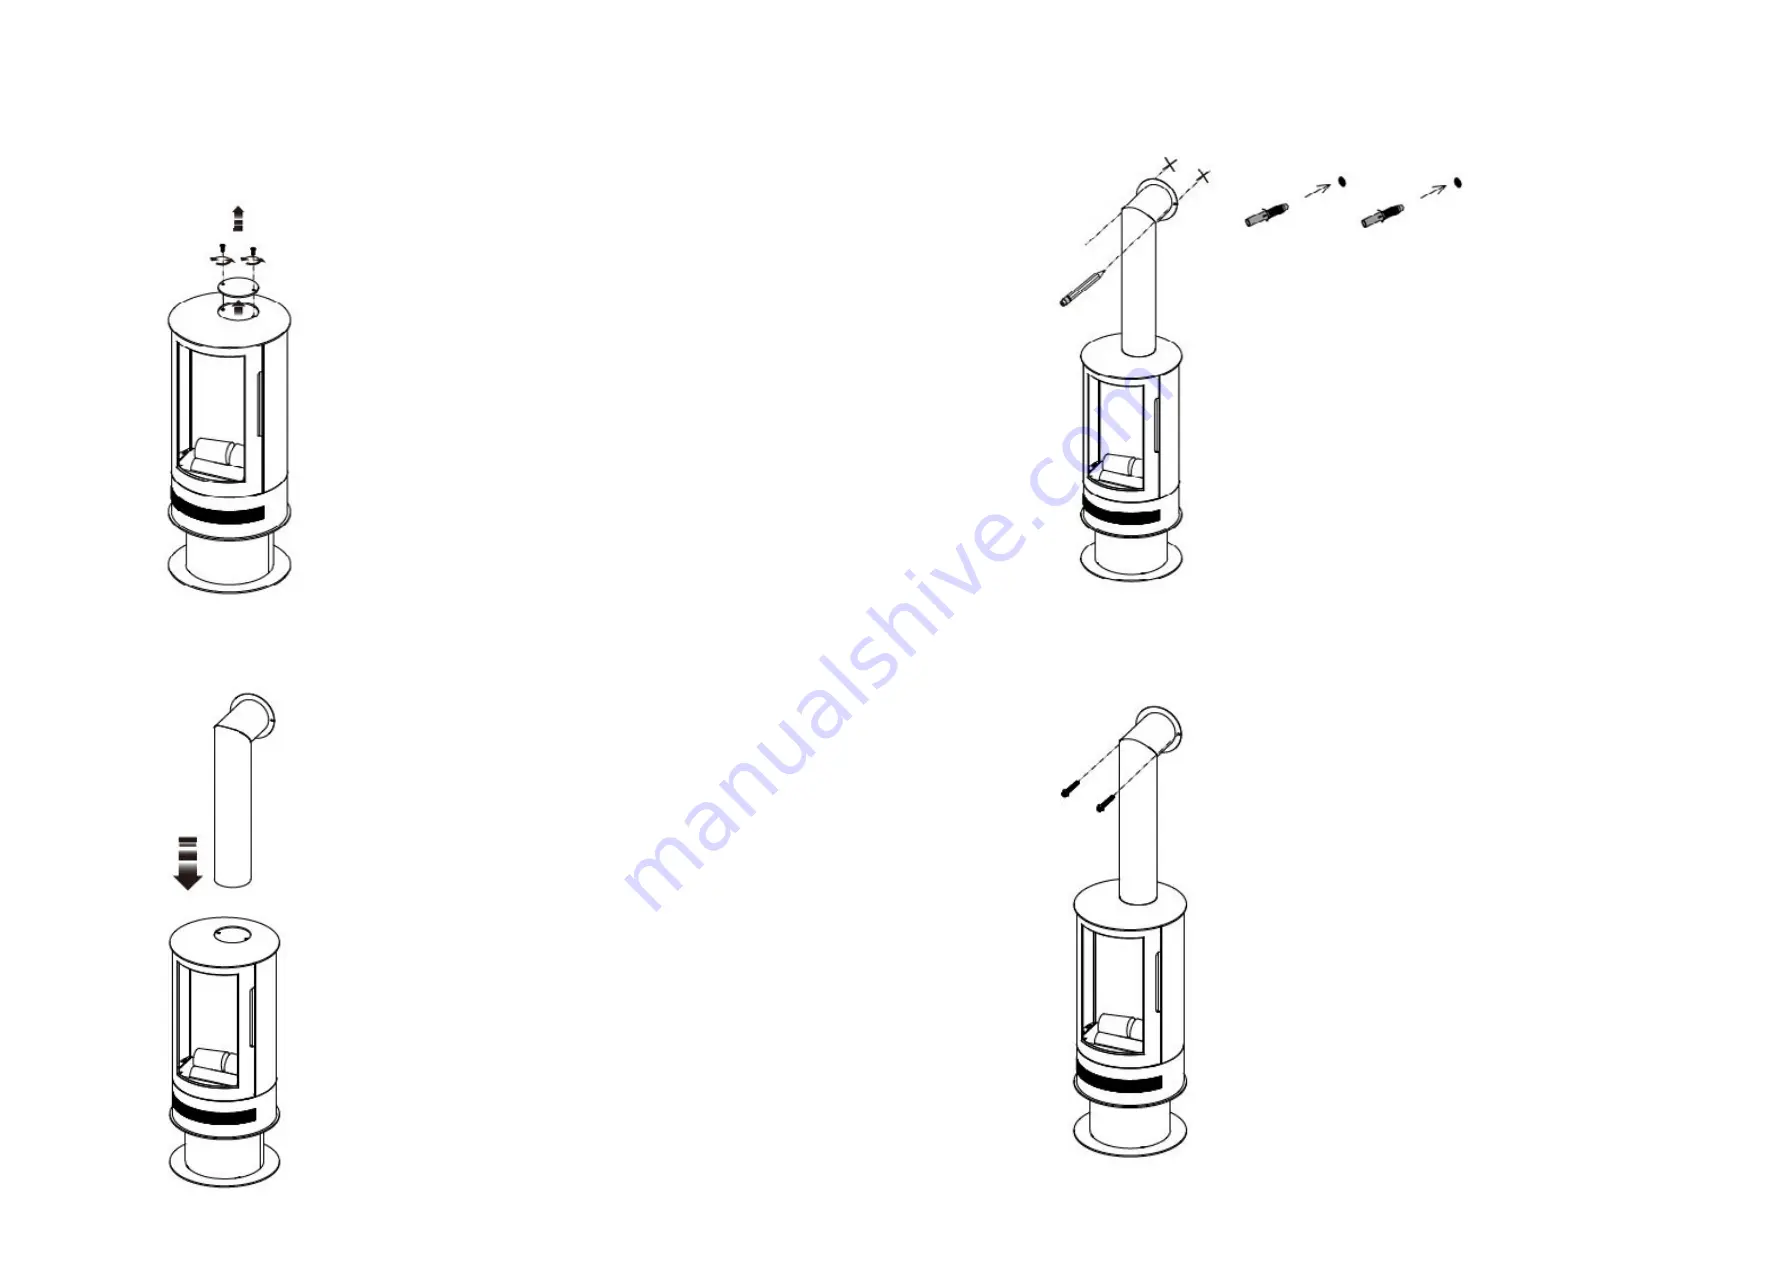
1. With a cross headed screw driver unscrew the 2x countersunk head
screws from the decorative grill plate on top of the appliance.
Carefully leaver the decorative grill plate off of the top of the
appliance through the screw holes.
2. Using 2x people, move the appliance to where you would like it to be
installed. Insert the small end of the Flue Pipe into the top recessed hole
on
the appliance
, also ensuring that the opposite flanged end of the pipe is
touching the wall.
//
16
© 2019 British Fires
//
/8.3 I INSTALLATION - FREESTANDING - FLUE PIPE - CONTINUED
4. Place the Flue Pipe back into its final position and secure the Flue Pipe to
the wall by fastenings provided into the wall anchors.
3. With a pencil, mark through the 2x holes at the top of the Flue Pipe
on the wall.
Remove the Flue Pipe and drill 2x holes using a 8mm drill bit, 40m deep.
(For hard wall installations only). For plasterboard walls use an alternative
fixing method shown in section 8.0.
Insert the wall anchors into the holes in the wall using a hammer.
//
16
©2019 Br
itish F
ires
/ /
/8.3 I INSTALLATION
- FREESTA
NDING
- FLUE
PIPE - CONTINUE
D
4.Place the Flue Pipe back into its final position and secure the
Flue Pipe to
the wall by fastenings provided into the wall anchors.
3.With a pencil, mark through the 2x holes at the top of the Flue
Pipe
on the wall.
Remove the Flue Pipe and drill 2x holes using a 8mm drill bit, 40m deep.
(For hard wall installations only). For plasterboard walls use an alternative
fixing method
shown in section 8.0.
Insert the wall anchors into the holes in the wall using a hammer.
//
16
© 2019 British Fires
//
/8.3 I INSTALLATION - FREESTANDING - FLUE PIPE - CONTINUED
4. Place the Flue Pipe back into its final position and secure the Flue Pipe to
the wall by fastenings provided into the wall anchors.
3. With a pencil, mark through the 2x holes at the top of the Flue Pipe
on the wall.
Remove the Flue Pipe and drill 2x holes using a 8mm drill bit, 40m deep.
(For hard wall installations only). For plasterboard walls use an alternative
fixing method shown in section 8.0.
Insert the wall anchors into the holes in the wall using a hammer.
1.
With a cross headed screw driver
unscrew the two (2) countersunk
head screws from the decorative
grill plate on top of the appliance.
Carefully leaver the decorative grill
plate off of the top of the appliance
through the screw holes.
3.
With a pencil, mark through the two
(2) holes at the top of the Flue Pipe
on the wall. Remove the Flue Pipe
and drill two holes using a 8mm
drill bit, 40m deep. (For hard wall
installations only). For plasterboard
walls use an alternative fixing method
shown in section 8.0. Insert the wall
anchors into the holes in the wall
using a hammer.
2.
Using two (2) people, move the
appliance to where you would like it
to be installed. Insert the small end
of the Flue Pipe into the top recessed
hole on the appliance, also ensuring
that the opposite flanged end of the
pipe is touching the wall.
4.
Place the Flue Pipe back into its final
position and secure the Flue Pipe to
the wall by fastenings provided into
the wall anchors.


