//
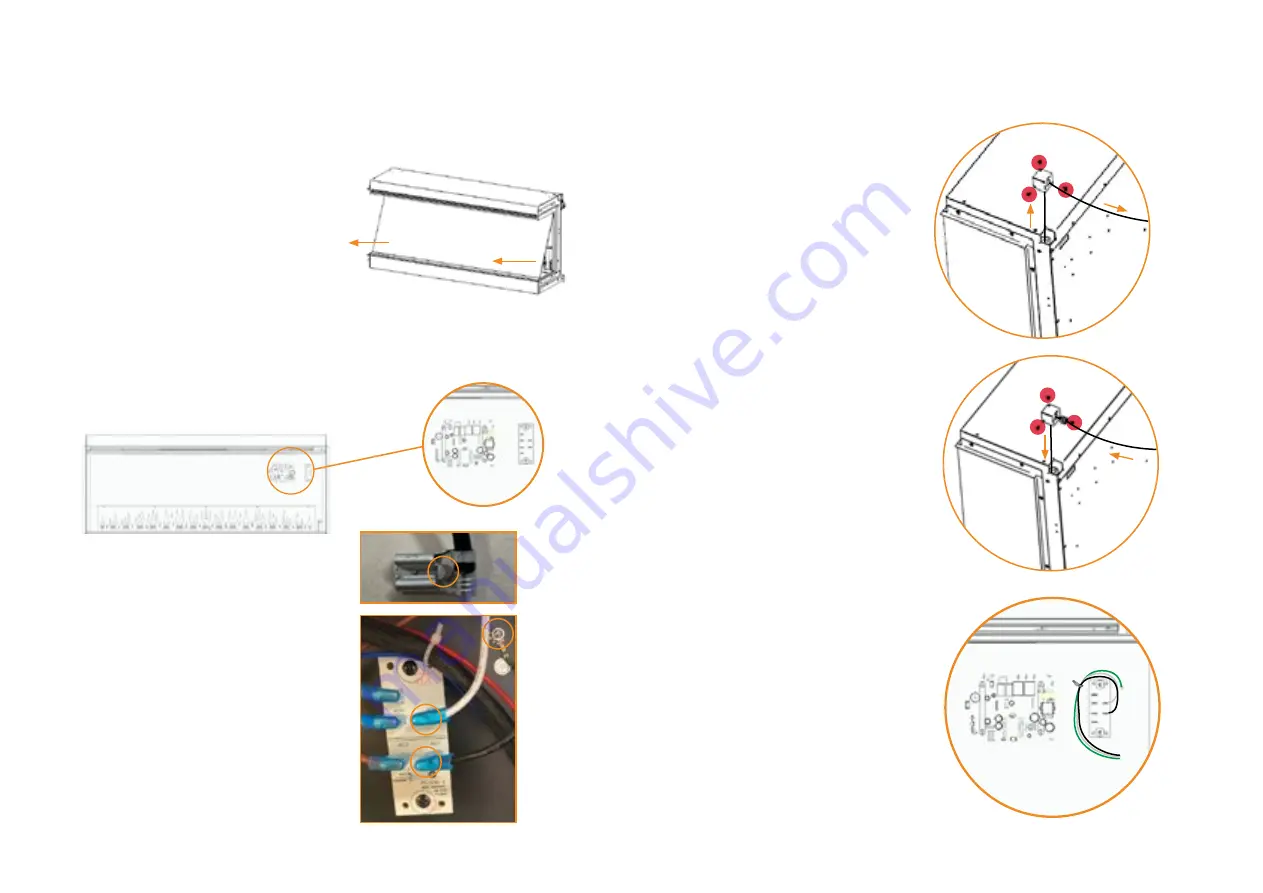
8.3 HARD WIRING THE APPLIANCE
8)
Carefully remove the rear glass
from the rear of the appliance
by gently pulling the glass towards
you at the bottom 3 in. (76 mm)
then down and out to release
and then place the glass safely
to one side.
9)
The wiring connections are readily
accessible.
10)
To remove the two (2x) spade
connectors from the PCB
carefully push the tab down on
the connector to release, this
can be done with a pair of pliers
or a flathead screw driver. Use
a
9
/
32
in. (7 mm) nut driver/
spanner to remove the Earth
cable from the Earth stud on the
rear of the appliance, ensure not
to lose the
5
/
32
in. (4 mm) nut and
the serrated washers.
11)
Remove the three (3x) screws
from the corner bracket back on
to the rear right hand side of the
appliance. Pull the inlet power
cable through the top rear of the
appliance. Dispose of power cable
responsibly.
12)
Insert the hard wire from the
property through the spare cable
gland and corner bracket from the
hard wiring kit in the packaging,
insert the cable to the correct
length inside the appliance then
tighten the cable gland and insert
the three (3x) screws securing
the corner bracket into position
13)
Insert the hardwire cable set
supplied onto the PCB board.
With the black wire on the Live
terminal, the white wire on the
neutral terminal and the green
wire on the Earth stud on the rear
of the firebox with the serrated
washers in between. Check all
connections are good and confirm
they are all on correctly.
//
11
Summary of Contents for EF40-63B
Page 1: ... 2022 British Fires NEW FOREST ELECTRIC 48 63 FIREPLACES INSTALLATION USER INSTRUCTIONS EN ...
Page 2: ... ii WELCOME TO BRITISH FIRES ...
Page 27: ... 24 2022 British Fires ...
Page 29: ... 26 2022 British Fires ...
Page 31: ...Three Diamond Light color settings 28 2022 British Fires ...
Page 43: ... 40 2022 British Fires ...
Page 46: ... 43 ...
Page 47: ... 44 2022 British Fires ...


