background image

www.brizo.com

2

All parts and finishes of the Brizo

®

 faucet are 

warranted to the original consumer purchaser to 

be free from defects in material & workmanship 

for as long as the original consumer purchaser 

owns their home. Delta Faucet Company 

recommends using a professional plumber for  

all installation & repair.
Delta


will replace, FREE OF CHARGE,  

during the warranty period, any part or finish  

that proves defective in material and/or  

workmanship under normal installation, use  

and service. Replacement parts may be  

obtained by calling 1-877-345-BRIZO (2749)  

(in the U.S. and Canada) or by writing to:
In the United States:         

Delta  Faucet Company       

Product Service 


55 E. 111th Street 


Indianapolis, IN 46280       


In Canada:

Masco Canada Limited, Plumbing Group 

350 South Edgeware Road,

St. Thomas, Ontario, Canada N5P 4L1
This warranty is extensive in that it covers 

replacement of all defective parts and even finish, 

but these are the only two things that are 

covered. LABOR CHARGES AND/OR DAMAGE 

INCURRED IN INSTALLATION, REPAIR, OR 

REPLACEMENT AS WELL AS ANY OTHER 

Lifetime Faucet and Finish Limited Warranty

KIND OF LOSS OR DAMAGES ARE 

EXCLUDED. Proof of purchase (original sales 

receipt) from the original consumer purchaser 

must be made available to Delta for all warranty 

claims. THIS IS THE EXCLUSIVE WARRANTY 

BY DELTA FAUCET COMPANY, WHICH DOES 

NOT MAKE ANY OTHER WARRANTY OF ANY 

KIND, INCLUDING THE IMPLIED WARRANTY  

OF MERCHANTABILITY.
This warranty excludes all industrial, commercial 

& business usage, whose purchasers are hereby 

extended a five year limited warranty from the 

date of purchase, with all other terms of this  

warranty applying except the duration of the  

warranty. This warranty is applicable to Brizo

®


faucets manufactured after January 1, 1995.
Some states/provinces do not allow the exclusion 

or limitation of incidental or consequential  

damages, so the above limitation or exclusion 

may not apply to you. Any damage to this faucet 

as a result of misuse, abuse, or neglect, or any 

use of other than genuine Delta

®

 replacement 

parts WILL VOID THE WARRANTY. 
This warranty gives you specific legal rights, and 

you may also have other rights which vary from 

state/province to state/province. It applies only for 

Brizo

®

 faucets installed in the United States of 

America, Canada, and Mexico.

© 2013 Masco Corporation of Indiana

Cleaning and Care  

Care should be given to the cleaning 

of this product. Although its finish is 

extremely durable, it can be damaged by 

harsh abrasives or polish. To clean, simply 

wipe gently with a damp cloth and blot dry 

with a soft towel.

Summary of Contents for Charlotte T60085

Page 1: ...se adjustments please refer to page 6 and if still uncertain call us at 1 877 345 BRIZO 2749 After installation and adjustment you must affix your name company name and the date you adjusted the temperature knob to the caution label provided and apply or attach the label to the back side of the closest cabinet door and the warning label to the water heater Leave this Instruction Sheet for the owne...

Page 2: ...the original consumer purchaser must be made available to Delta for all warranty claims THIS IS THE EXCLUSIVE WARRANTY BY DELTA FAUCET COMPANY WHICH DOES NOT MAKE ANY OTHER WARRANTY OF ANY KIND INCLUDING THE IMPLIED WARRANTY OF MERCHANTABILITY This warranty excludes all industrial commercial business usage whose purchasers are hereby extended a five year limited warranty from the date of purchase ...

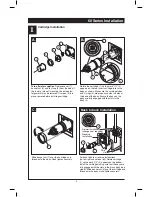
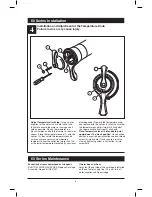
Page 3: ...roperly seated in holes at the base of the body Ensure the keys on the body are fully engaged with the slots in the body 4 For back to back or reverse installations hot on right and cold on left Rotate cartridge 1 so the word UP 2 appears on the bottom Install the cartridge making sure that the keys are fully engaged with the slots in the brass body see step B Slide bonnet nut 3 over the cartridge...

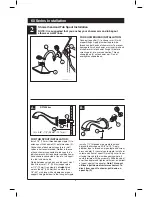
Page 4: ...threaded pipe nipple to extend beyond the finished wall 3 8 to 1 2 Apply plumber tape to thread on pipe nipple and screw brass adapter 1 securely onto nipple Install set screw on bottom of spout 2 making sure it is not sticking through to the inside opening where it could interfere with the assembly Slide tub spout over the adapter and tighten set screw on bottom of spout against the adapter Note ...

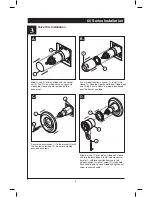
Page 5: ...roperly positioned over the front of cartridge Secure the escutcheon 1 to the bracket 2 with the 2 screws provided 3 Do not overtighten escutcheon screws Slide trim ring 1 over the cartridge and sleeve and into the escutcheon Install volume control handle 2 with lever pointed downward to 6 o clock position Install set screw 3 into handle Push handle onto valve cartridge and tighten set screw to se...

Page 6: ...ted by your local plumbing code Remove the temperature knob and replace onto the splines 2 making sure that the temperature knob limit stop 3 hits against the volume handle limit stop 4 as shown Note Temperature lever is intended to point upward near 12 o clock position Once desired position is acquired per instructions above thread screw 5 into handle 1 and secure it to valve stem by tightening s...

Page 7: ... 877 345 BRIZO 2749 Después de hacer la instalación y el ajuste usted puede agregarle a la etiqueta de aviso proporcionada su nombre el nombre de la compañía y la fecha cuando ajustó y el pomo para la temperatura y aplicar o fijar la etiqueta al dorso de la puerta del gabinete más cercano y la etiqueta de aviso al calentador de agua Deje la Hoja de Instrucciones para referencia del dueño usuario A...

Page 8: ...mprador consumidor original debe de ser disponible a Delta para todos los reclamos ESTA ES LA GARANTÍA EXCLUSIVA DE DELTA FAUCET COMPANY QUE NO HACE CUALQUIER OTRA GARANTÍA DE CUALQUIER TIPO INCLUYENDO LA GARANTÍA IMPLÍCITA DE COMERCIALIZACIÓN Esta garantía excluye todo uso industrial comercial y de negocio a cuyos compradores se les da una garantía limitada extendida de cinco años desde la fecha ...

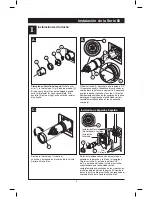
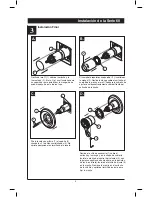
Page 9: ...os agujeros en la base del cuerpo Asegúrese que los dentados estén completamente encajados en las muescas del cuerpo 4 En las instalaciones dorso con dorso el agua caliente en la derecha y la fría en la izquierda Gire el cartucho 1 así que la palabra UP de 2 aparece en el fondo Instale el cartucho asegurándose que los dentados estén completamente enganchados en las muescas en el cuerpo de bronce v...

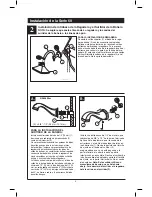
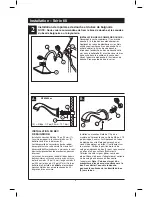
Page 10: ...ctadas en lugar de un tubo de salida de bañera a una válvula de bañera regadera La tubería entre el cuerpo de la válvula y el tubo de salida de la bañera debe ser de tubo de cobre de un mínimo de 1 2 13 mm o tubo de hierro de 1 2 13 mm en caída recta no menos de 8 203 mm pero no más de 18 457 mm de largo con sólo un codo de 90 de hierro o cobre a la entrerrosca del tubo de salida de agua 1 3 3 3 8...

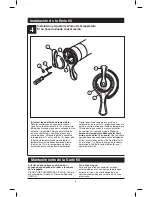
Page 11: ...requiere un separador 1 insértelo en la manga 2 Deslice la manga sobre el cartucho el cuerpo de la pieza y el aro O Asegure la cubierta de ajuste se coloca correctamente sobre el frente del cartucho de la ducha 2 1 Deslice el anillo de accesorio 1 sobre el cartucho y la manga y en la chapa de cubierta Instale la manija del control del volumen 2 con la palanca apuntando hacia abajo en la posición d...

Page 12: ...s 2 asegurándose que la perilla o control del tope del límite de temperatura 3 queda situada contra la manija del control de volumen 4 como se muestra Nota la palanca de temperatura debe señalar hacia arriba cerca de las 12 en punto Una vez que la posición deseada se adquiere como establecida en las instrucciones arriba atornille el tornillo 5 en el mango 1 y fíjelo a la espiga de la válvula apret...

Page 13: ...77 345 BRIZO 2749 Après avoir terminé l installation et le réglage vous devez inscrire sur l étiquette de mise en garde fournie votre nom le nom de votre entreprise et la date à laquelle vous avez réglé le bouton de température puis fixer l étiquette à l endos de la porte de la coiffeuse Vous devez également fixer l étiquette d avertissement au chauffe eau Veuillez laisser ce feuillet d instructio...

Page 14: ...u de la présente garantie doit être adressée à Delta accompagnée de la preuve d achat original de la facture du premier acheteur CETTE GARANTIE EST LA SEULE OFFERTE PAR DELTA FAUCET COMPANY OU DELTA FAUCET CANADA SELON LE CAS ELLE EXCLUT TOUTE AUTRE GARANTIE Y COMPRIS LA GARANTIE IMPLICITE DE QUALITÉ MARCHANDE Les robinets installés dans un établissement industriel ou commercial ou dans une place ...

Page 15: ...lés dans les orifices à la base du corps Assurez vous que les ergots sont parfaitement engagés dans les rainures du corps 4 Dans le cas d une installation dos à dos ou inversée eau chaude à droite et eau froide à gauche Tournez la cartouche 1 de sorte que le mot UP 2 se trouve sur le dessus Installez la cartouche en vous assurant que les ergots sont introduits entièrement dans les rainures du corp...

Page 16: ...ets aux deux extrémités du bras de douche Pour éviter d abîmer le fini du bras de douche introduisez l extrémité du bras de douche côté mur dans la collerette 3 avant de visser le bras de douche dans le raccord du tuyau vertical Vissez la pomme de douche 4 sur le bras de douche Prenez garde de trop la serrer 1 3 3 3 8 po 1 2 po 9 5 mm 12 7 mm 2 RP62605s A B 1 2 3 Installez un manchon fileté de 1 2...

Page 17: ...t correctement placé au dessus de l avant de la cartouche de douche Fixez la rosace 1 sur le support 2 à l aide des 2 vis fournies 3 Prenez garde de serrer les vis de la rosace excessivement 3 Installation des pièces de finition 1 2 2 1 2 3 Installation Série 60 1 Glissez l anneau de finition 1 sur la cartouche et le manchon puis dans la plaque de finition Montez la manette de la commande de débit...

Page 18: ...re et replacez les sur les cannelures 2 en vous assurant que la butée de température maximale 3 s appuie contre la butée de la manette de débit 4 comme le montre la figure Note La manette de température est conçue pour être orientée vers le haut à la position 12 heures Après avoir réglé les éléments conformément aux instructions qui précèdent vissez la vis 5 dans la manette 1 et fixez la manette à...

Page 19: ...RP49089s Trim Ring Aro de accesorio Anneau décoratif RP23336 O Ring Anillo O Joint Torique RP70906 Handle Assembly Set Screw Ensamble de la Manija y Tornillo de Ajuste Poignée et Vis de Calage RP70907 Temperature Knob Screw Button Perilla de la Temperatura Tornillo y Botone Poigneé de Réglage de Température Vis et bouton RP70916 Set Screw Allen Wrench Tornillos de Ajuste y Llaves Hexagonales Vis d...

Page 20: ...Delta Faucet Company Product Service 55 E 111th Street Indianapolis IN 46280 ...

Reviews: