background image

RB80C 

„


RB110C Installation Guide

Page 5

3

4

1

2

New Construction Installation

5

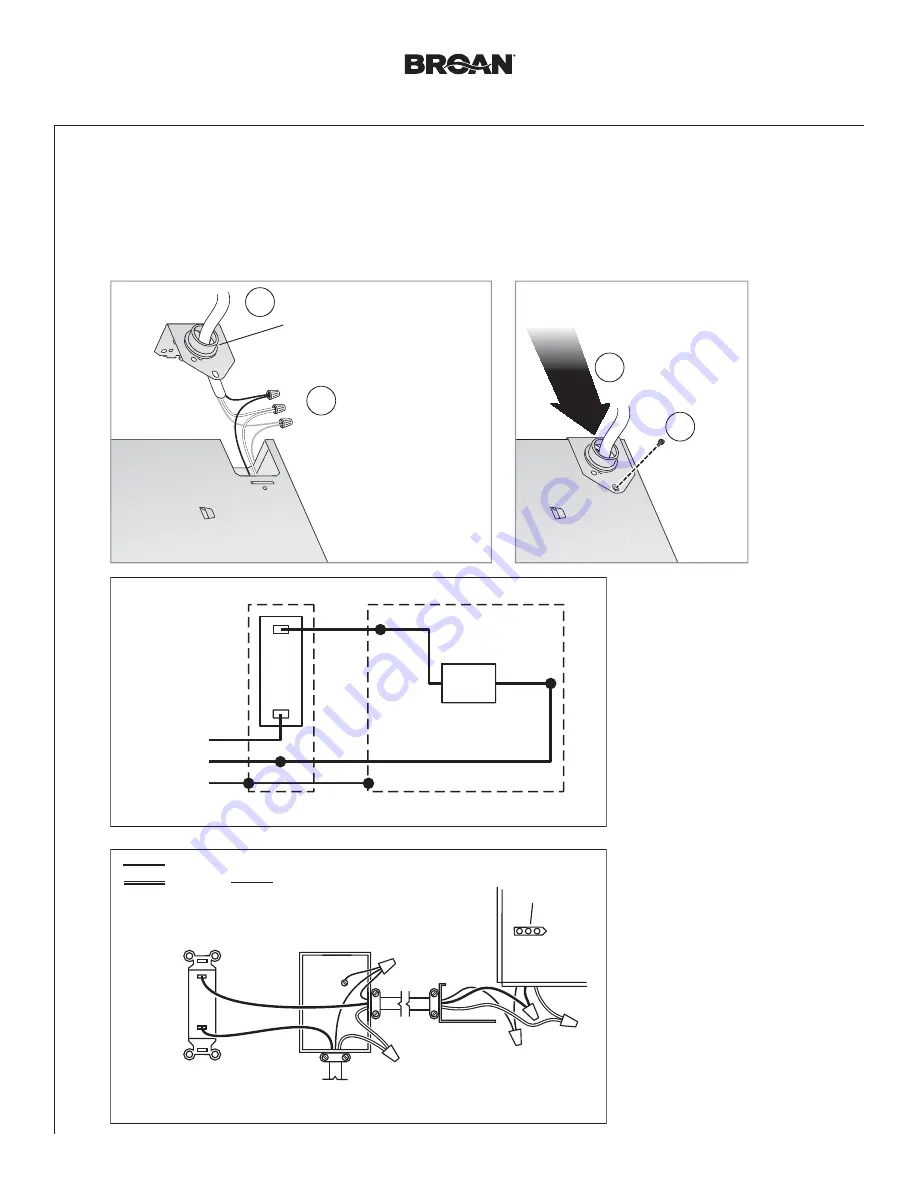
  Connect Wires and Install Knockout Plate

•  Run 120VAC electrical wiring to the installation location. 

•  Use proper UL-approved connectors to secure wiring to the Knockout Plate provided in Parts Bag. 

•  Connect wires as shown in wiring diagram. 

Screw from 

Parts Bag

Attach cable clamp to Knockout

Plate. Knockout Plate mounts to

outside of Housing and may be

oriented as desired.

Connect wires

LINE

IN

GRD

WHT

BLK

GRD

WHT

BLK

BLK

ON/OFF

SWITCH

(purchase separately)

FAN

WHT

UNIT

SWITCH BOX

KNOCKOUT

PLATE

RECEPTACLE

120 VAC LINE IN

SWITCH BOX

BLACK

WHITE

GROUND (green or bare)

ON/OFF

SWITCH

Summary of Contents for RB110C

Page 1: ...ide with homeowner Register your product online at www broan ca register Easy installation in both new construction and retrofit Table of Contents Warnings and Cautions 2 Typical Installation 2 New Construction Installation 3 Retrofit Installation 7 Operation 12 Cleaning and Maintenance 12 Troubleshooting 12 Service Parts 13 Warranty 13 2014 Broan NuTone LLC ...

Page 2: ... do not damage electrical wiring and other hidden utilities 6 Ducted fans must always be vented to the outdoors 7 If this unit is to be installed over a tub or shower it must be marked as appropriate for the application and be connected to a GFCI Ground Fault Circuit Interrupter protected branch circuit 8 Use an on off switch to operate this ventilator Use of speed controls may cause a motor hummi...

Page 3: ... with a Phillips bit Phillips screwdriver Flathead screwdriver Pliers Wire insulation stripper Wire cutter Materials needed 4 round metal ducting recommended for best performance Use of other ducting is acceptable but may impact performance Roof cap or wall cap built in damper recommended Tape to seal duct connections Electrical wiring and supplies per local code requirements 1 Remove Packaging 2 ...

Page 4: ...nge Transition and Ducting Position Housing between joists and crimp channel on both sides of Mounting Frame to lock Housing in place Do not crimp Housing Screws from Parts Bag Top and bottom flanges go outside Housing Insert tab into slot inside Housing Screw from Parts Bag Flange Tape Tape 4 Ducting snap Transition Attach Muffler Align ...

Page 5: ...ng to the Knockout Plate provided in Parts Bag Connect wires as shown in wiring diagram Screw from Parts Bag Attach cable clamp to Knockout Plate Knockout Plate mounts to outside of Housing and may be oriented as desired Connect wires LINE IN GRD WHT BLK GRD WHT BLK BLK ON OFF SWITCH purchase separately FAN WHT UNIT SWITCH BOX KNOCKOUT PLATE RECEPTACLE 120 VAC LINE IN SWITCH BOX BLACK WHITE GROUND...

Page 6: ...ation 6 Insert Mask and Finish Ceiling 7 Install Grille See Page 12 for Operation Cleaning and Maintenance and Troubleshooting Mask protects unit during construction Remove before installing Grille Tape Mask into Housing Install ceiling material Cut out around Housing ...

Page 7: ...xisting wiring to make sure it is not damaged If any damage is found DO NOT CONTINUE INSTALLATION of this product Contact a qualified person s for repair Remove Instruction Sheet Punch out Mask from packaging See Step 12 1 Remove Packaging 2 Switch Off Power 4 Examine Wiring 3 Enlarge Ceiling Opening and Remove Existing Fan Ruler Pencil Drywall saw Claw hammer or pry bar Utility knife Materials ne...

Page 8: ... 4 5 1 2 3 2 Retrofit Installation 5 Remove Blower Assembly 6 Remove Wiring Panel 7 Insert Mounting Frame Both sides Set aside Blower Assembly Set aside Wiring Panel Set aside screw Bend up four tabs Remove screws from Mounting Frame and set aside ...

Page 9: ...ews set aside in Step 7 Pull existing wiring into Housing as it is inserted into Mounting Frame Pull existing ductwork into Housing Insert tab into slot inside Housing 10 Attach Flange Transition and Ducting 8 Secure Mounting Frame 9 Snap in Housing snap Tape Tape Transition 4 Ducting Flange Align ...

Page 10: ...o inside of Housing and may be oriented as desired Connect wires Screw set aside in Step 6 Use proper UL approved connectors to secure wiring to the Knockout Plate provided in Parts Bag Connect wires as shown in wiring diagram LINE IN GRD WHT BLK GRD WHT BLK BLK ON OFF SWITCH purchase separately FAN WHT UNIT SWITCH BOX KNOCKOUT PLATE RECEPTACLE 120 VAC LINE IN SWITCH BOX BLACK WHITE GROUND green o...

Page 11: ...etrofit Installation 12 Insert and Secure Blower Assembly and Muffler 13 Install Grille Screws from Parts Bag Attach Muffler If ceiling repairs are needed tape Mask into Housing See New Construction Installation Step 6 Remove Mask before installing Grille ...

Page 12: ...nterior of unit with a dusting brush attachment The Motor is permanently lubricated and never needs oiling If the motor bearings are making excessive or unusual noises replace the Motor Troubleshooting Symptom The fan does not run Check for an open fuse or circuit breaker in the building s service panel Check that the plug in connection for the Motor is seated firmly in place Check that the Blower...

Page 13: ...at has been moved from its original point of installation f damage caused by environmental or natural elements g damage in transit h natural wear of finish i Fans in commercial or nonresidential use or j damage caused by fire flood or other act of God This warranty covers only Fans sold in Canada or through Canadian distributors authorized by Broan EXCLUSION OF DAMAGES BROAN S OBLIGATION TO PROVID...

Page 14: ...RB80C RB110C Installation Guide Page 14 99045229A ...

Reviews: