background image

MODEL  SPK110

Page 3

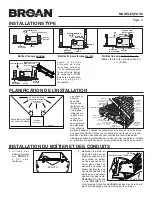
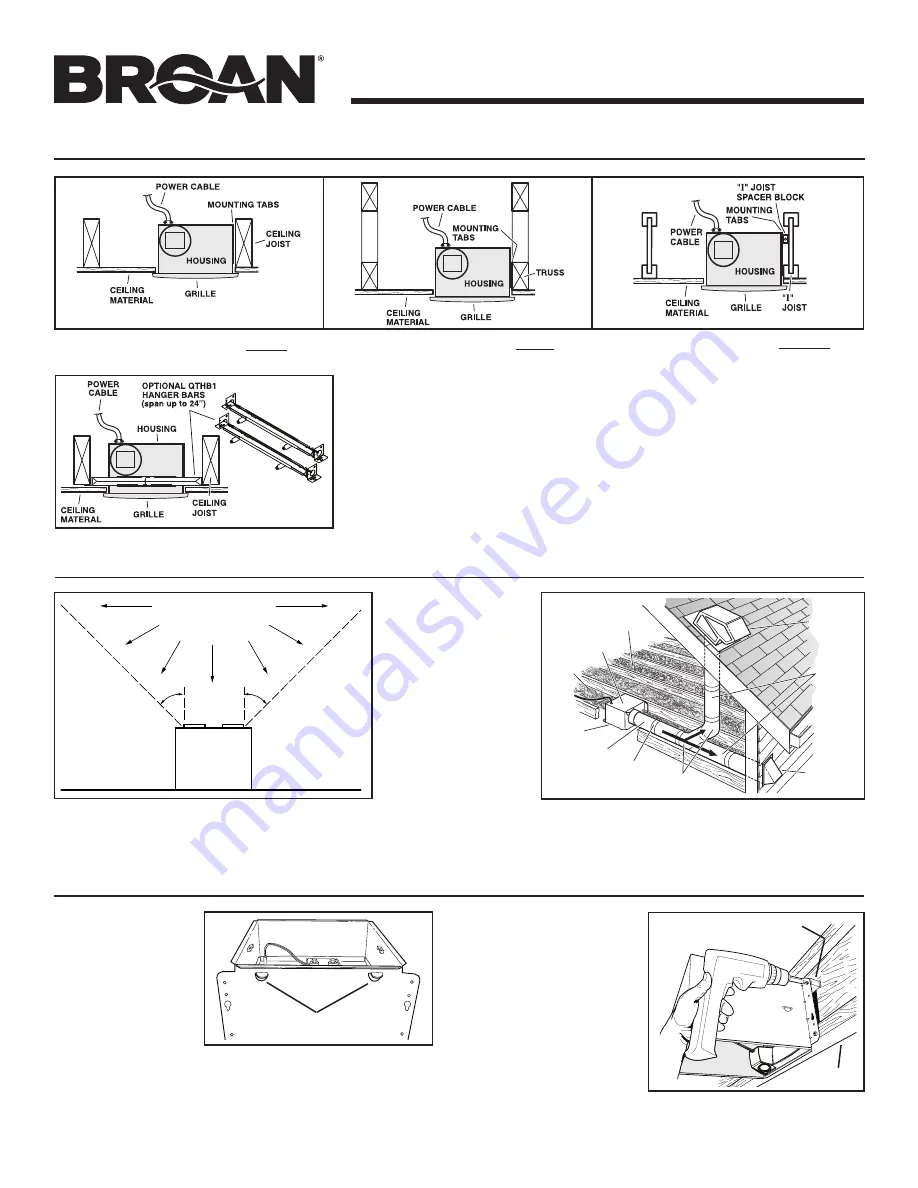
INSTALL HOUSING & DUCT

1.  Use a pliers to 

b e n d   h o u s i n g 

TABS

 out to 90

0

.

2.  Hold housing in place 

so that the housing 

t a b s   c o n t a c t   t h e 

bottom of the joist. 

The housing mounts 

with four (4) screws 

or nails. Screw or 

nail housing to joist 

through lowest holes 

in each mounting 

flange,  then through 

highest holes. NOTE: 

Mounting to 

I-JOIST


(shown) requires use of 

SPACERS

 (included) between the 

highest hole of each mounting flange and the I-joist.

SPACER

(use for mounting to I-Joist)

I-JOIST

TABS

PLAN THE INSTALLATION

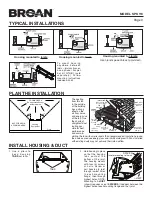
Cooking

Equipment

Floor

COOKING AREA

Do not install above or

inside this area.

45

o

45

o

NOT FOR USE IN

A COOKING AREA.

ROOF CAP*

(with built-in

damper)

WALL CAP*

(with built-in

damper)

4-IN. ROUND

ELBOWS*

4-IN. ROUND

DUCT*

FAN

HOUSING

Seal gaps

around

housing.

Seal duct

joints with

tape.

Keep duct

runs short.

INSULATION

(Place around and

over fan housing.)

POWER

CABLE*

*Purchase

separately.

OR

TYPICAL INSTALLATIONS

Housing mounted to I-joists.


Use I-joist spacer block (provided).

Housing mounted to joists.

Housing mounted to truss.

To   m o u n t   h o u s i n g 

a ny w h e re   b e t we e n 

joists, i-joists or trusses, 

use optional hanger 

bar kit QTHB1 (sold 

separately). Follow 

mounting instructions 

included with kit.

The ducting 

from this fan 

to the outside 

of the building 

has a strong 

effect on the 

air flow, noise 

and energy use 

of the fan. Use 

the shortest, 

straightest duct 

routing pos-

sible for best 

performance, 

and avoid in-

stalling the fan with smaller ducts than recommended. Insulation around 

the ducts can reduce energy loss and inhibit mold growth. Fans installed 

with existing ducts may not achieve their rated airflow.

Summary of Contents for SPK110 SPEAKER FAN

Page 1: ... unit with the dusting brush attachment Be careful vacuuming around speakers The motor is permanently lubricated and never needs oiling If the motor bearings are making excessive or unusual noises replace the blower assembly includes motor and impeller OPERATION Use an on off switch to operate this ventilator Do not use a solid state speed control with this Speaker Fan See Connect Wiring for detai...

Page 2: ...possible 5 Turn 8 32 X 5 8 SCREWS partially installed in Step 2 until they make contact with FAN PARTITION PLATE Alternately tighten both screws DO NOT OVERTIGHTEN NOTE Screws are designed to raise and tighten speaker bracket against motor bracket Screw heads may or may not contact speaker bracket when tight 6 Insert SPEAKER PLUG into power receptacle where motor plug was disconnected 7 Connect FA...

Page 3: ... 4 IN ROUND ELBOWS 4 IN ROUND DUCT FAN HOUSING Seal gaps around housing Seal duct joints with tape Keep duct runs short INSULATION Place around and over fan housing POWER CABLE Purchase separately OR TYPICAL INSTALLATIONS Housing mounted to I joists Use I joist spacer block provided Housing mounted to joists Housing mounted to truss To mount housing anywhere bet ween joists i joists or trusses use...

Page 4: ...gle TAB on the motor plate located next to the receptacle Push up near motor plate tab while pushing out on side of housing Or insert a straight blade screwdriver into slot in housing next to tab and twist screwdriver SERVICE NOTES 4 Connect 4 inch round ductwork to damper duct connector Run ductwork to a roof cap or wall cap Tape all ductwork connections to make them secure and air tight To remov...

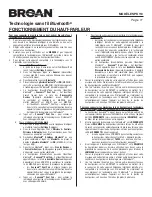
Page 5: ...less technology enabled Phone Tablet or Pad device to set it to search for Bluetooth wireless technology accessories ii Most Bluetooth wireless technology enabled devices will require you to go to the Paired Devices or similar screen and SELECT Search for Devices or something similar iii The Broan NuTone Speaker has the Bluetooth identifier Sensonic Vent Fan This identifier should show up in the l...

Page 6: ...of the Limited Warranty Remedy During the applicable limited warranty period the Company will at its option provide replacement parts for or repair or replace without charge any Product or part thereof to the extent the Company finds it to be covered by and in breach of this limited warranty under normal use and service The Company will ship the repaired or replaced Product or replacement parts to...

Page 7: ...qu une durabilité et une apparence supérieures abaissez ou enlevez la grille et nettoyez l intérieur de l appareil avec un aspirateur muni d une brosse à épousseter Prenez garde de ne pas abîmer les haut parleurs avec l aspirateur Le moteur est lubrifié en permanence et n a pas besoin d être huilé Si les roulements du moteur sont anormalement bruyants remplacez l ensemble de ventilateur incluant l...

Page 8: ...32 X 5 8 PO installées partiellement à l étape 2 jusqu à ce qu elles touchent à la PLAQUE DE SÉPARATION DU VENTILATEUR Serrez alternativement les deux vis NE LES SERREZ PAS TROP REMARQUE Ces vis sont conçues pour relever et maintenir le support de haut parleur contre le support du moteur Les têtes de vis peuvent ou non toucher au support de haut parleur une fois serrées 6 Insérez la FICHE DU HAUT ...

Page 9: ... t i e r n impor te où entre les solives solives en I ou les fermes avec l ensemble de barres de suspension QTHB1 Suivez les instructions a c c o m p a g n a n t l ensemble FIL D ALIMENTATION BARRES DE SUSPENSION QTHB1 EN OPTION jusqu à 61 cm 24 po BOÎTIER SOLIVE DU PLAFOND GRILLE MATÉRIAU DU PLAFOND CAPUCHON DE TOIT avec clapet intégré CAPUCHON MURAL avec clapet intégré COUDES RONDS DE 10 CM 4 PO...

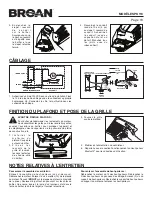
Page 10: ...z le clapet raccord d e c o n d u i t sur le boîtier Assurez vous que le haut du raccord est à égalité avec le boîtier et que le clapet retombe fermé 4 Raccordez le conduit rond de 10 cm 4 po au clapet raccord de conduit Acheminez le conduit jusqu au capuchon mural ou de toit Étanchez tous les joints avec du ruban adhésif Pour enlever l ensemble de haut parleurs Débranchez le moteur du fil des hau...

Page 11: ...luetooth i Suivez les instructions qui accompagnent votre téléphone intelligent tablette ou autre appareil compatible à la technologie sans fil Bluetooth et réglez le pour qu il recherche les accessoires à technologie sans fil Bluetooth ii La plupart des appareils compatibles à la technologie sans fil Bluetooth exigeront que vous alliez à l écran des Appareils jumelés ou tout écran semblable et qu...

Page 12: ...hoix fournir des pièces de rechange ou réparer ou remplacer sans frais tout produit ou toute pièce dans la mesure où la Société constate qu il est couvert et contrevient à la présente garantie limitée dans des conditions normales d utilisation et de service La Société vous enverra gratuitement le produit réparé ou remplacé ou les pièces de rechange Vous êtes responsable des frais de démontage de r...

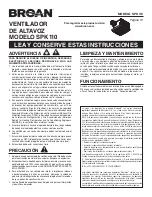
Page 13: ...MPIEZAY MANTENIMIENTO Para lograr un funcionamiento silencioso y eficiente así como también una larga vida y una apariencia atractiva del producto baje o retire la rejilla y aspire el interior de la unidad con el accesorio del cepillo para sacudir polvo Tenga cuidado cuando aspire cerca de los altavoces El motor está permanentemente lubricado y nunca necesitará ponerle aceite Si los cojinetes del ...

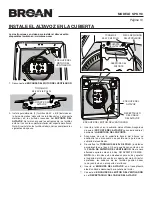
Page 14: ...alados parcialmente en el paso 2 hasta que hagan contacto con la PLACA DE DIVISIÓN DEL VENTILADOR De manera alternada apriete ambos tornillos NO APRIETE DE MÁS NOTA Los tornillos están diseñados para subir y apretar el soporte del altavoz contra el soporte del motor Al estar apretadas las cabezas de los tornillos podrían hacer o no contacto con el soporte del altavoz 6 Inserte el ENCHUFE DEL ALTAV...

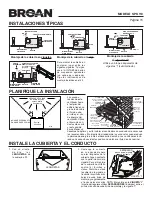
Page 15: ...ilador CABLE ELÉCTRICO Se compra por separado O INSTALACIONES TÍPICAS Montaje de la cubierta en viguetas I Utilice un bloque separador de viguetas I suministrado Montaje de la cubierta en viguetas Montaje de la cubierta a la viga Para montar la cubierta en cualquier lugar entre las viguetas viguetas I o vigas use el kit QTHB1 de barras de suspensión opcionales se vende por separado Siga las instru...

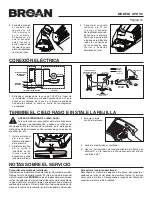
Page 16: ...d u c t o en la cubierta Asegúrese de que el conector esté al ras con la parte superior de la cubierta y que la aleta del regulador se cierre al caer 4 Conecte el conducto redondo de 10 cm 4 pulg al conector del regulador conducto Extienda el conducto hacia una tapa de techo o tapa de pared Encinte todas las conexiones de los conductos para fijarlas y hacerlas herméticas al aire Para quitar el con...

Page 17: ... todos los demás dispositivos habilitados con tecnología inalámbrica Bluetooth i Siga las instrucciones incluidas con su teléfono o tableta habilitada con tecnología inalámbrica Bluetooth para configurarla para que busque accesorios con Bluetooth ii La mayoría de los dispositivos Bluetooth le pedirán que vaya a la pantalla Paired Devices Dispositivos acoplados o similar y que SELECCIONE Search for...

Page 18: ...tía limitada aplicable la Compañía a su opción suministrará piezas de repuesto o reparará o reemplazará sin cargo alguno cualquier Producto o pieza del mismo hasta el grado en que la Compañía lo encuentre cubierto bajo esta garantía limitada y en incumplimiento de la misma en condiciones normales de uso y servicio La Compañía le enviará el Producto reparado o reemplazado o las piezas de repuesto s...

Page 19: ...MODEL MODÈLE MODELO SPK110 Page Página 19 ...

Page 20: ...n 2 10 99420665 Thumbscrew 8 18 x 375 Vis à oreilles n 8 18 x 0 375 Tornillo de apriete manual 8 18 x 0 375 11 SPKACC Speaker Haut parleur Altavoz 97019751 Parts Bag Assembly use 2 8 32 x 5 8 screws discard short screws and bracket Sachet de pièces utiliser les deux vis n 8 32 x 5 8 po jeter les vis courtes et le support Conjunto de la bolsa de piezas use 2 tornillos 8 32 x 5 8 pulg descarte los t...

Reviews: