


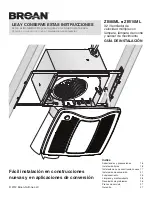

ZB80ML
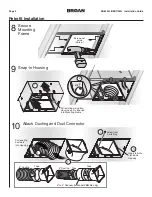
n
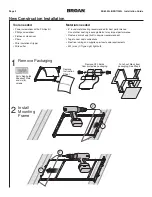
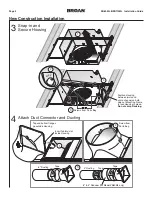
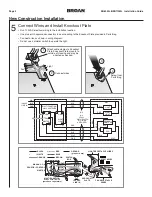
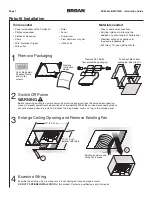
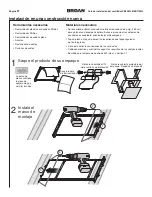
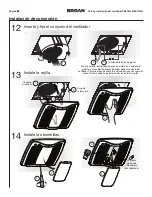
ZB110ML Installation Guide
Page 13
Warranty
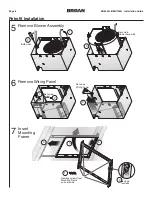
8
7
11
1
3
9
10
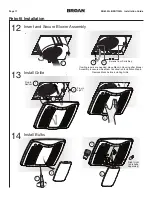
12
14
2
13
4
6
5
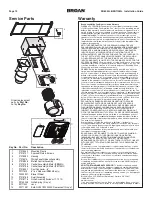
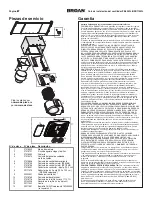
Service Parts
Order replacement
parts by
Part No.
,
not by
Key No.
Key No. Part No.
Description
1
97018349
Mounting Frame
2
97018721
Knockout Plate & Screws
3
97018382 Housing
4
97018474
Wiring Panel/Harness Assembly
5
97018846
Motion Control Assembly
6
97018758
Control Assembly & Motor (ZB80ML)
97018756
Control Assembly & Motor (ZB110ML)
7
97018331
Duct Connector - 6"
8
99111513
6” to 4” Reducer (ZB80ML only)
9
99020301
Blower Wheel
10
97018768
Scroll Assembly
11
97018776
Grille Assembly
(includes 11, 12, 13)
12
99140208
Grille Spring
(2 req’d)
13
99111542 Lens
14
99271381
Bulb, GU24 18W 3500K Fluorescent
(2 req’d)
Broan Ventilation Fan/Lights Limited Warranty
WARRANTY PERIOD: Broan warrants to the original consumer purchaser
of its Broan Ventilation Fan/Light (the “Fan”) that your Fan (excluding lamps/
bulbs) will be materially free from defects in materials or workmanship for a
period of three (3) years from the date of original purchase. The warranty on
the lamps/bulbs provided with the Fan is one (1) year and does not cover
lamp/bulb breakage. This warranty does not cover accessories, such as
speed controls, that may be purchased separately and installed with the Fan.
The limited warranty period for replacement parts, and for Fans repaired or
replaced under this limited warranty, shall continue for the remainder of the
original warranty period.
NO OTHER WARRANTIES: THE FOREGOING WARRANTIES ARE
EXCLUSIVE AND IN LIEU OF ANY OTHER WARRANTIES, EXPRESS OR
IMPLIED. BROAN DISCLAIMS AND EXCLUDES ALL OTHER EXPRESS
WARRANTIES, AND DISCLAIMS AND EXCLUDES ALL WARRANTIES
IMPLIED BY LAW, INCLUDING WITHOUT LIMITATION THOSE OF
MERCHANTABILITY AND FITNESS FOR A PARTICULAR PURPOSE. TO
THE EXTENT THAT APPLICABLE LAW PROHIBITS THE EXCLUSION
OF IMPLIED WARRANTIES, THE DURATION OF ANY APPLICABLE
IMPLIED WARRANTY IS LIMITED TO THE PERIOD SPECIFIED FOR THE
EXPRESS WARRANTY. Some states do not allow limitations on how long an
implied warranty lasts, so the above limitation may not apply to you. Any oral
or written description of the Fan is for the sole purpose of identifying it and
shall not be construed as an express warranty.
REMEDY: During the applicable limited warranty period, Broan will, at its
option, provide replacement parts for, or repair or replace, without charge,
any Fan or part thereof, to the extent Broan finds it to be covered by and in
breach of this limited warranty. Broan will ship the repaired or replaced Fan
or replacement parts to you at no charge. You are responsible for all costs
for removal, reinstallation and shipping, insurance or other freight charges
incurred in the shipment of the Fan or part to Broan. This warranty does not
cover (a) normal maintenance and service, (b) normal wear and tear, (c) any
Fans or parts which have been subject to misuse, abuse, abnormal usage,
negligence, accident, improper or insufficient maintenance, storage or repair
(other than repair by Broan), (d) damage caused by faulty installation, or
installation or use contrary to recommendations or instructions, (e) any Fan
that has been moved from its original point of installation, (f) damage caused
by environmental or natural elements, (g) damage in transit, (h) natural wear
of finish, (i) Fans in commercial or nonresidential use, or (j) damage caused
by fire, flood or other act of God. This warranty covers only Fans sold in the
United States or through U.S. distributors authorized by Broan.
EXCLUSION OF DAMAGES: BROAN’S OBLIGATION TO PROVIDE
REPLACEMENT PARTS, OR REPAIR OR REPLACE, AT BROAN’S
OPTION, SHALL BE YOUR SOLE AND EXCLUSIVE REMEDY UNDER
THIS LIMITED WARRANTY AND BROAN’S SOLE AND EXCLUSIVE
OBLIGATION. BROAN SHALL NOT BE LIABLE FOR INCIDENTAL,
INDIRECT, CONSEQUENTIAL OR SPECIAL DAMAGES ARISING OUT
OF OR IN CONNECTION WITH THE FAN, ITS USE OR PERFORMANCE.
Incidental damages include but are not limited to such damages as loss of
time and loss of use. Consequential damages include but are not limited to
the cost of repairing or replacing other property which was damaged if the
Fan does not work properly.
Some states do not allow the exclusion or limitation of incidental or
consequential damages, so the above limitation or exclusion may not apply
to you. This warranty gives you specific legal rights, and you may also have
other rights, which vary from state to state.
This warranty supersedes all prior warranties and is not transferable from
the original consumer purchaser.
BROAN SHALL NOT BE LIABLE TO YOU, OR TO ANYONE CLAIMING
UNDER YOU, FOR ANY OTHER OBLIGATIONS OR LIABILITIES,
INCLUDING, BUT NOT LIMITED TO, OBLIGATIONS OR LIABILITIES
ARISING OUT OF BREACH OF CONTRACT OR WARRANTY,
NEGLIGENCE OR OTHER TORT OR ANY THEORY OF STRICT LIABILITY,
WITH RESPECT TO THE FAN OR BROAN’S ACTS OR OMISSIONS OR
OTHERWISE.
This warranty covers only replacement or repair of defective Fans or parts
thereof at Broan’s main facility and does not include the cost of field service
travel and living expenses.
Any assistance Broan provides to or procures for you outside the terms,
limitations or exclusions of this limited warranty will not constitute a waiver
of such terms, limitations or exclusions, nor will such assistance extend or
revive the warranty.
Broan will not reimburse you for any expenses incurred by you in repairing
or replacing any defective Fan, except for those incurred with Broan’s prior
written permission.
HOW TO OBTAIN WARRANTY SERVICE:
To qualify for warranty service,
you must (a) notify Broan at the address or telephone number stated below
within seven (7) days of discovering the covered defect, (b) give the model
number and part identification and (c) describe the nature of any defect in
the Fan or part. At the time of requesting warranty service, you must present
evidence of the original purchase date.
Broan-NuTone LLC, 926 West State Street, Hartford, WI 53027
(1-800-637-1453)
www.broan.com
If you must send the Fan or part to Broan, as instructed by Broan, you must
properly pack the Fan or part—Broan is not responsible for damage in transit.


