3-11
11. Tighten compression nut (25).
12. Reconnect red and yellow wires (23).
13. Replace controller, front panel and
condensate pan.
14. Replace capillary guard (18).
15. Return cooking oil to cooking well.
16. See CALIBRATION.
17. Cook a load and check for leaks.
18. Tighten compression nut (25) if neces-
sary.
Replacement 2400E:
1. See ACCESS FOR SERVICE.
2. Disconnect probe (23) wires.
3. OPEN cover. Drain cooking oil from
cooking well. Close drain valve.
4. Remove capillary guard (18) inside of
cooking well.
5. Remove basket guide (27) inside of
cooking well.
6. Slide item (27) off of Temperature Sen-
sor probe (28). Note where probe bend
is located. Placement is important.
7. Loosen compression nut (25).
8. Remove fitting (26) from reducer fitting
(20).
9. Remove reducer fitting (20) from out-
side of the cooking well.
10. Carefully pull probe out of cooking
well.
11. Install new probe in the same location
as old probe. Slide guide (27) onto
probe and assemble noting dimen-
sions for locating probe (28). See Fig.1
below.
broaster.com Manual #15460 8/02 Rev 7/14
Summary of Contents for 2004E
Page 2: ......
Page 8: ......
Page 12: ......
Page 21: ...2 9 MODEL 2400GH DOMESTIC MODEL 2400GHXP EXPORT broaster com Manual 15460 8 02 Rev 7 14 ...
Page 22: ...2 10 MODEL 2400GHCE EU broaster com Manual 15460 8 02 Rev 7 14 1 2 2 1 2 1 ...
Page 44: ......
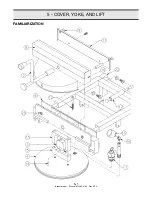
Page 45: ...5 COVER YOKE AND LIFT 5 1 FAMILIARIZATION broaster com Manual 15460 8 02 Rev 9 14 ...
Page 54: ......
Page 81: ...9 9 This page intentionally left blank broaster com Manual 15460 8 02 Rev 3 16 ...
Page 87: ...broaster com Manual 15460 8 02 SERVICE NOTES ...
Page 88: ...broaster com Manual 15460 8 02 SERVICE NOTES ...
Page 89: ...broaster com Manual 15460 8 02 SERVICE NOTES ...
Page 90: ......
Page 91: ......
Page 92: ...Broaster Company 2855 Cranston Road Beloit WI 53511 3991 608 365 0193 broaster com ...


