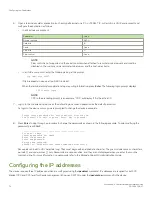
6. Open a terminal emulator application (such as HyperTerminal on a PC, or TERM, TIP, or Kermit in a UNIX environment), and
configure the application as follows:
•
In a Windows environment:
Parameter
Value
Bits per second
9600
Data bits
8
Parity
None
Stop bits
1
Flow control
None
NOTE
Flow control is not supported on the serial consoles when attached to remote terminal servers and must be
disabled on the customer-side remote terminal server and the host-side clients.
•
In a UNIX environment, enter the following string at the prompt:
tip /dev/ttyb -9600
If ttyb is already in use, use ttya -9600 instead.
When the terminal emulator application stops reporting information, press
Enter
. The following login prompt displays:
CP0 Console Login:
NOTE
CP0 in the preceding prompt is an example. "CP1" will display if it is the active CP.
7. Log in to the console using
admin
as the default login name and
password
as the default password.
As login to the device occurs, you are prompted to change the device passwords.
Please change passwords for switch default accounts now.
Use Control-C to exit or press 'Enter' key to proceed.
8. Press
Enter
to step through a procedure to change the passwords as shown in the following example. To skip modifying the
password, press
Ctrl+C
.
-----------------------------------------------------
for user - admin
Changing password for admin
Enter old password:
Enter new password:
Re-type new password:
passwd: all authentication tokens updated successfully
Passwords can be 8 to 40 characters long. They must begin with an alphabetic character. They can include numeric characters,
periods (.), and underscores (_) only. Passwords are case-sensitive, and they are not displayed when you enter them on the
command line. For more information on passwords, refer to the
Brocade Fabric OS Administration Guide
.
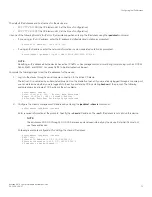
Configuring the IP addresses
The device requires three IP addresses, which are configured using the
ipaddrset
command. IP addresses are required for both CP
blades (CP0 and CP1) and for chassis management (shown as SWITCH under the
ipaddrshow
command) in the device.
Configuring the IP addresses
Brocade X6-4 Director Hardware Installation Guide
74
53-1004106-07
Summary of Contents for X6-4
Page 12: ...Brocade X6 4 Director Hardware Installation Guide 12 53 1004106 07...
Page 20: ...Brocade X6 4 Director Hardware Installation Guide 20 53 1004106 07...
Page 28: ...Brocade X6 4 Director Hardware Installation Guide 28 53 1004106 07...
Page 64: ...Brocade X6 4 Director Hardware Installation Guide 64 53 1004106 07...
Page 86: ...Brocade X6 4 Director Hardware Installation Guide 86 53 1004106 07...
Page 102: ...Brocade X6 4 Director Hardware Installation Guide 102 53 1004106 07...
Page 130: ...Brocade X6 4 Director Hardware Installation Guide 130 53 1004106 07...
Page 140: ...Brocade X6 4 Director Hardware Installation Guide 140 53 1004106 07...
Page 166: ...Brocade X6 4 Director Hardware Installation Guide 166 53 1004106 07...
Page 196: ...Brocade X6 4 Director Hardware Installation Guide 196 53 1004106 07...
Page 200: ...Brocade X6 4 Director Hardware Installation Guide 200 53 1004106 07...
Page 204: ...Brocade X6 4 Director Hardware Installation Guide 204 53 1004106 07...
Page 210: ...Brocade X6 4 Director Hardware Installation Guide 210 53 1004106 07...
Page 224: ...Brocade X6 4 Director Hardware Installation Guide 224 53 1004106 07...
Page 238: ...Brocade X6 4 Director Hardware Installation Guide 238 53 1004106 07...


