GSS2520JAN
Instruction Manual
Guide d’utilisation
17
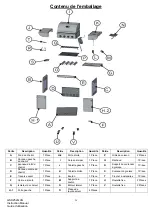
REPLACEMENT PARTS LIST
For replacement parts, call our customer service department at 1-855-630-5390, 7 A..M – 4 P.M., EST, Monday- Friday.
REF# DESCRIPTION QTY
REF#
DESCRIPTION
QTY
REF#
DESCRIPTION
QTY
1 LID
1pc 20
HEAT PLATE FRONT
SUPPORT
1pc
39
CART LEFT PANEL
1pc
2 LID
HANDLE
1pc 21
HEAT PLATE BACK
SUPPORT
1pc 40
CART RIGHT PANEL
1pc
3 LID
PIN
2pcs 22 HEAT PLATE
4pcs
41
CART BACK PANEL
1pc
4 HANDLE
SEAT
2pcs 23 TOOL HOOK
1pc
42
CART FRONT BEAM
1pc
5 SIDE
BURNER
ELECTRODE 1pc 24 FIREBOX LEFT WALL
1pc
43
CART DOOR
2pcs
6 IGNITION
CABLE
1pc 25 FIREBOX RIGHT WALL
1pc
44
SIDE BURNER
1pc
7 CUSHION
2pcs 26 GREASE CUP SUPPORT
1pc
45
SIDE BURNER GRATE
1pc
8 HANDLE
CAP
2pcs 27 KNOB
5pcs
46
DOOR HANDLE
2pcs
9 PIN
2pcs 28 SIDE BURNER VALVE
1pc
47
DOOR HANDLE CAP
4pcs
10 THERMOMETER
1pc 29 COOKING GRATE
2pcs
48
DOOR LATCH BASE
1pc
11 FIREBOX
BACK
PANEL
1pc 30 WARMING RACK
1pc
49
SWIVEL LOCKING
CASTER
2pcs
12
FIREBOX FRONT PANEL
1pc 31
MAIN VALVE
1pc
50
RIGID CASTER
2pcs
13
FIREBOX LEFT PANEL
1pc 32
GAS HOSE
1pc
51
DOOR LATCH
4pcs
14
FIREBOX RIGHT PANEL
1pc 33
NATURAL GAS HOSE
1pc
52
SIDE BURNER FRAME
1pc
15
FIREBOX UPPER BACK
PANEL
1pc 34
LIGHTING ROD
1pc 53
LEFT SIDE TABLE
1pc
16
GREASE PAN
1pc 35
BEZEL
5pcs 54
RIGHT SIDE TABLE
1pc
17
HEAT INSULATOR
1pc 36
GREASE CUP
1pc 55
SIDE BURNER LID
1pc
18
CONTROL PANEL
1pc
37
MAIN BURNER
4pcs
19
BURNER SUPPORT
1pc
38
CART BOTTOM PANEL
1pc
Irregular flame.
Inside of lid is peeling – like
paint peeling.
Flashback [fire in burner tubes].
Flare-up.
Persistent grease fire.
Grease build up.
Excessive fat in meat.
Excessive cooking temperature.
Grease trapped by food build up
around burner system.
Clean grill.
Trim fat from meat before grilling
.
Adjust (lower) temperature accordingly.
Turn knobs to OFF. Turn gas OFF with
natural gas valve.
Leave lid in closed
position and let fire burn out. After grill cools,
remove and clean all parts.
Burner and/or burner tubes are locked
.
Clean burner and/or burner tube(s).
The lid is stainless steel, not painted.
Baked on grease build up has turned to
carbon and is flaking off. Clean thoroughly.
Air flow is not correct. Correct flame
blue with yellow tips, 1-2” high. Too
little air: wavy yellow or orange flames.
Too much air: noise blue flames.
If flames are yellow or orange – open flap at
the end of the venturi tubes in
1/8 in. increments until flames are
correct.
If flames are blue and noisy – close flap at
the end of the venturi tubes in
1/8 in. increments until flames are
correct.
*Natural Gas Models must be open a
minimum of 1/16 in.


