background image


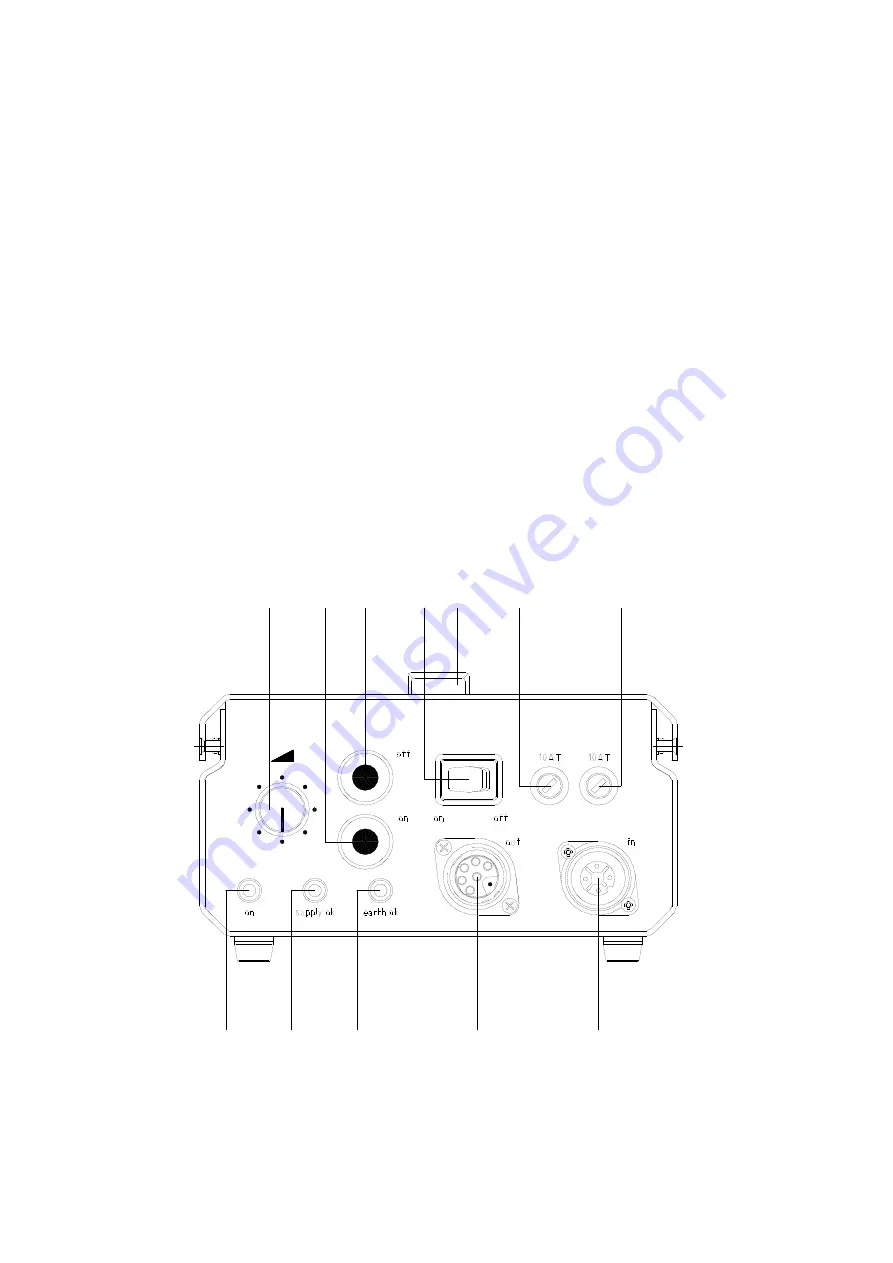
Bedienungs- und Anzeigeelemente 
Elektronisches Vorschaltgerät HMI 575.800 

 
1. 

 Netzschalter 

2. 

Taste “aus“ (off) 

3. 

Taste “ein“ (on) 

4. 

Leistungsregler (Dimmer) 

5. 

LED (grün) für Betriebskontrolle “on“ 

6. 

LED (rot) für Netzkontrolle ”supply ok“ 

7. 

LED (gelb) für Schutzleiter-Kontrolle “earth ok“ 

8. 

Buchse für Leuchtenstecker 

9. 

Buchse für Netzkabel 

10. 

Sicherung 1 

11. 

Sicherung 2 

12. 

Handgriff 


4

1

12

11

10

2

9

8

5

6

7

3


Summary of Contents for HMI 575.800

Page 1: ...Operating instructions Bedienungsanleitung Mode d emploi HMI 575 800 www broncolor com ...

Page 2: ...s them on to further users if necessary Observe the safety instructions Contents page Important safety instructions 2 Read before starting up the ballast unit 2 Controls and displays 4 Electronic ballast unit HMI 575 800 4 Controls and displays 5 Lamp base HMI F575 800 5 1 Application area HMI 575 800 6 2 Starting up 6 3 Power regulation 7 4 LED displays 8 5 Lamp base HMI F575 800 8 6 Protection 9...

Page 3: ...source 5 Close supervision is necessary when any lamp is used near children Do not leave lamp unattended while in use 6 The lamp base and the accessories mounted onto the lamp may heat up to high temperatures so please handle with care 7 Do not operate units with a damaged cable or if they have dropped or damaged until they have been examined by a qualified serviceperson 8 Position the cable so th...

Page 4: ...t unit in water or other liquids 16 Lamp bases and ballast units are not suitable for application in wet or explosion hazard environments 17 Protect the ballast unit and the lamp base from water and from excessive exposure to dust Avoid operating with wet hands 18 To reduce the risk of electric shock do not open this appliance but take it to a qualified service person when service or repair work i...

Page 5: ...75 800 1 Mains switch 2 off switch 3 on switch 4 Power regulator dimmer 5 LED green operation control on 6 LED red mains control supply ok 7 LED yellow earth conductor monitoring earth on 8 Lamp plug socket 9 Mains cable socket 10 Fuse 1 11 Fuse 2 12 Grip ...

Page 6: ...ase HMI F575 800 1 Mains switch on off 2 Change over switch 575 W 800 W 3 Rotary knob for focusing 4 Locking slider 5 Bayonet connection with automatic locking 6 Counter reflector screws 7 Daylight lamp 8 Lamp cable 9 Locking lever ...

Page 7: ...ile hot making waiting time unnecessary For safety reasons the high ignition voltages required for this purpose must have a faultless earth conductor the function of which can be checked with the aid of the earth monitoring lamp earth ok 7 For this reason the ballast unit must always be connected to the power supply with an earthed mains plug 1 Adjust with a coin or a screw driver the desired powe...

Page 8: ...essary in order to prolong the service life of the lamp The heat up process should always be carried out on full power Attention If the HMI MSR lamp cannot be triggered the ballast unit stops the trigger process after about 1 5 s A new attempt to trigger can be initiated by first pressing the red off 2 and then the green on 3 keys After 10 attempts the unit will block the trigger circuit for about...

Page 9: ...it in the ballast unit and or in the lamp base e Technical failure If the red LED flashes the ballast unit switches off automatically For safety reasons the unit does not switch on automatically when the technical failure is resolved and it has returned to normal operation mode red LED lights up continuously The lamp must be switched on again manually 4 3 Yellow LED earth ok If the ballast unit HM...

Page 10: ...e replaced and the counter reflector and the protecting glass can be remounted 6 Protection 6 1 Fan cooling A low noised fan cools the lamp base 6 2 Thermo protection If the ballast unit HMI 575 800 is in operation the green LED on for the operation control 5 must continuously light up If the green LED flashes the temperature control is activated and regulates slowly the power down to 60 If the ba...

Page 11: ...ensive damage to the ballast unit or lamp base 9 Mounting The stand adapter is located underneath the housing It allows the insertion of 12 mm broncolor or 16 mm bolts When operating make sure that the unit is securely fixed on the stand By pulling out the stop lever it can adjusted in its notches 10 Service repair Your broncolor daylight source is a precision unit If you take good care it will wo...

Page 12: ...0 V 265 V Ignition possible from 90 V 90 V Efficiency 0 9 0 9 Power factor 95 by 230 V 99 by 110 V 95 by 230 V 99 by 110 V Flicker 5 5 Ambient temperature 5 C to 45 C 5 C to 45 C Operation possible up to 60 C from 45 C automatic power reduction to 60 Cooling Stabilized fan Stabilized fan Dimensions ballast unit 267 x 184 x 112 5 mm 267 x 184 x 112 5 mm Dimensions lamp base 321 x 120 x 198 mm 321 x...

Page 13: ...le no 33 150 00 Reflector Mini Satellite Article no 33 152 00 Special reflectors Para Para FF Para FB various article numbers Softbox Pulsoflex EM 80 x 80 cm Article no 33 407 00 Only use with adapter ring with integrated reflector Art no 43 100 00 Softbox Pulsoflex EM 110 x 110 cm Article no 33 408 00 Only use with adapter ring with integrated reflector Art no 43 100 00 Softbox Pulsoflex EM 80 x ...

Page 14: ...for HMI F575 800 with 4 lenses 5500 K Article no 43 103 55 Parabolic reflector for HMI F575 800 with 4 lenses 5900 K Article no 43 103 59 Lamp HMI 575 W SE for lamp base HMI F575 800 Article no 44 100 00 Lamp BA 800 SE HR for lamp base HMI F575 800 Article no 44 104 00 Protecting glass 5500 K for lamp base HMI F575 800 Article no 44 101 55 Protecting glass 5500 K matt for lamp base HMI F575 800 Ar...

Page 15: ...Sie diese gegebenenfalls an Nachbenutzer weiter Beachten Sie die Sicherheitshinweise Inhaltsverzeichnis Seite Wichtige Sicherheitshinweise 2 Vor Inbetriebnahme des Gerätes lesen 2 Bedienungs und Anzeigeelemente 4 Elektronisches Vorschaltgerät HMI 575 800 4 Bedienungs und Anzeigeelemente 5 Leuchtenkopf HMI F575 800 5 1 Einsatzgebiet HMI 575 800 6 2 Inbetriebnahme 6 3 Leistungsregelung 7 4 LED Anzei...

Page 16: ... Sie besonders in Gegenwart von Kindern auf Ihre Ausrüstung Lassen Sie die Geräte nicht unbeaufsichtigt 6 Denken Sie daran dass im Betrieb hohe Temperaturen entstehen und die Berührung von heissen Teilen Verletzungen verursachen kann 7 Verwenden Sie nur intakte Anschlusskabel und lassen Sie Geräte die fallengelassen wurden oder beschädigt sind vor Wiederinbetriebnahme von einer Fachperson prüfen 8...

Page 17: ...berührungsgefährliche Spannungsentladungen entstehen 16 Leuchtenkopf und Vorschaltgerät sind nicht geeignet für den Einsatz in nasser oder explosionsgefährdeter Umgebung 17 Das Vorschaltgerät und der Leuchtenkopf ist vor Spritz und Tropfwasser sowie erheblicher Staubeinwirkung zu schützen Die Bedienung mit nassen Händen ist zu vermeiden 18 Um gefährliche elektrische Schläge zu vermeiden Vorschaltg...

Page 18: ...aste aus off 3 Taste ein on 4 Leistungsregler Dimmer 5 LED grün für Betriebskontrolle on 6 LED rot für Netzkontrolle supply ok 7 LED gelb für Schutzleiter Kontrolle earth ok 8 Buchse für Leuchtenstecker 9 Buchse für Netzkabel 10 Sicherung 1 11 Sicherung 2 12 Handgriff 4 1 12 11 10 2 9 8 5 6 7 3 ...

Page 19: ...f HMI F575 800 1 Netzschalter ein aus on off 2 Umschalter 575 W 800 W 3 Drehknopf Fokussierung 4 Verriegelungsschieber 5 Bajonett Anschluss mit automatischer Verriegelung 6 Gegenreflektor Schrauben 7 Tageslicht Brenner 8 Leuchtenkabel 9 Rasthebel ...

Page 20: ...beim Wiedereinschalten im heissen Zustand entfallen Die dazu notwendigen hohen Zündspannungen erfordern aus Sicherheitsgründen eine einwandfreie Erdzuleitung deren Funktion unter Mithilfe der gelben Schutzleiter Kontrollleuchte earth ok 7 überprüft werden kann Aus diesem Grund muss das Vorschaltgerät immer mit geerdetem Netzstecker am Stromnetz angeschlossen werden 1 Am Umschalter 2 des Leuchtenko...

Page 21: ...ngedimmt d h mit voller Leistung erfolgen Achtung Sollte unter Umständen ein Brenner nicht zündbar sein schaltet das Vorschaltgerät HMI 575 800 nach zirka 1 5 s die Zündeinrichtung aus Ein erneuter Startversuch kann durch Betätigung der roten Taste off 2 und anschliessend der grünen Taste on 3 erfolgen Um die Zündeinrichtung zu schützen wird diese nach ca 10 Zündversuchen in Folge für ca 30 Sekund...

Page 22: ...in Folge für zirka 30 Sekunden blockiert c Übertemperatur im Vorschaltgerät d Kurzschluss im Vorschaltgerät und oder im Leuchtenkopf e Technische Störung Wenn die rote LED Anzeige blinkt wird das Vorschaltgerät automatisch ausgeschalten Aus Sicherheitsgründen schaltet sich das Gerät nicht automatisch ein wenn die Störung beseitigt ist und es sich wieder im normalen Betriebsmodus befindet rote LED ...

Page 23: ...nkopf unbedingt vom Vorschaltgerät zu trennen Achtung Heisser Brenner Nach dem Entfernen des Schutzglases müssen die Gegenreflektorschrauben 6 gelöst werden damit der Gegenreflektor über den Brenner abgezogen werden kann Nun wird der Brenner ausgetauscht und der Gegenreflektor sowie das Schutzglas können wieder montiert werden 6 Schutzeinrichtungen 6 1 Ventilator Kühlung Der Leuchtenkopf wird durc...

Page 24: ...ch auf der Bedienungsseite des Vorschaltgerätes HMI 575 800 Es sind ausschliesslich sandgefüllte Sicherungen mit dem Wert 10 AT zu verwenden Die Verwendung falscher Sicherungen kann zu schweren technischen Defekten im Vorschaltgerät und im Leuchtenkopf führen 9 Montage Der Stativadapter ist unten am Gehäuse angebracht Er ermöglicht die Aufnahme von Bolzen 12 mm broncolor und Bolzen 16 mm Im Betrie...

Page 25: ...ngsgrad 0 9 0 9 Power Faktor 95 bei 230 V 99 bei 110 V 95 bei 230 V 99 bei 110 V Flicker 5 5 Umgebungstemperatur 5 C bis 45 C 5 C bis 45 C Betrieb möglich bis 60 C ab 45 C autom Leistungsreduktion bis 60 Kühlung Ventilator stabilisiert Ventilator stabilisiert Abmessungen Vorschaltgerät 267 x 184 x 112 5 mm 267 x 184 x 112 5 mm Abmessungen Lampenkopf 321 x 120 x 198 mm 321 x 120 x 198 mm Gewicht Vo...

Page 26: ... Spezial Reflektoren Para Para FF Para FB diverse Artikel Nummern Softbox Pulsoflex EM 80 x 80 cm Art Nr 33 407 00 darf nur mit Adapterring mit integriertem Reflektor Art Nr 43 100 00 verwendet werden Softbox Pulsoflex EM 110 x 110 cm Art Nr 33 408 00 darf nur mit Adapterring mit integriertem Reflektor Art Nr 43 100 00 verwendet werden Softbox Pulsoflex EM 80 x 140 cm Art Nr 33 417 00 darf nur mit...

Page 27: ...abolreflektor zu HMI F575 800 mit 4 Streuscheiben 5500 K Art Nr 43 103 55 Parabolreflektor zu HMI F575 800 mit 4 Streuscheiben 5900 K Art Nr 43 103 59 Brenner HMI 575 W SE zu Leuchtenkopf HMI F575 800 Art Nr 44 100 00 Brenner BA 800 SE HR zu Leuchtenkopf HMI F575 800 Art Nr 44 104 00 Schutzglas 5500 K zu Leuchtenkopf HMI F575 800 Art Nr 44 101 55 Schutzglas 5500 K mattiert zu Leuchtenkopf HMI F575...

Page 28: ...r Veuillez vous conformer aux consignes de sécurité Table de matières page Indications de sécurité importantes 2 A lire avant la mise en service 2 Eléments de commande et d affichage 4 Régulateur de puissance broncolor HMI 575 800 4 Eléments de commande et d affichage 5 torche broncolor HMI F575 800 5 1 Domaine d utilisation du HMI 575 800 6 2 Mise en service 6 3 Régulation de puissance 7 4 Affich...

Page 29: ...tre utilisé par des enfants Gardez le à l œil surtout en présence d enfants Ne laissez pas les appareils sans surveillance 6 Gardez à l esprit que tout contact avec des éléments chauds peut provoquer des blessures 7 Utilisez uniquement des câbles de raccordement intacts et confiez la vérification des appareils qui sont tombés ou ont été endommagés à un spécialiste avant de les manipuler à nouveau ...

Page 30: ...dans un environnement humide présentant un danger d explosion 17 Le régulateur et la torche doivent être protégés contre les projections d eau contre la pluie ainsi que contre la boue Il faut éviter la manipulation avec des mains mouillées 18 Pour éviter les électrocutions n ouvrez jamais le régulateur de puissance ou la torche Confiez toujours les travaux d entretien ou de réparation à un spécial...

Page 31: ... d allumage 3 Bouton d extinction 4 Régulateur de puissance 5 Affichage LED vert témoin de service on 6 Affichage LED rouge témoin de contrôle réseau supply ok 7 Affichage LED jaune témoin de mise à terre earth ok 8 Prise de torche 9 Prise de câble réseau 10 Fusible 1 11 Fusible 2 12 Poignée 4 1 12 11 10 2 9 8 5 6 7 3 ...

Page 32: ...errupteur marche arrêt 2 Commutateur 575 W 800 W 3 Bouton tournant pour la focalisation 4 Dispositif de verrouillage des modeleurs 5 Fixation à baïonnette avec verrouillage automatique 6 Vis pour contre réflecteur 7 Lampe lumière du jour 8 Câble de torche 9 Levier de serrage ...

Page 33: ... lampes peuvent être rallumées à chaud à tout moment Un délai d attente pour le réamorçage n est pas nécessaire Pour des raisons de sécurité les tensions d amorçage plus élevées nécessaires à cela exigent une mise à terre impeccable dont la fonction peut être contrôlée au moyen du témoin lumineux de mise à terre earth ok 7 Pour cette raison l appareil doit toujours être raccordé au réseau d alimen...

Page 34: ...rs fait avec la puissance maximale Attention Si la lampe refuse de s allumer le régulateur de puissance HMI 575 800 interrompt la procédure d amorçage après environ 1 5 secondes Un nouvel essai peut être tenté en appuyant sur la touche rouge off 2 et après sur la touche verte on 3 Cette opération peut être renouvelée une dizaine de fois avant que la procédure d amorçage ne soit bloquée pour une du...

Page 35: ... environ 30 s après une dizaine de tentatives successives c La température dans le régulateur de puissance est trop élevée d La lampe ou le régulateur de puissance ont un court circuit e Incident technique Lorsque le voyant rouge clignote la torche s éteint automatiquement Par mesure de sécurité l appareil ne se rallume pas automatiquement après que l on ait remédié à l incident technique et l app...

Page 36: ...ce Attention Lampe brûlante Après avoir enlevé le verre de protection il faut dévisser les vis du contre réflecteur 6 pour pouvoir le retirer Remplacer la lampe maintenant et remonter le contre réflecteur ainsi que le verre de protection 6 Dispositifs de protection 6 1 Refroidissement par ventilateur La torche est refroidie par un ventilateur silencieux 6 2 Protection thermique Si le régulateur de...

Page 37: ... utiliser uniquement des fusibles avec remplissage de sable avec une valeur de 10 AT L utilisation de fusibles inadaptés peut provoquer des dégâts au régulateur de puissance ainsi qu à la torche 9 Montage Le support pour pied est situé en dessous du boîtier L adaptateur permet la fixation sur les chevilles broncolor de 12mm ou 16 mm Veiller à ce que le pied soit stable La poignée de serrage de l a...

Page 38: ... V 99 à 110 V 95 bei 230 V 99 bei 110 V Scintillement 5 5 Température ambiante 5 C bis 45 C 5 C bis 45 C Fonctionnement possible jusqu à 60 C à 45 C réduction progressive de la puissance jusqu à 60 Système de refroidissement Ventilateur stabilisé Ventilateur stabilisé Dimensions du régulateur de puissance 267 x 184 x 112 5 mm 267 x 184 x 112 5 mm Dimensions de la torche 321 x 120 x 198 mm 321 x 12...

Page 39: ...peut être utilisé seulement avec anneau pour adaptateur avec réflecteur intégré no d article 43 100 00 Softbox Pulsoflex EM 110 x 110 cm No d article 33 408 00 peut être utilisé seulement avec anneau pour adaptateur avec réflecteur intégré no d article 43 100 00 Softbox Pulsoflex EM 80 x 140 cm No d article 33 417 00 peut être utilisé seulement avec anneau pour adaptateur avec réflecteur intégré n...

Page 40: ... F575 800 avec set de lentilles PAR 5500 K No d article 43 103 55 Réflecteur parabolique pour HMI F575 800 avec set de lentilles PAR 5900 K No d article 43 103 59 Lampe HMI 575 W SE pour torche HMI F575 800 No d article 44 100 00 Lampe BA 800 SE HR pour torche HMI F575 800 No d article 44 104 00 Verre de protection 5500 K pour torche HMI F575 800 No d article 44 101 55 Verre de protection 5500 K m...

Page 41: ...Bron Elektronik AG CH 4123 Allschwil Schweiz Switzerland BA064 00 Printed in Switzerland 03 09 ...

Reviews: