© Bronkhorst High-Tech B.V.
5
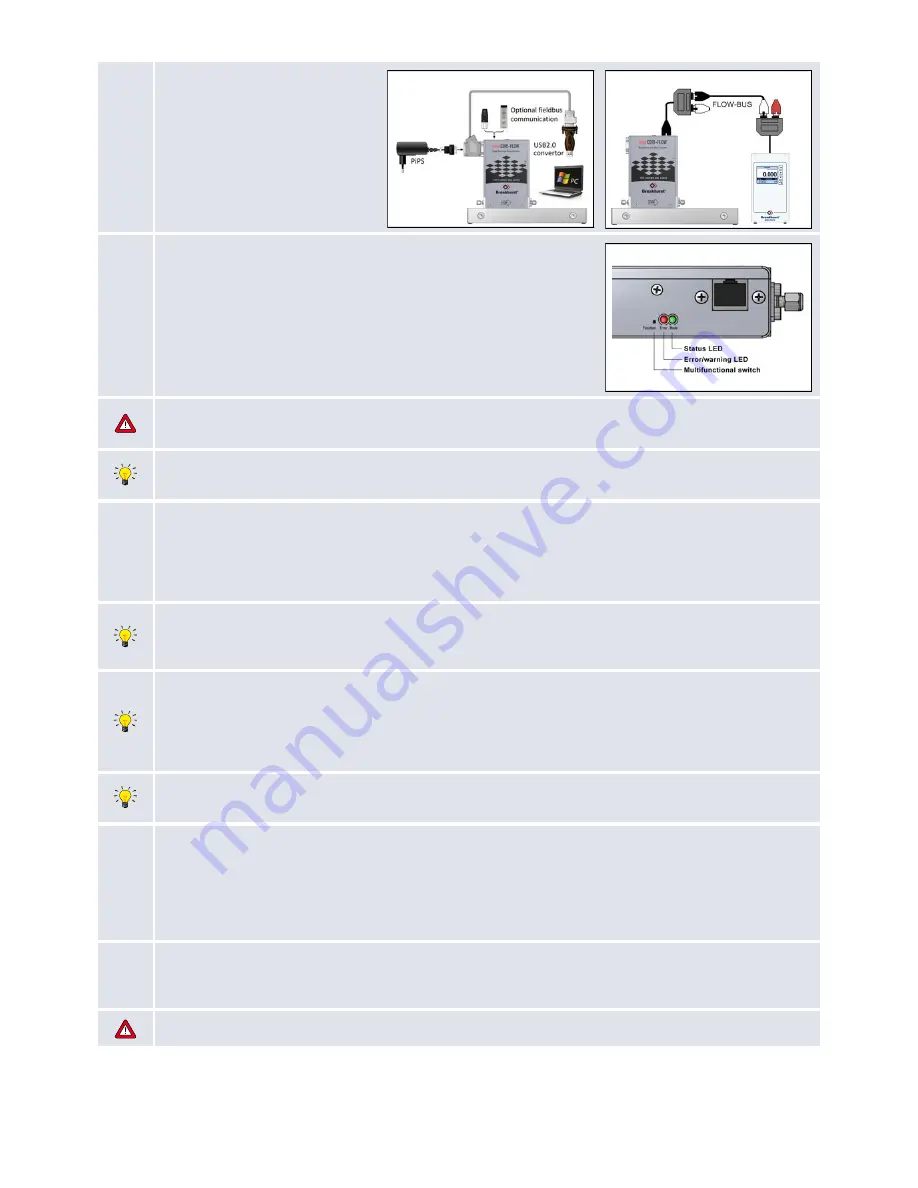
7.2
BUS/digital operation
For this procedure see description
for RS232 operation or specific
(optional) fieldbus.
RS232 connection cable 7.03.366
enables to use (free downloadable)
tooling programs for Windows.
Example 3
Example 4
8
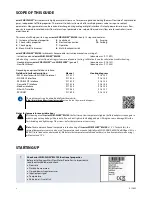
Multi-functional switch operation
Using the 2 colored LEDs and the switch on the
mini CORI-FLOW™ ML120
,
several actions can be monitored and started. The green
•
LED is used for
status indication. The red
•
LED is used for errors/warnings. The switch can be
used to start several actions, such as auto-zero, restore factory settings and bus-
initialization actions. See specific zero-procedure part in this manual or see
'General instructions for
mini CORI-FLOW™ ML120
' for more details.
Important warning!
When red
•
LED blinks shortly: measuring signal is unstably or noisy: instrument is possibly
exposed to vibrations or pulsating flow.
The micro switch on top of the
mini CORI-FLOW™ ML120
can be operated with a thin, metal or hard plastic pin. For
example the end of a paperclip.
9
Purging
In systems for use with corrosive or reactive fluids, purging with an inert gas is absolutely necessary before use. After
use with corrosive or reactive fluids, complete purging is also required before exposing the system to air. Purge the
mini CORI-FLOW™ ML120
with actual fluid to get rid of all the Air/gas in the tubes (for liquids) or to remove all
possible condensation drops (for gases).
Purging during start-up
In order to remove condensation drops during start-up, flushing with dry gas for some minutes with high flow rate
(while tapping the valve) is recommended.
Special control mode for purging
In case of purging of a
mini CORI-FLOW™ ML120
controller give setpoint = 100 % to control the valve or the pump.
It is also possible to use special control mode = 8 to fully open the valve or set the pump at max. rpm, using a digital
interface. This will bypass the PID-controller and might be usefull when having the
mini CORI-FLOW™ ML120
set
to a low capacity. It will ensure you to get the highest possible flow for purging.
Warm-up time
Let the
mini CORI-FLOW™ ML120
warm-up for at least 30 minutes for best accuracy.
10
Zeroing
Before first use, when process conditions change significantly (especially temperature) or when the instrument has
been re-mounted (e.g. after servicing) it is recommended to perform an automatic zero action with the
mini CORI-
FLOW™ ML120
. This action can be started manually (as described below) or via a digital interface (see document
Operation instructions digital instruments: 9.17.023). Under normal (constant) conditions it will not be necessary to
zero before each application start-up.
10.1
Set process conditions
After warming-up, pressuring and purging the system (including the
mini CORI-FLOW™ ML120
)
prepare the
instrument for actual process conditions.
During zeroing avoid external vibrations and shocks.


