background image

Bronkhorst®

Instruction Manual mini CORI-FLOW ML120

9.17.097G

60

6

Troubleshooting and service

During operation, the LEDs can indicate errors and/or warnings. See 

LED indications

 for an explanation of the possible LED

indications.

Error and warning information can also be found by connecting the instrument to FlowDDE and FlowPlot (see section 

Basic RS232 operation

). FlowDDE puts all errors and warnings on the console screen; in FlowPlot, the Alarm & Count tab

(Instrument Settings) provides several specific alarm and counter indicators.

6.1

Restoring factory settings

In case changes to the instrument configuration leads to non-recoverable erroneous behavior, the instrument can be reset

to the pre-configured factory settings. This can be done in FlowPlot (Instrument Settings > Restore Settings) or with the

multifunctional switch (see 

Multifunctional switch

).

Changes made to the network settings (bus address, baud rate, parity) will 

not

 be restored by a factory reset.

If digital communication with the instrument can not be re-established, see 

Multifunctional switch

 to enter configuration

mode, overrule the 9-pin D-sub communication settings and use the RS232 communication mode to re-establish

communication.

6.2

Common issues

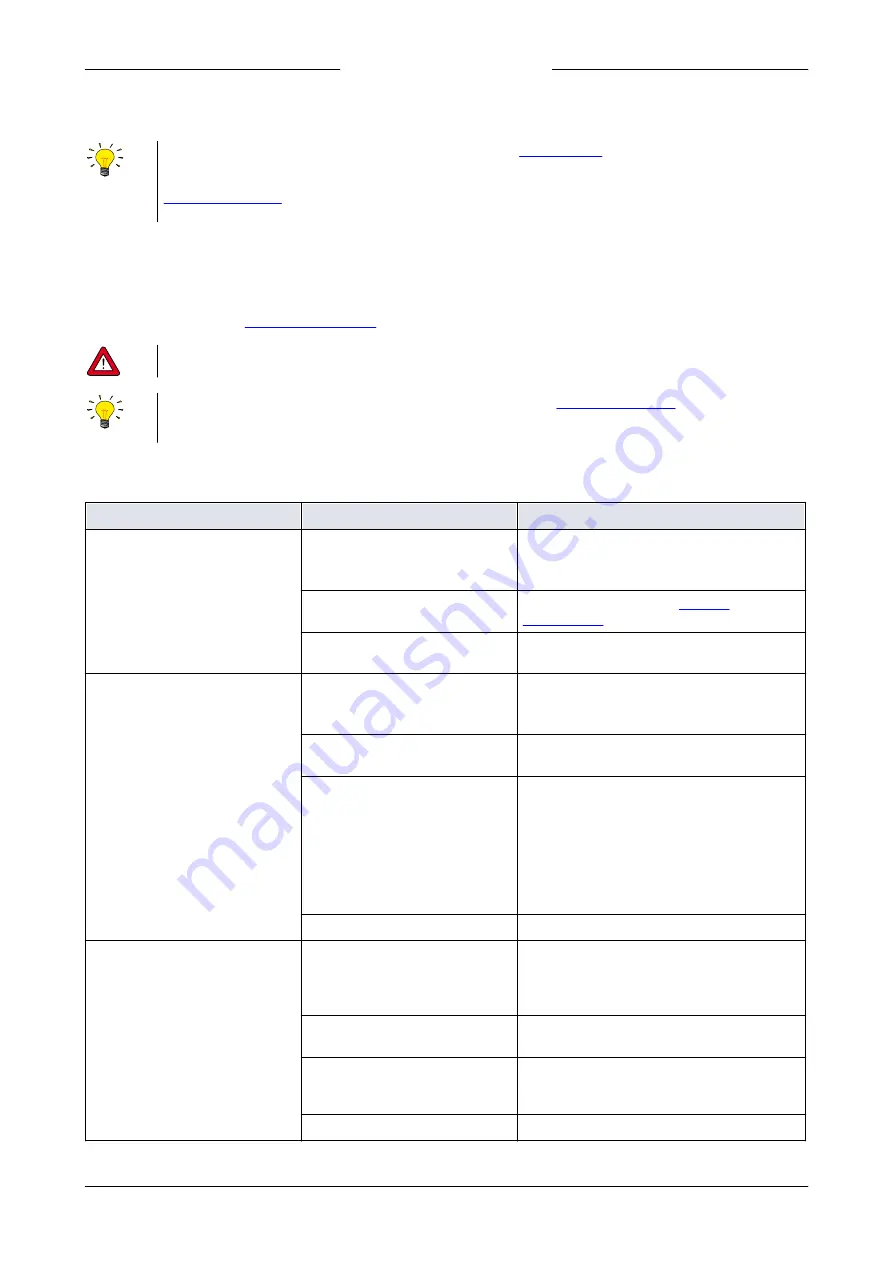
Symptom

Possible cause

Action

No fieldbus communication

No power supply

·

Check power supply

·

Check cable connection

·

Check cable hook-up

Invalid node address

Change node address (see 

Network

configuration

)

Other

Reset instrument and/or restart master. Contact

Bronkhorst if problem persists.

No output signal

No power supply

·

Check power supply

·

Check cable connection

·

Check cable hook-up

Inlet pressure or differential

pressure too low

Increase inlet pressure

Piping, filters and/or control valve

clogged or blocked

·

Clean system (flush with clean, dry air or a

non-aggressive cleaning liquid (e.g. ethanol

or isopropyl alcohol)

·

For external proportional control valves:

supply 0…15 Vdc and operational inlet

pressure to valve and slowly increase

voltage. If valve does not open, clean parts

and re-adjust valve

Sensor failure

Return equipment to factory

·

Control behavior unstable

·

Red LED flashes irregularly

Measurement disturbed by

mechanical vibration

·

If possible, avoid installation in close

proximity of mechanical vibration

·

Reduce sensitivity to vibrations by using a

mass block, dampeners, and flexible tubing

Inlet pressure unstable

Eliminate pressure fluctuations, e.g. by

installing a pressure regulator

Gas accumulation in tubing

Flush the system to remove gas

Tip: use frequency or density signal to detect

presence of gas bubbles

Wrong controller settings

Adjust settings (e.g. with FlowPlot)

Summary of Contents for mini CORI-FLOW ML120

Page 1: ...this Instruction Manualcarefully beforeinstalling and operating theinstrument Notfollowing theguidelines could resultin personalinjury and ordamageto theequipment mini CORI FLOW ML120 Ultra Low Flow Coriolis Mass Flow Meters Controllers Instruction Manual ...

Page 2: ...ationwill facilitatetheuseoftheinstrument and or contributetoitsoptimal performance Additional infoavailableontheinternet or from your local salesrepresentative Receipt of equipment Check the outside package box for damage incurred during shipment If the box is damaged then the local carrier must be notified at once regarding his liability if so required At the same time a report should be submitt...

Page 3: ...ety precautions This product is intended for use by qualified personnel who recognize shock hazards and are familiar with the safety precautions required to avoid possible injury Read the operating information carefully before using the product Before operating make sure the line cord is connected to a properly grounded power receptacle Inspect the connecting cables for cracks or breaks before eac...

Page 4: ...Bronkhorst Instruction Manual mini CORI FLOW ML120 9 17 097G 4 ...

Page 5: ... 15 Digital RS232 interface 2 7 2 15 E 8000 2 7 2 1 15 BRIGHT 2 7 2 2 15 Digital RS485 interface 2 7 3 16 FLOW BUS 2 7 3 1 16 Modbus 2 7 3 2 17 Other fieldbuses 2 7 3 3 17 2 8 Micro switch operation and LED indications 17 2 9 Purging before use 17 2 10 Zeroing 18 Zeroing using micro switch 2 10 1 19 Zeroing through digital communication 2 10 2 19 2 11 Powering up and powering down 20 2 12 Temperat...

Page 6: ... 8 1 43 Advanced fluid set parameters 4 8 2 45 Fluid mixture parameters 4 8 3 45 4 9 Master slave configuration FLOW BUS 46 4 10 Controller 49 Batch dosing with CORI FILL 5 49 5 1 Dosing principle 49 Proportional control 5 1 1 49 Preventing overshoot 5 1 2 50 Estimated dosing time 5 1 3 50 5 2 Process conditions 50 5 3 Parameter settings 51 Dosing method 5 3 1 52 Batch settings 5 3 2 53 Overrun co...

Page 7: ...onkhorst are precise and compact Mass Flow Meters and Controllers for liquids and gases based on the Coriolis measuring principle Designed to cover the needs of the ultra low flow market from 5 g h up to 200 g h full scale values the miniCORI FLOW offers multi range functionality factory calibrated ranges can be rescaled by the user maintaining the original accuracy specifications Instruments of t...

Page 8: ...required if the mini CORI FLOW is operated properly with clean media compatible with the wetted materials avoiding pressure and thermal shocks and vibrations Units may be purged with a clean dry and inert gas or a non aggressive and non corrosive solvent In case of severe contamination cleaning of the inside of the instrument and of the valve orifice if applicable may be required Inexpertlyservici...

Page 9: ...ough pin 5 of the M12 connector as an option The required I O options are factory installed as specified at ordering time and cannot be changed manually The possible configurations are described in the table below See the hook up diagram for custom bus and I O configurations document 9 16 118 for an explanation of the codes Code Description 000 Disabled pin 5 is pulled down to 0 Vdc default select...

Page 10: ...et for digital control by factory the setpoint threshold for activating the device connected to pin 5 is any value 0 Note If the instrument is forced into Valve Safe State the digital output is not affected so a n c shut off valve connected to pin 5 will not close when the n c controller is in Valve Safe State Make sure to use 24Vdc power supply corresponding to the shut off valve specifications C...

Page 11: ...troller mode valve close Valve closes when pin 5 is connected to 0 Vdc This option switches between the default Control mode and mode Valve Close value 3 When the default Control mode is digital the default value is 0 bus RS232 when the default Control mode is analog the default value is 1 Analog input I8C Digital input controller mode valve purge Valve is fully opened when pin 5 is connected to 0...

Page 12: ...re Mass Flow Meter Mass Flow Controller 2 2 2 Sealing material mini CORI FLOW ML120 instrumentsareequippedwithspecific sealingmaterial s compatiblewiththemediaspecified at orderingtime Besurethat thesealingmaterialsarecompatiblewiththemediaandconditionsusedinthesystem Do not exceedtheindicatedmaximum operatingpressureandtemperature Bronkhorst High TechB V cannot beheld responsiblefor anydamageresu...

Page 13: ...instrument label Make sure that the power supply is suitable for the power ratings as indicated on the instrument label and that double or reinforced insulation is used for the power supply Bronkhorst recommends using their standard cables These cables have the right connectors and if loose ends are used these are marked to prevent wrong connection Hook updiagramsfor MLxxxseriesinstrumentscanbefou...

Page 14: ...e available through a connector on top of the instrument o see Digital RS485 interface 2 7 1 Analog or local interface Connect the ML120 series instrument to the power supply readout unit using a cable with 9 pin D sub connector according to the Bronkhorst standard for the Sub D9 connector Refer to the hook up diagram for analog operation document 9 16 119 or use a 9 pin D sub loose end cable 7 03...

Page 15: ... bronkhorst com en downloads Seedocument 9 17 027 Instruction manual RS232interface for moreinformationabout hook upand communication 2 7 2 1 E 8000 When a miniCORI FLOW ML120 instrument is used in combination with an E 8000 readout control unit equipped with an RS232 interface the instrument can be powered and operated using the 9 pin D sub female connector at the rear of the E 8000 module and a ...

Page 16: ... FLOW BUS interfaces in a FLOW BUS system simultaneously Power theinstrumentsinaFLOW BUS local host system byhooking upthepower supplydirectlyontheFLOW BUS line andnot bypoweringaset ofinstrumentsthroughthe9 pinD subconnector ononeofthedigital instruments Seedocument 9 17 024 Instruction manual FLOW BUS interface for moreinformationabout hook upand communication 2 7 3 2 Modbus In the example below...

Page 17: ...ntrollers PLC etc and I O devices slaves field devices PROFINET uses the proven communication model and application view of PROFIBUS DP Consult Instruction manual PROFINETinterface document no 9 17 095 for moreinformationabout settingupa PROFINET network 2 8 Micro switch operation and LED indications Using the two colored LEDs and the micro switch on the ML120 series several actions can be monitor...

Page 18: ...are two ways to perform zeroing of a mini CORI FLOW instrument 1 With the micro switch 2 Through digital communication Alwaysmakesurethat thereisabsolutelynoflowwhentheinstrument isperformingthe auto zeroprocedureandthere arenomechanical vibrationsor pulsatinginlet pressures If the instrument has problems finding a proper and stable zero it will repeat the auto zero procedure up to 4 times Each ti...

Page 19: ... the shut off valves before and after the instrument 3 Send parameters Send the following parameter values in this sequence o Init Reset 64 o Control Mode 9 o Calibration Mode 255 o Calibration Mode 0 o Calibration Mode 9 4 Zeroing The zeroing procedure will start at that moment and the green LED will blink fast The zeroing procedure waits for a stable signal and saves the zero If the signal is no...

Page 20: ...tice there will be a balance between fluid temperature self heating cooling effects and ambient temperature at the instrument If the fluid is really hot it would help if the instrument is in a cool environment It will also depend on how well the installation on which the instrument has been mounted is capable of cooling Makesurethetemperatureinthehousingdoesnot exceed70 C otherwisetheelectronicsmi...

Page 21: ...oset thecorrect processconditions Althoughmini CORI FLOWML120instrumentshaveexcellent temperaturestability thebest accuracyisachievedwhen temperaturegradientsacrosstheinstrumentsareavoided Makesurethat themediatemperaturematchestheambient temperatureasgoodaspossibleandmount theinstrumentsonarigid heat conducting surface mini CORI FLOWML120instrumentshandlepressureshocksinthesystem well but arenot ...

Page 22: ...formation about LED indications for the Valve Safe State mode or Fluid set for the fluid set configuration parameters 3 2 Analog operation With analog operation the following parameters are available output signal measured value input signal setpoint controller only Using analog and digital interfaces simultaneously Theinstrument canbeoperatedviatheanaloganddigital interfaces RS232 fieldbus at the...

Page 23: ...n an instrument FlowDDE translates the node address and process number to a channel number DDE client applications communicate with the FlowDDE server by using DDE messages Before messages can be exchanged a DDE link has to be made A DDE link consists of three parts the server the topic and an item For separation the characters and may be used so a DDE link in e g Microsoft Excel becomes Server To...

Page 24: ...following baud rates for RS232 communication The factory selected baud rate is indicated on the instrument label Refer to Digital parameters Network configuration for changing the baud rate settings for the instrument The default baud rate for RS232 communication is 38400 Baud Interface medium RS232 Protocol FLOW BUS Baud rate 9600 16200 38400 57600 115200 230400 460800 Nodeaddress 3 Parity None M...

Page 25: ...he same Modbus system In a Modbus system Bronkhorst instruments always serve as Modbus slaves There is no mutual communication between Modbus slaves only between master and slave The master device is for example a Windows computer Characteristics Several selectable baud rates between 9600 and 256000 Baud default 19200 Baud 15 24 Vdc supply voltage connection of max 247 instruments on a single bus ...

Page 26: ...he right reads 63 Set the rotary switches to 00 for automatic installation Refer to the corresponding fieldbus manual document 9 17 024 FLOW BUS or document 9 17 035 Modbus for more details For changing the baud rate or parity settings use the RS232 interface to change the corresponding parameters See Digital parameters Network configuration for changing parameters Changing RS485 settingsof the9 p...

Page 27: ...us address and the LSD least Significant Digit to set the unit of the bus address Set the MSD rotary switch to P to select programmable bus address For the data rate setting select 1 for 125000 Baud 2 for 250000 Baud 5 for 500000 Baud and P for programmable data rate Changing EtherCAT Second Address EtherCAT supports the use of a Second Address Bronkhorst instruments have 3 rotary switches with wh...

Page 28: ...nication error EtherCAT Instrument is not in OP mode PROFINET No application relation established normal flash 0 2 sec on 0 2 sec off Incorrectfluid setconfiguration see Digital parameters Fluid set in this case the valves are in safe state AND OR Fieldbusspecificwarning message FLOW BUS Waiting for communication check communication settings of all FLOW BUS devices in the fieldbus setup Usually th...

Page 29: ...ndication LEDs These functions are available in analog as well as in digital operation mode The available functions are presented in a repeating sequence of patterns where each pattern indicates a special function To select and start a function press and hold the switch until the LEDs show the pattern of the function to be started By releasing the switch the selected function is started Availablef...

Page 30: ...ec Restorefactorysettings except communication settings 8 12 sec FLOW BUS Auto installto bus let the instrument obtain a free node address from the FLOW BUS system 12 16 sec Activateconfiguration mode The baud rate and bus type for the 9 pin D sub side connector are set to 38k4 and RS232 FLOW BUS ProPar In configuration mode the green LED blinks 2 seconds on and 0 1 second off Configuration mode r...

Page 31: ...ds DeviceNet Instruments in a DeviceNet system can be monitored and operated using third party software as a master device such as SyCon by Hilscher GmbH or Step 7 for PLC by Siemens To configure a device a so called EDS file Electronics Data Sheet can be loaded into the software The EDS file contains all necessary configuration information to operate the device in a DeviceNet system including com...

Page 32: ...col ProPar when using RS232 parameters are identified by a unique combination of a process number and a parameter number Pro Process number Par Parameter number Consult Instruction manual RS232interface document no 9 17 027 for detailedinformation Thisdocument canbedownloadedfrom http www bronkhorst com en downloads Modbus In the Modbus protocol parameters are accessed by specifying their unique d...

Page 33: ...re Identification Number Type Access Range FlowDDE FLOW BUS Modbus Unsigned char RW 0 255 175 113 12 0x0E2C 3629 Bronkhorst digital device type identification number DeviceType Type Access Range FlowDDE FLOW BUS Modbus Unsigned char 6 R 90 113 1 0xF108 0xF10A 61705 61707 Device type information string this parameter contains an abbreviation referring to the identification number 4 3 Measurement an...

Page 34: ...setpoint Type Access Range FlowDDE FLOW BUS Modbus Float RW 0 3 4E 38 206 33 3 0xA119 0xA11A 41241 41242 Floating point variant of Setpoint Fsetpoint shows the setpoint in the capacity and capacity unit for which the instrument has been set Fsetpoint is dependent of CapacityUnit and Sensor Type SetpointSlope Type Access Range FlowDDE FLOW BUS Modbus Unsigned int RW 0 30000 10 1 2 0x0022 35 The val...

Page 35: ...Bronkhorst readout andcontrol unit The built in alarm functionality can be used to handle different alarm types system errors and warnings min max alarms response alarms batch alarms master slave alarms The used alarm type can be set with parameter Alarm Mode When an alarm is activated the type can be read out using parameter Alarm Info An automatic setpoint change can be set using the parameters ...

Page 36: ... Access Range FlowDDE FLOW BUS Modbus Unsigned char RW 0 255 182 97 7 0x0C27 3112 This value represents the time in seconds the alarm action will be delayed when an alarm limit has been exceeded This value also delays the alarm off action if an alarm limit is no longer exceeded Default value 0 AlarmMaximumLimit Type Access Range FlowDDE FLOW BUS Modbus Unsigned int RW 0 32000 116 97 1 0x0C21 3106 ...

Page 37: ...eset 3 8 Automatically when alarm conditions no longer apply 4 5 Counter Counter settingsaremost easilyaccessibleviaFlowPlot or FlowViewor aBronkhorst readout andcontrol unit Counter Mode Type Access Range FlowDDE FLOW BUS Modbus Unsigned char RW 0 2 130 104 8 0x0D08 3337 Available modes Value Description 0 Counter off default 1 Counting up continuously 2 Counting up until limit reached set by Cou...

Page 38: ... Value Description 0 No setpoint change default 1 Change setpoint to Counter newsetpoint Counter New Setpoint Type Access Range FlowDDE FLOW BUS Modbus Unsigned int RW 0 32000 127 104 6 0x0D06 3335 New safe setpoint when a counter limit is reached until reset Range 0 32000 represents 0 100 setpoint Default value 0 ResetCounter Enable Type Access Range FlowDDE FLOW BUS Modbus Unsigned char RW 0 15 ...

Page 39: ...unication viastandard connection RS232 RS485 Use the following parameters to configure the instrument for FLOW BUS or Modbus communication via the side connector Ifthe9 pinD sub side connector oftheinstrument isconfiguredfor RS485 communication FLOW BUS Modbus it will not respondwhenconnectedtoanRS232 configuration Inthat case usethepower upfunctionalityofthemultifunctional switchtoswitchtoconfigu...

Page 40: ...tomatically via the Ethernet protocol 4 7 Special parameters InitReset Type Access Range FlowDDE FLOW BUS Modbus Unsigned char RW 82 64 7 0 10 0x000A 11 Init Reset is used to unlock secured parameters designated by a symbol for writing This parameter can be set to the following values Value Description 64 unlocked secured parameters can be read and written to 82 locked secured parameters are read ...

Page 41: ...log Slave Acting as slave of other instrument in analog mode AnalogInput x Slave Factor 00 12 Setpoint 0 Setpoint fixed to 0 13 FLOW BUS Analog Slave Acting as slave of other instrument on FLOW BUS slave factor is set by analog input signal RS485 only FLOW BUS master output x AnalogInput 18 RS232 Normal operation via RS232 RS232 20 Valve Steering Controller disabled setpoint redirected to Valveout...

Page 42: ...e FlowDDE FLOW BUS Modbus Unsigned char RW 0 7 24 1 16 0x0030 49 With this parameter any of the pre configured fluid sets maximum 8 can be selected Each fluid set has its specific configurable properties such as FluidName Capacity etc Default value 0 fluid 1 Fluid Name Type Access Range FlowDDE FLOW BUS Modbus Unsigned char 10 RW 25 1 17 0x8188 0x818C 33161 33165 This parameter contains the fluid ...

Page 43: ...emperature Type Access Range FlowDDE FLOW BUS Modbus Float RW 273 15 3 4E 38 245 33 10 0xA150 0xA151 41297 41298 This parameter is used for reference in calculating custom volume flows from the measured mass flow See also parameters CapacityUnit and Counter Unit CapacityUnitTypePressure Type Access Range FlowDDE FLOW BUS Modbus Float RW 0 3 4E 38 246 33 11 0xA158 0xA159 41305 41306 This parameter ...

Page 44: ...1 61825 61826 Fixed temperature in C used for capacity calculations Density Type Access Range FlowDDE FLOW BUS Modbus Float RW 0 3 4E 38 170 33 21 0xA1A8 0xA1A9 41385 41386 Density for the selected fluid set in kg m3 HeatCapacity Type Access Range FlowDDE FLOW BUS Modbus Float RW 0 3 4E 38 250 113 18 0xF190 0xF191 61841 61842 Heat capacity for the selected fluid set in J kg K ThermalConductivity T...

Page 45: ...components MixComponentFraction Type Access Range FlowDDE FLOW BUS Modbus Float RW 0 1 350 126 8 0xFE40 0xFE41 65089 65090 Mix fraction for the according mix component MixComponent Index The value range corresponds with 0 100 The sum of the all mix fractions must be equal to 1 If the value is 0 the next component slots are ignored MixComponentFluid Name Type Access Range FlowDDE FLOW BUS Modbus Un...

Page 46: ...rcular referencesbetween devicesonthesamefieldbus TheFLOW BUS system doesnot haveaprotectionmechanism Master Node Type Access Range FlowDDE FLOW BUS Modbus Unsigned char RW 1 128 158 33 14 n a Set the master node for the instrument Note that this parameter only is effective in a FLOW BUS system via RS485 SlaveFactor Type Access Range FlowDDE FLOW BUS Modbus Float RW 0 500 139 33 1 0xA108 0xA109 41...

Page 47: ...loads Because controlling characteristics are optimized during manufacture Bronkhorst strongly advises not to change these parameters If changing controllersettings is absolutely necessary it should be performed by or undersupervision of trained service personnel only Controller Speed Type Access Range FlowDDE FLOW BUS Modbus Float RW 0 2 5 254 114 30 0xF2F0 0xF2F1 62193 62194 This parameter sets ...

Page 48: ...s adjust the controller gain correction signal as follows Controller gain Controller Speed PID Kp 1 05 response factor 128 StableSituation Response Type Access Range FlowDDE FLOW BUS Modbus Unsigned char RW 0 255 141 114 17 0x0E51 3666 Stable situation response applied when the controller is stable within a 2 band around the setpoint Default value 128 no correction Other values adjust the controll...

Page 49: ...situations where dosing speed is more important 5 1 1 Proportional control With proportional control each batch starts with a linear phase where dosing is done with the highest possible flow rate flow setpoint 100 When the configured batch size is being approached the flow can be reduced by gradually closing the valve or reducing pump speed until the flow rate reaches zero at the end of the batch ...

Page 50: ...ptabletimeframe For liquiddosing theliquidshouldnot containanygasbubbles Gasbubblesact asan expansionvessel destabilizing theflowrateandslowingdownresponsetimes Usingadegasser isrecommended especiallywithverysmall batchsizes and or times intheorder ofmg ml andmsrespectively Theamount ofpiping reducers connectionsandT partsshouldbelimitedtotheabsoluteminimum Tubing pipingsizeshouldbeappropriatetoth...

Page 51: ...the instrument The instrument supports different types of volume measurement Depending on the specific type selected the actual measured by the instrument or theoretical fluid density is used For liquid dosing FlowPlot supports Mass Flow and Volume Flow for gas Mass Flow Normal Volume Flow or Standard Volume Flow can be selected With MassFlow the instrument does not need extra information to calcu...

Page 52: ... The counter function of the instrument is used to configure the actual batch parameters In FlowPlot these settings are done on the Alarm Count tab of the Instrument Settings function 1 For batch dosing set the counter to totalize the measured flow rate until the required batch size is reached Up to limit 2 The counter limit defines the required batch size note that the selectable counter units au...

Page 53: ...able 157 104 9 3338 asrequired enable new batch trigger s 5 3 3 Overrun correction By setting Counter Controller OverrunCorrection to a value between 0 and 1 the system closes the valve or stops the pump a fraction before reaching the batch size minimizing overshoot In FlowPlot the overrun correction can be set on the Alarm Count tab of the Instrument Settings function Anoverruncorrectionvalueof0 ...

Page 54: ...al noise can be eliminated by increasing the minimum capacity of the instrument to a value just above the noise level The minimum capacity cannot be entered in FlowPlot instead use the parameter test function of FlowDDE To read and write parameters with FlowDDE proceed as follows 1 In FlowDDE open FLOW BUS Test FLOW BUS andDDE 2 From the Parameter list select the required parameter 3 In the Writev...

Page 55: ... can be reduced further when nearing the configured batch size control gain phase To change the maximum capacity in FlowPlot return to the Basic tab of the Instrument Settings function and edit the Full scale value In the plotting area of the main screen this value is translated to 100 The starting point of the control gain phase is determined by the value of Counter control gain From the start of...

Page 56: ...ated on the Controller tab of the Instrument Settings 1 A control valve or pump needs a minimum electrical current threshold to open or start running Normally when opening the valve the current is increased gradually until the threshold is reached and the valve opens The time to reach the threshold dead time can be minimized by specifying a starting power current just under the threshold This shor...

Page 57: ...e to speed up controller increase to slow down PID Td 169 114 23 62137 62138 0 controller derivative action preventssetpoint overshoot For moreinformationabout thePID controller seeDigital parameters Controller inthismanual or theFlowPlot manual document 9 17 030 5 3 6 On off control settings Minimizing valvetemperature When working with fluids with a low boiling evaporation point it can be useful...

Page 58: ...ng hints Problem Possiblecause Action Batch size overshoot not reduced after more than 3 batches Dosing time too short Decrease inlet pressure Decrease maximum capacity Counter control gain too high Decrease counter control gain Dosing time too long Flow rate too low Increase inlet pressure Increase maximum capacity Counter control gain too low Increase counter control gain Controller too slow Opt...

Page 59: ...usion in liquid Install degasser Inlet pressure unstable Eliminate pressure fluctuations e g by installing a pressure regulator Filter settings not optimized Disable filters see Disabling filters Proportional dosing too fast Decrease counter control gain see Proportional control settings Controller settings not optimized Set overrun correction to 0 8 see Overrun correction Flow signal 130 Inlet pr...

Page 60: ...ause Action No fieldbus communication No power supply Check power supply Check cable connection Check cable hook up Invalid node address Change node address see Network configuration Other Reset instrument and or restart master Contact Bronkhorst if problem persists No output signal No power supply Check power supply Check cable connection Check cable hook up Inlet pressure or differential pressur...

Page 61: ... in conditions it was designed for Piping or filters blocked or contaminated Clean system Sensor blocked or contaminated Clean sensor Valve blocked or contaminated Clean valve Supplied fluid type does not match configured fluid type Supply equipment with other fluid or change fluid type in instrument configuration Measured value or output signal indicates a flow while there should be none Instrume...

Page 62: ...ght product for your application Contact sales by e mail sales bronkhorst com For after sales questions our Customer Service Department is available with help and guidance To contact CSD by e mail support bronkhorst com No matter the time zone our experts within the Support Group are available to answer your request immediately or ensure appropriate further action Our experts can be reached at 31 ...

Page 63: ...l the bag 7 Place the bag in an appropriate shipping container if possible use the original packaging box Add documentation Reason of return Failure symptoms Contaminated condition Declaration on decontamination It is absolutely required to notify the factory if toxicordangerous fluids have been in contact with the device Thisistoenablethefactorytotakesufficient precautionarymeasurestosafeguardthe...

Page 64: ...Bronkhorst Instruction Manual mini CORI FLOW ML120 9 17 097G 64 ...

Page 65: ...2 Parameters Fluid set advanced Density 44 Fluid Temperature 44 Heat Capacity 44 Inlet Pressure 44 Outlet Pressure 44 Pressure 43 Temperature 43 Thermal Conductivity 44 Viscosity 44 Parameters Fluid set basic Capacity 42 Capacity Unit 43 Capacity Unit Type Pressure 43 Capacity Unit Type Temperature 43 Fluid Name 42 Fluid Set Index 42 Parameters Fluid set mixture Mix Component Fluid Name 45 Mix Com...

Reviews: