33
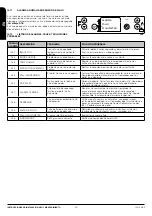
Menu
Sub-menu 1.
Sub-menu 2.
Value
31- Monday Prog. 4
ON/OFF
32- Tuesday Prog. 4
ON/OFF
33- Wednesday Prog. 4
ON/OFF
34- Thursday Prog. 4
ON/OFF
35- Friday Prog. 4
ON/OFF
36- Saturday Prog. 4
ON/OFF
37- Sunday Prog. 4
ON/OFF
04 - PROG Weekend
01 - PROG Weekend
ON/OFF
02- START 1
Hour
03- Stop 1
Hour
04- START 2
Hour
05- Stop 2
Hour
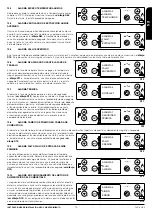
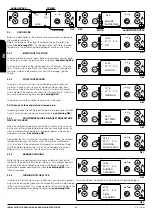
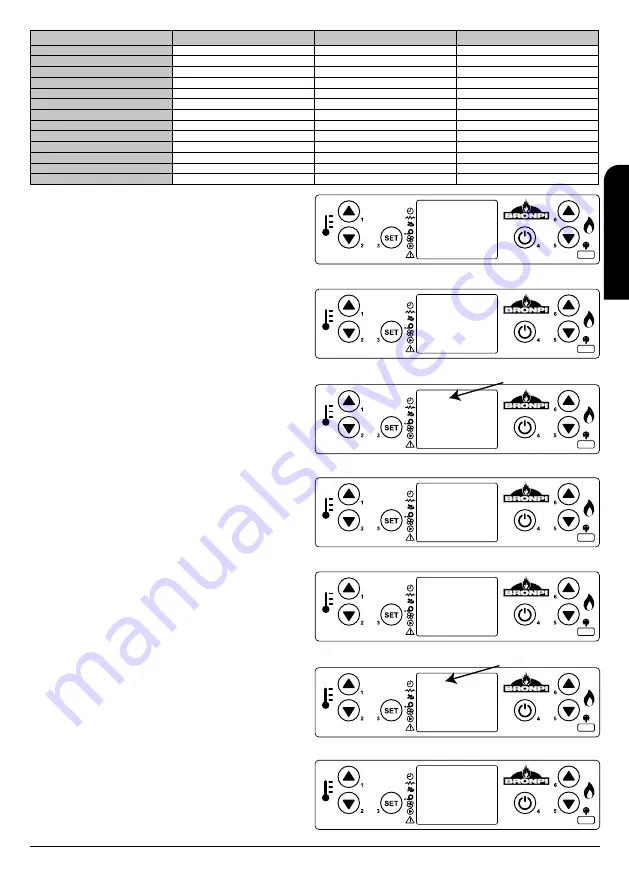
To schedule the stove you have to access to the programming menu
pressing only once the button nº 3 “SET” and with buttons nº 5 or 6
we can move to menu nº 3 “Programme Adjustment” (
see drawing
D33
).
We need to confirm the access to this programme by pressing
button nº3 “SET”.
To see different sub-menus use buttons nº 5 and nº 6.
Sub-menu 03-01- Enable chrono
To programme the stove it is necessary to access to sub-menu 3-1
“Enable chrono” and pressing button nº 3 will show the next screen
(
see drawing D34
).
By default, in top left margin it shows “off”. Touching button nº 1 or nº
2 we are able to change it to “on” to notify to the stove the intention
of programming (
see drawing D35
).
Right after, we need to choose the set up that we want to introduce:
daily, weekly or weekend. To do so from the previous screen, we
need to press repeatedly buttons nº5 and nº6 until we reach the
desired option.
Submenu 02.02. Daily Programme
To choose the daily program of the stove we need to go to the
following screen (
see drawing D36
):
By pressing just once button nº3 we are able to access to the daily
programming submenu of the stove. By default, it will show the
following screen (
see drawing D37
).
We need to change the option “OFF” with “ON” by pressing the
buttons nº1 and nº2 so as to confirm to the machine.
Now we need to choose the hours that we would like the stove to be
switched ON. To do this, there are 2 hours available to start and 2 to
stop the stove: START 1 and STOP 1; START 2 and STOP 2.
For example:
Start at 09:00 hours / stop at 14:30 hours.
Start at 20:30 hours / stop at 23:00 hours.
From the previous screen, we press button nº6 and it will show up
(
see drawing D38
):
By pressing nº1 and nº2 buttons we modify the value “OFF” and we
set the time of the first start (
see drawing D39
):
D33
Menu 03
PROGRAMME
SETTING
D34
OFF
M-3-1-01
ENABLE
CHRONO
M - 3 - 1 -01
On
D35
ENABLE
CHRONO
M - 3 - 2
D36
PROGRAMME
DAY
M - 3 - 2 - 01
Off
D37
PROGRAMME
DAILY
M - 3 - 2 - 02
START 1
Off
D38
DAY
M - 3 - 2 - 02
START 1
09:00
D39
DAY
INSTALLATION, OPERATING AND SERVICING INSTRUCTIONS
AIR SERIES
EN
Summary of Contents for Air Series
Page 105: ...104 11 3 NINA FT ...
Page 121: ...120 11 11 SARA NC ...
Page 123: ...122 11 12 EVA FT ...
Page 125: ...124 11 13 EVA NC FT ...
Page 127: ...126 11 14 CORAL FT ...

