background image

Introduction

Polycold Cryochiller

Regulatory Compliance

Installation and Operation Manual

Brooks Automation

1-14

214072  Revision B

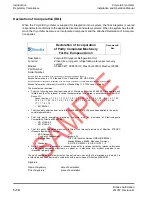
Declaration of Incorporation (DOI) 

When the Polycold Cryochiller is supplied for integration into a system, the final integrator is overall
responsible for conformity to the applicable directives and safety systems. When the system has the CE
mark, the Cryochiller becomes an incorporated component and the attached Declaration of Incorpora-
tion applies. 

Declaration of Incorporation

of Partly Completed Machinery

For the European Union

Document #:

Rev

Description:

Polycold® Cryogenic Refrigeration Unit,

Function:

Closed loop cryogenic refrigeration water vapor recovery 
system 

Models:

XC8800 MT, XC8800 HC, MaxCool 4000H, MaxCool 2500L.

Part Number:
Serial Number:

Business name and full address of the manufacturer of the partly completed machinery:

Brooks Automation Inc., 15 Elizabeth Drive, Chelmsford, MA, USA 01824

Name and address of the person, established in the Community, authorized to compile the relevant technical documentation:

Brooks Automation (Germany) GmbH, Ernst-Ruska-Ring 11, 07745 Jena, Germany

The manufacturer declares:

x

That the following essential requirements of Machinery Directive 2006/42/EC are applied and 
fulfilled and that the relevant technical documentation is compiled in accordance with part B of 
Annex VII:

Annex I sections:

1.1.2, 1.1.3, 1.1.5, 1.1.6, 1.2.1, 1.2.2, 1.2.3, 1.2.4, 1.2.5, 1.2.6, 1.3.1, 1.3.2, 

1.3.4, 1.5.1, 1.5.2, 1.5.3, 1.5.4, 1.5.5, 1.5.6, 1.5.7, 1.5.8, 1.5.9, 1.5.11, 1.6.1, 1.6.3, 1.6.4, 
1.7.1, 1.7.2, 1.7.3

o

EN 60204-1

x

That the safety objectives set out in directive 2006/95/EC (LVD) have been applied to the partly 
completed machinery.

x

That this partly completed machinery conforms with the provisions of Electromagnetic 
Compatibility Directive 2004/108/EC.

o

EN 61000-6-4

o

EN 61000-6-2

x

That this partly completed machinery fulfills all the relevant provisions of Directive 97/23/EC 
(Pressure Equipment Directive).

o

PED Category:

II

o

Conformity Assessment: 

Module A1

o

Notified Body:

TÜV SÜD Industrie Service GMBH (NB #0036)
WestendStrasse, 80686, Munchen, Germany

o

Standards:

EN 378, EN 60204-1, EN ISO 12100-1, -2

x

We will transmit, in response to a reasoned request by a national authority, relevant information 
on the partly completed machinery, on paper or in electronic form, without prejudice to our 
intellectual property rights.

The partly completed machinery must not be put into service until the final machinery into which it is
incorporated has been declared in conformity with the provisions of Directive 2006/42/EC

Signature

Name of signatory

date of declaration

Title of signatory

place of declaration

Summary of Contents for Polycold MaxCool 2500L

Page 1: ...Polycold MaxCool Cryochiller Installation and Operation Manual Including Models MaxCool 4000H MaxCool 2500L 214072 Revision B...

Page 2: ...nvectron On Board Polycold Razor Simplicity Solutions the Simplicity Solutions logo Stabil Ion TrueBlue TurboPlus Vision Zaris and the Brooks Automation logo are registered U S trademarks of Brooks Au...

Page 3: ...hiller System Components 1 8 Polycold Cryochiller Component List 1 8 Polycold Cryochiller Views 1 10 Regulatory Compliance 1 13 Declaration of Conformity DOC 1 13 Declaration of Incorporation DOI 1 14...
Page 4: ...3 7 Water Purity Properties 3 7 Performance Specifications 3 9 Cryocoils and Refrigerant Lines 3 10 Balance Pressure 3 11 Refrigerants in the MaxCool Unit 3 12 Installation Installation Checklist 4 2...

Page 5: ...r Place Into Service 4 48 Install Seismic Restraints 4 51 Interfacing General Interface Information 5 1 General Interface Rules 5 2 RS 232 Interface 5 2 Gauge Relay J4 5 3 Human Machine Interface HMI...

Page 6: ...m Boot Power Up 6 8 Compressor Startup 6 9 Alternate Compressor Startup 6 9 Operating the Polycold Cryochiller with a Cryocoil 6 9 Start and Cool the System 6 9 Defrost the Cryocoil 6 10 Operating the...

Page 7: ...or Data Snapshot 7 23 SYSTEM_VALVE_STATE Valve Open Closed State for system valves 7 25 CLDST_LQD_TEMP Unit Coldest Liquid Temperature 7 25 COLD_JUNCT_TEMP Cold Junction Temperature 7 25 BUFFER_LINE_T...

Page 8: ...ion 8 1 Power Management Cylinder Unloading 8 2 Power Management in Standby Mode 8 2 Power Management in Cool Mode 8 2 Mode Selection 8 3 Standby 8 3 Cool Mode Selection 8 3 Defrost Mode Selection 8 3...

Page 9: ...iring 12 5 Appendix D Remote EMO 12 6 EMO Status 12 6 EMO Remote Control 12 6 Remote EMO Connector Wiring 12 7 Appendix E Water Vapor Cryotrapping 12 8 Cryosurface Pumping Efficiency 12 8 Appendix F F...

Page 10: ...Contents Polycold Cryochiller Installation and Operation Manual Brooks Automation x 214072 Revision B This Page Intentionally Left Blank...

Page 11: ...enance troubleshooting and repair information in other manuals which may affect the settings or operation of the Polycold Cryochiller When integrated in a system the Polycold Cryochiller may be set to...

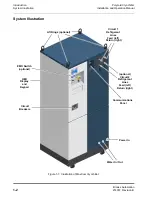
Page 12: ...72 Revision B System Illustration Figure 1 1 Illustration of MaxCool Cryochiller Circuit HMI Display and Keypad EMO Switch optional Communications Panel Power In Water In Out Circuit 1 Refrigerant Lin...

Page 13: ...used to cool and heat objects such as electrostatic chucks used in semiconductor wafer processing The Polycold MaxCool Cryochiller consists of a refrigeration unit refrigerant line set and a cryosurfa...

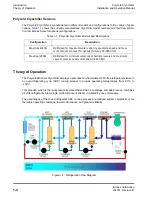
Page 14: ...ss to provide operating temperatures from 80 C to 150 C This process which is thermodynamically more efficient than a multistage cascade process combines all of its refrigerants into a single multi co...

Page 15: ...cycle time and increases product throughput As the vacuum chamber begins the pump down sequence the pre programmed Polycold Cryochiller can exit the Standby mode and quickly cool the cryocoil providin...

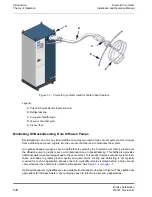
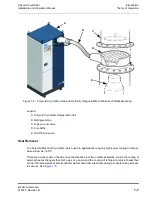
Page 16: ...Cryochiller is placed over the diffusion pump to greatly reduce oil contamination due to backstreaming This baffle also provides additional water vapor pumping speed to the vacuum tool This greatly im...

Page 17: ...applications requiring high power cooling to temper ature as low as 150 C There are a wide variety of heat removal applications but two notable examples include the cooling of external heat exchanger...

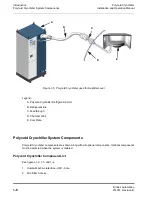
Page 18: ...line C Feedthrough D Chamber Wall E Cool Plate Polycold Cryochiller System Components Polycold Cryochiller components are shown along with all optional components Optional components must be selected...

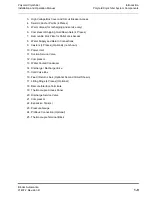
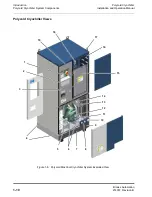
Page 19: ...ovable Kick Plate for Pallet Jack Access 8 Water Supply and Return Connections 9 Casters 4 Places Optional not shown 10 Power Inlet 11 Suction Service Valve 12 Compressor 13 Water Cooled Condenser 14...

Page 20: ...Cryochiller System Components Installation and Operation Manual Brooks Automation 1 10 214072 Revision B Polycold Cryochiller Views Figure 1 6 Polycold MaxCool Cryochiller System Exploded View 3 4 5...

Page 21: ...Cryochiller Introduction Installation and Operation Manual Polycold Cryochiller System Components Brooks Automation 214072 Revision B 1 11 Figure 1 7 Polycold MaxCool Cryochiller Compressor View 20 21...

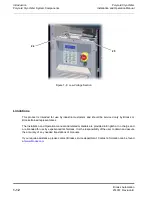
Page 22: ...oks or Brooks trained representatives The Installation and Operation manual and related materials are provided in English at no charge and are intended for use by experienced technicians It is the res...

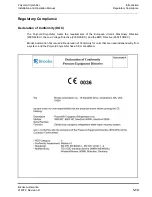
Page 23: ...ration of Conformity DOC The Polycold Cryochiller meets the requirements of the European Union s Machinery Directive 2006 42 EC the Low Voltage Directive 2006 95 EC and the EMC Directive 2004 108 EC B...

Page 24: ...2 EC are applied and fulfilled and that the relevant technical documentation is compiled in accordance with part B of Annex VII Annex I sections 1 1 2 1 1 3 1 1 5 1 1 6 1 2 1 1 2 2 1 2 3 1 2 4 1 2 5 1...

Page 25: ...nyls PBB Polybrominated Diphenyl Ethers PBDE ELECTRICAL ASSY X X X O O O HEAT EXCHANGER VALVE ASSY X O O O O O COMPRESSOR COMPARTMENT ASSY X O O O O O CUSTOMER COMMUNICATION ASSY X X X O O O PACKAGING...

Page 26: ...ing products including Water vapor cryopumps XC PFC PCT FLC FI chillers PGC PGCL cryocoolers P and accessories 24 Months 12 Months 12 months BROOKS DISCLAIMS ANY WARRANTY WITH RESPECT TO PRODUCTS MODI...

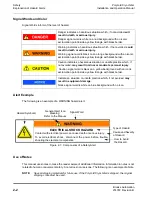
Page 27: ...Text Safety Icons and Signal Words and Color Safety Text Hazard alert text follows a standard fixed order three part format Identify the hazard State the consequences if the hazard is not avoided Stat...

Page 28: ...black border Warning indicates a hazardous situation which if not avoided could result in death or serious injury Warning signal word is black on an orange background with an iconic exclamation point...

Page 29: ...y cause personal injury Do not operate the Polycold Cryochiller before it is properly installed Do not modify connectors or cables Do not operate the unit without all guards and safety devices in plac...

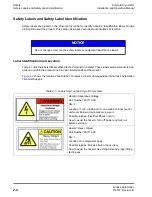
Page 30: ...uct and provide information about the product Figure 2 2 shows the location of each label To replace a lost or damaged label call Brooks Automation Technical Support NOTICE Do not change or remove the...

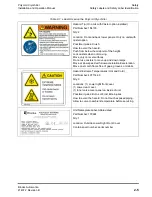
Page 31: ...e casters to move up and down ramps Move at slow speed with slow acceleration deceleration Move on smooth floors free of gaps grooves or debris Hazard Extreme Temperatures Hot and Cold Part Number 407...

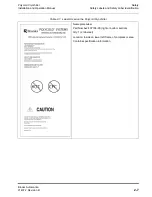
Page 32: ...ion Manual Brooks Automation 2 6 214072 Revision B Nameplate Label Part Number 407168 00 left or top section Qty 1 2 label set Location Inside on lower left frame of compressor area Contains part numb...

Page 33: ...ty Label Identification Brooks Automation 214072 Revision B 2 7 Nameplate Label Part Number 407168 00 right or bottom section Qty 1 2 label set Location Inside on lower left frame of compressor area C...

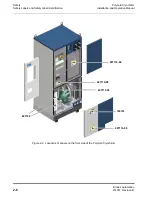
Page 34: ...ls and Safety Label Identification Installation and Operation Manual Brooks Automation 2 8 214072 Revision B Figure 2 2 Locations of Labels on the front side of the Polycold Cryochiller 407114 00 4071...

Page 35: ...otect personal safety Operational interlocks protect the Polycold Cryochiller Addi tional interlocks may be added to the Cryochiller by the user For additional information see Compres sor Safety Chain...

Page 36: ...when the refriger ant circuit pressure exceeds the set point of the valve Causes a controlled release of excess pressure for the refrig erant in a manner that avoids an over pressure event Valve close...

Page 37: ...energy must be removed from the equipment per the sys tem s or the facility s Lockout Tagout procedure before servicing If local procedures are not available follow the procedure for Lockout Tagout in...

Page 38: ...he high voltage box cover 1 Apply Lockout Tagout procedures at the source of the input power 2 Turn off the main circuit breaker and move the Lockout Tagout slide bar to the Lock out Tagout position 3...

Page 39: ...angle between the sling strap and horizontal at each lift ring must be greater than 45 Strength of lift device must be greater than 4 times weight of unit being lifted Trip Hazard Trip hazard which ma...

Page 40: ...rounded Use proper power and proper electrical connections in accor dance with the appropriate electrical code Do not allow cables to be walked on or become wet Turn off power before connecting or dis...

Page 41: ...oving covers Allow cryocoil cold chuck or cryobaffle to come to 10 C 50 F Wait until signs of frost have gone before servicing Use appropriate Personal Protective Equipment if handling cold devices Do...

Page 42: ...r in a well ventilated area as specified by ASHRAE 15 and EN 378 Chemical Hazard Opening the refrigerant circuit or changing valve settings without following the instructions in this manual could resu...

Page 43: ...using high pressure gas for cleaning Follow safety guidelines for cleaning with high pressure gas as specified by the facility Fire Hazard Cleaning fluids such as isopropyl alcohol may cause fire if...

Page 44: ...epending on the application All of the blends of refrigerant gases are non flam mable and non toxic A single Material Safety Data Sheet set for the different blends of gasses is located in Appendix J...

Page 45: ...Sound measurements were made on each side of the unit at a distance of 1 0m 39 in and at a height of 1 6m 63 in Measurements taken from each side of the unit did not vary sig nificantly Measurements...

Page 46: ...mensions Figure 3 1 Polycold Cryochiller Refrigeration Unit Dimensions Dimensions are mm inches based on a standard unit Center of gravity based on a unit without casters For a unit with casters incre...

Page 47: ...on the Polycold Cryochiller requires 51mm 2 inches of clear area at the back of the system and 914mm 36 inches at the front See Figure 3 2 This clearance is required for access to switches settings ai...

Page 48: ...nabled Parameter MaxCool 4000H MaxCool 2500L Power Management Cool at 2 3 Max Rated Load 14 kW 14 9 kW Power Management Cool with No Load 9 2 kW 12 4 kW Power Management in Standby 10 1 kW 9 9 kW Tabl...

Page 49: ...ryochiller power circuit Actual protection must comply with local codes Worst Case low Volts refers to the lowest amount of voltage available Power fluctuates by 10 so the lowest voltage amount would...

Page 50: ...3 7 Cooling water recommendations Install a user supplied filter that can be quickly purged of accumulated sediment by purging water from the filter or install two parallel redundant user supplied wa...

Page 51: ...ent from the make up of the water originally filled into the cooling loop Best practice for cooling loop maintenance call for periodic sampling i e monthly and analysis of the water quality circulatin...

Page 52: ...ation and dissolution of the metal surface Sulphate SO4 2 100 ppm Levels higher than 100 ppm increase the risk of copper pitting corrosion Electrical Resistivity 2 000 100 000 cm Resistivity is the in...

Page 53: ...nerally more effective for moisture above 1 torr 5 Estimated time depending upon cryocoil mass and refrigerant line 6 Units were tested in a manufacturing environment while under maximum load in the C...

Page 54: ...he two circuits Larger cryocoils may give faster pumping speeds and can be used in some applications However if the heat load is too great the cryopump becomes less efficient and may be shut off by a...

Page 55: ...on and discharge sides of the compressor NOTICE The tubing for the refrigerant lines and cryocoil must be dried prior to installation Perform strength test with dry compressed nitrogen using the appro...

Page 56: ...o the environment at any time The refrigerant should be reclaimed and either recycled or destroyed in accordance with international regu lations and the current best industry practices Calculations of...

Page 57: ...es associated with the materials and refrigerants contained in the Polycold Cryochiller Read the section titled Installation Considerations and decide on how each of these issues will be handled Confi...

Page 58: ...spect and Unpack the Polycold Cryochiller Balance Pressure _______ 4 4 3 Move to Location 4 7 4 Remove Compressor Hold Down Nuts 4 9 5 Connect Cooling Water 4 10 6 Connect Electrical Power 4 13 7 Inst...

Page 59: ...be proprietary Therefore the following information complies with the above standards The amount of refrigerant mixture the minimum room size and the refrigerant safety group classification are includ...

Page 60: ...ycold Cryochiller Table 4 2 Pressure Relief Venting Requirements Refrigeration Unit Recommended Discharge Capacity lb air min 1 ANSI ASHRAE 15 EN 378 MaxCool 4000H 2 58 1 58 MaxCool 2500L 2 37 1 47 It...

Page 61: ...he Brooks Automation contact information in the Appendix of this manual If there is no damage continue this procedure 3 Remove strapping and fasteners that hold the cardboard enclosure to the palette...

Page 62: ...is the balance pressure b Read the balance pressure on the pressure gauge The pressure should be within the ranges shown on the Balance Pressure Table Table 3 10 on page 3 11 c Record the balance pre...

Page 63: ...al Category Type 1 Equipment is fully de energized Tools Lift Device to lift move and place the unit See Warning Heavy Object below 2 Phillips screwdriver 2 9 16 inch wrenches Heavy Object The refrige...

Page 64: ...an appropriate lift device to lift the refrig eration unit When using a forklift or pallet jack remove both the front and back bot tom panels to access the slots for the forks See Figure 4 2 Place th...

Page 65: ...ower panel on the system and remove the panels See Figure 4 4 3 If an optional spare parts kit was ordered it will be behind the lower front panel of the unit Remove the spare parts kit and verify tha...

Page 66: ...a tion unit Recommended Place nuts on cable tie and secure to compressor 9 Go to the Installation Checklist Table 4 1 Initial and date this task Go to the next task on the check list Connect the Cooli...

Page 67: ...water cooling problems See Figure 4 6 It is also recommended to install two parallel input water lines including valves water filters and flow meters This allows switching water lines and avoiding equ...

Page 68: ...water port on the left side 5 Tighten each water line finger tight until the water line gasket contacts the fitting and then tighten 2 to 3 additional full turns The number of turns required to tighte...

Page 69: ...crews that hold the front edge of the upper cable track may be removed and the track lowered to provide greater access When completed replace the 3 screws 5 If the input power cable is too large to ro...

Page 70: ...ermi nals input side of CB1 using the provided screws and washers optional in the stack sequence shown in Figure 4 10 Figure 4 8 Power Cable Routing Cable or wires run in track below shelf Cable or wi...

Page 71: ...lly connected secure the power cable to the track using cable ties Holes are provided in the cable track for inserting the cable ties 13 If the Polycold Cryochiller is operating at maximum load and th...

Page 72: ...0V and 480V All transformers use the same numbering scheme for tap settings but the taps may be in differ ent physical locations on the transformer depending on the transformer that is used Change Tra...

Page 73: ...feed through on the Brooks Polycold Systems Cryocoil is designed to be installed from the inside of a vacuum chamber This allows removal of the cryosurface when cleaning or servicing the vacuum chambe...

Page 74: ...from the vacuum chamber wall to prevent ice bridging Greater distances are better 8 Hold the feed through in place and tighten the nut with the spanner wrench included with the cryo surface assembly...

Page 75: ...he heat source and as far away as possible from the cryobaffle The cryobaffle traps molecules best when it has maximum view of the vacuum chamber 5 Check the vacuum chamber for leaks If any leaks are...

Page 76: ...the O ring removal tool to remove an O ring from the Parker UltraSeal compatible couplings See Appendix G Zero Line Loss Procedure on page 12 13 Item Description Electrical Category Type 1 Equipment i...

Page 77: ...100mm 4 inches wide Do not use supports that make direct contact with the exposed tubes or couplings Do not allow the lines to be vibrated by the application Important The feed lines are made of soft...

Page 78: ...onnect the refrigerant line to the cryosurface first if possible Finger tighten the refrigerant line couplings to the feed through couplings 5 Remove the upper right front panel of the refrigeration u...

Page 79: ...e following procedure See Figure 4 16 a Use one wrench to hold the fitting on the refrigerant line steady b Use a second wrench to carefully loosen the blank off fitting from the refrigerant line c Sl...

Page 80: ...nment before going to the next step 15 Go to the installation procedures for either the Parker UltaSeal or Cajon VCR couplings Install Parker UltraSeal Compatible Couplings Standard Fitting 1 Insert a...

Page 81: ...his task Go to the next task on the checklist Install Cajon VCR Couplings Optional Fitting 1 Place a new gasket into the female nut 2 Assemble the components and finger tighten the coupling 3 Use both...

Page 82: ...he hose to posi tion Support the drain pan fitting while carefully moving the drain hose to the desired side of the unit 4 When the drain hose is in its final position check the hose for kinks and adj...

Page 83: ...erial Cylinder of refrigerant gas R 134a Cylinder of dry nitrogen gas very low dew point of 80 C with a regulator Service manifold gauge set with three hoses manifold Electronic halogen leak detector...

Page 84: ...sitives created by the armaflex insulation around the line set The factory installed tube insulation and flat insulation can produce false positives with some leak check sensors Leak Check Procedure R...

Page 85: ...mpatible or Cajon VCR couplings the Evacuation Valve and all brazed joints The couplings have two small access holes on each nut to help find leaks Cover the lower access hole with a finger and put th...

Page 86: ...stance 13 If no leaks are found verify the manifold pressure is still 1030kPa 150 psig 14 If the pressure in the manifold stays at 1030 kPa 150 psig follow these steps a Close the valves on the manifo...

Page 87: ...mble the coupling as follows a Open the discharge valve on the manifold to release the gas in the refrigerant line and cryosurface b Perform the Zero Line Loss Procedure and then disassemble the coupl...

Page 88: ...le type vacuum gauge Granville Phillips Convectron works well for this purpose Service manifold gauge set with hoses manifold 1 4 inch ratchet valve wrench 7 16 inch open end wrench 9 16 inch open end...

Page 89: ...e service manifold 3 On the following valves remove the solenoid coils and place coil magnets on the valve stems See Figure 4 25 Figure 4 26 and Figure 4 27 Single Circuit VLV5 in the cold valve box V...

Page 90: ...t line and cryosurface to 13Pa 0 1 torr 5 Allow the vacuum pump to continue pumping for at least 30 minutes NOTE The vacuum pump should evacuate the refrigerant line and cryosurface to 13Pa 0 1 torr w...

Page 91: ...10 15 lb ft See Figure 4 28 8 Remove the magnets and reinstall the solenoid coils on the valves 9 Go to the Installation Checklist Table 4 1 on page 4 2 Initial and date this task Go to the next task...

Page 92: ...all labels or tape Table 4 3 Complete Thermocouple List for Unit with All Options Thermo couple Customer Installed Description Note TC1 Compressor Discharge TC2 Refrigerant Liquid Line TC3 C1 Return T...

Page 93: ...rol thermocouples for Cool and Defrost modes using Host command EXT_TC_ENABLE NOTE If the refrigerant line was made by someone other than Polycold make sure the thermo couples are properly installed R...

Page 94: ...the thermocouple wires to their designated locations See Figure 4 30 and Table 4 3 The blue insulated copper wire must be attached to the positive terminal The red insulated constantan wire must be at...

Page 95: ...on the check list Preliminary Check of the Polycold Cryochiller 1 Make sure you have performed all of the tasks up to this point on the installation check list 2 Perform the following tasks before ope...

Page 96: ...s Automation 4 40 214072 Revision B Figure 4 31 Illustration of Cold Valve Box with Valve Names asterisk denotes optional item MV102 Cold Gas Feed VLV11 Cool Ckt 2 VLV5 Cool Ckt 1 MV101 Hot Gas Feed M...

Page 97: ...egard this step If the back side of the system is accessible locate the pressure gauge and read the pressure value This is the Static Pressure See Figure 4 32 Record the pressure reading in a maintena...

Page 98: ...l wrap of Armaflex Insulation Tape Overlap the previous wrap of insulation tape by at least 1 inch to ensure there are no gaps Alternately cut sheet insulation the same length as the tubes of insulati...

Page 99: ...e it in place 5 Seal both ends of the refrigerant line bundle with tape or insulation tape Secure the insulation around the refrigerant line bundle to the refrigerant line s insulation and to the unit...

Page 100: ...ace Seal both ends of the insulation with tape to secure the insulation on to the insulation on the refrig erant lines and to the feed through Do not put the tape closer than 1 2 inches 25 50 mm to th...

Page 101: ...ed Refrigerant Tubes and Couplings Brooks Automation 214072 Revision B 4 45 8 Go to the Installation Checklist Table 4 1 Initial and date this task Go to the next task on the check list Figure 4 36 Vi...

Page 102: ...37 4 Move CB 2 to the ON position See Figure 4 38 5 Wait for the system to boot up Boot up takes less than one minute When boot up is complete the system HMI screen displays information 6 On systems...

Page 103: ...and pressure parameter data 12 Select Cool See Figure 4 42 Wait 5 minutes if the refrigeration line plus coil is 6 meters 20 feet or less Wait 10 minutes if the refrigerant line plus coil is lon ger...

Page 104: ...he unit s lower rear panel and locate the oil sight glass on the body of the compressor Oil level should be 1 8 to 1 2 full on a compressor that has been running for at least 60 minutes Preferred leve...

Page 105: ...te the vacuum chamber where the cryosurface is installed to at least 0 01 torr 1 33 Pa 8 Select Cool and wait 30 minutes NOTE If a dual circuit system select Cool for both refrigerant circuits Table 4...

Page 106: ...om temperature or warmer 15 Recheck the balance pressure see Table 3 10 and cooling water temperature see Table 3 6 to verify that the Polycold Cryochiller is operating within specifications Check tha...

Page 107: ...hardware as required by the bracket design and facility or local regulations 4 Tighten all hardware to appropriate torque specifications 5 Go to the Installation Checklist Table 4 1 Initial and date...

Page 108: ...Installation Polycold Cryochiller Install Seismic Restraints Installation and Operation Manual Brooks Automation 4 52 214072 Revision B This Page Intentionally Left Blank...

Page 109: ...odel The available interface options are as follows RS 232 standard Gauge Relay standard Human Machine Interface HMI standard Ethernet Host and Service Profibus DeviceNet 24V DI DO Remote All interfac...

Page 110: ...when the Remote key is pressed when the system is in remote mode The default control mode becomes the control interface when the Remote key is pressed The Remote LED is on when in Remote mode and off...

Page 111: ...is connected to either pin 1 or pin 2 of the Polycold Cryochiller Gauge Relay input Common for the 24V power source is connected to the remaining pin 2 or pin 1 of the Polycold Cryochiller Gauge Rela...

Page 112: ...Standby mode keys to set the mode for each circuit The default mode for Cool and Heat mode set by the Cool and Heat keys is set by OPERATING_MODE_DEF_COOL and OPERATING_MODE_DEF_DEFROST or by the HMI...

Page 113: ...ring you to a nested sub menu If highlighted item does not have a right arrow then Enter toggles the selection or allows data entry using the up and down arrows HMI Display Press the up and down arrow...

Page 114: ...gle Circuit Single Circuit Home Screen Description C1 mode Static display of the specific mode of Circuit 1 1 user selected value from LN2 list Static display of selected LN2 value 1 user selected val...

Page 115: ...ROST SYSTEM STATUS SHOW ALL CRYO COOLER CKT1 STATUS CKT2 STATUS STACK STATE SCREEN FAULT STATE NO FAULT CKT 2 MODE COOL STANDBY DEFROST COMPRESSOR ON OFF COMPRESSOR ON COMPRESSOR OFF CONFIGURATION CON...

Page 116: ...Interfacing Polycold Cryochiller HMI Display Installation and Operation Manual Brooks Automation 5 8 214072 Revision B System Status From HMI Top Menu On Page 5 8...

Page 117: ...NET DEVICENET PROFIBUS WEB GUI CONTROL PARAMETERS SHOW ALL CRYO COOLER PARAMS CKT1 PARAMETERS CKT2 PARAMETERS SERV MODE PARAMS SET CKT1 COOL MODE COOL COOL RAMP CONTROL COOL TEMP CONTROL COOL RMP TMP...

Page 118: ...cold Cryochiller HMI Display Installation and Operation Manual Brooks Automation 5 10 214072 Revision B Configuration Page 2 Go to Set Comm Parameters on page 5 12 See Also Configuration From HMI Top...

Page 119: ...EFR COMPLT C1 BYPASS TMP C2 BYPASS TMP BUFF MIN OPEN C1 COOL RAMP LMT C2 COOL RAMP LMT C1 DEFR RAMP LMT C2 DEFR RAMP LMT CRYOCOOLER PARAMS FREEZEOUT BUFF V START CKT 1 PARAMETERS C1 COLDEST LQ TMP C1...

Page 120: ...SS XXX XXX XXX XXX DEFAULT GATEWAY XXX XXX XXX XXX NETMASK XXX XXX XXX XXX INFO IP ADDRESS XXX XXX XXX XXX DEFAULT GATEWAY XXX XXX XXX XXX NETMASK XXX XXX XXX XXX MAC ID XX XX XX XX XX XX MAC ID MANUA...

Page 121: ...al HMI Display Brooks Automation 214072 Revision B 5 13 Basic Service AUTHORIZATION CODE 0 SERVICE MENU S N XXXXX M N XXXXXXXXXX SW VER XX XX XX XX DSP VER XX XX XX XX CPRS HRS XX LAST RCHG NONE AUTHO...

Page 122: ...g the new IP address must be made Port Host or Service port RJ45 on the Communications Panel Cable Crossover CAT5 6 cable with RJ45 connector Standard CAT5 6 is OK if computer supports auto crossover...

Page 123: ...e compressor on and off Port Standard ProfiBus DB9 connector on top of low voltage box Route through pass through on Communications Panel Cable Standard ProfiBus DB9 Cable Slave ID Address 1 125 Host...

Page 124: ...tware command set to retrieve system data and has the ability to control some functions such as Mode selection and turning the compressor on and off Port Connects to a standard microsealed DeviceNet c...

Page 125: ...ation Set Comm Params Legacy Remote Comp Signal Logic Default behavior in v1 4 0 3 is PFC backward compatible when v1 4 0 3 is installed Users will see a change from the previous MaxCool behavior In v...

Page 126: ...Customer supplied external switch closes and returns the 24V AC 10mA provided by the Polycold Cryochiller when active Customer supplied 24 25 17 V AC DC 10mA power must be applied to the input pin to...

Page 127: ...evision B 5 19 Figure 5 8 24V DI DO Remote Communication Connection 24V DI DO Remote Connector Figure 5 9 24V DI DO Connector Wire Side Pin Out 1 4 5 10 16 23 29 34 22 28 33 37 9 15 Isolated pin seque...

Page 128: ...gle Circuit Non Isolated If a Polycold Cryochiller with the new 24V DI DO non isolated interface is replacing a PFC unit that used the standard PFC remote interface please note that the Cryochiller is...

Page 129: ...ual Circuit Non Isolated If a Polycold Cryochiller with the new 24V DI DO non isolated interface is replacing a PFC unit that used the standard PFC remote interface please note that the Cryochiller is...

Page 130: ...er customer requirements reversible supply support 2 Active HIGH inputs and active LOW outputs Wire as above 3 Active LOW inputs and active HIGH outputs Wire as above but reverse polarity of external...

Page 131: ...er customer requirements reversible supply support 2 Active HIGH inputs and active LOW outputs Wire as above 3 Active LOW inputs and active HIGH outputs Wire as above but reverse polarity of external...

Page 132: ...hs Slide one of the insulation tubes onto each soldered wire but do not shrink at this time 7 Insert each pin into the appropriate contact socket on the back side of the connector Push each pin in unt...

Page 133: ...switch to the ON position The Polycold Cryochiller operates in Standby mode while it cools the internal stack and gets ready for normal operation To manually operate the unit Set the unit to Local con...

Page 134: ...ustration of Polycold Cryochiller Components Circuit Breakers CB1 and CB2 CB3 behind panel Compressor ON OFF Switch HMI Display and Keypad EMO Switch optional Lift Rings optional x 4 Power In Cooling...

Page 135: ...or right Increase or decrease the value of a highlighted field Enter Selects the current highlighted field Enters the current submenu designated by character Advances to next character in a selected f...

Page 136: ...efrigeration circuit in Heat Defrost Mode Green LED flashing when defrosting Green LED on solid when defrost is complete Remote Toggles the system between Remote and Local mode Green LED on solid when...

Page 137: ...hermocouple reading Default is 148C Logic associated with compressor startup where the Buffer valve may be opened Logic for the Cylinder Unloader solenoid for power management If the Cylinder Unloader...

Page 138: ...r the remote command line interface or the web GUI to set the default Cool mode for the Cool button s The unit must first be turned to Standby or Defrost then back to the desired Cool mode Defrost Whe...

Page 139: ...ot an issue However when both circuits are used to cool cryocoils you must evaluate the impact on your process when you defrost one circuit while the other circuit is in Cool during a deposition proce...

Page 140: ...ually reset Emergency Off Button EMO if equipped on unit EMO provides emergency control for compressor contactor If the EMO button is pressed in compressor contactor opens EMO button must be manually...

Page 141: ...n Off or EMO switches Compressor Startup Use one of the following methods to start the compressor after system boot up completes If the compressor switch is in the OFF position when system boot up com...

Page 142: ...he high vacuum valve The cryocoil will start capturing water vapor within 60 sec onds NOTE Experiment to determine the shortest pumpdown time for each application The sooner the unit is switched to Co...

Page 143: ...ration unit cools the refrigerant so the unit is ready to go into Cool mode NOTE If the unit is off for more than 12 hours it may take up to 30 minutes after going into Standby to attain complete prec...

Page 144: ...obaffle Complete defrosting can take 8 hours or more depending upon the amount of moisture captured the mass of the cold surface and the vacuum level 1 When ready to defrost switch the high vacuum pum...

Page 145: ...not used by Profibus or DeviceNet which each have their own communication protocols Command Group Listing Command Group Listing 7 1 Command Format 7 2 Example of Interface Usage 7 6 Security Levels 7...

Page 146: ...by the equation in Checksum Calculation on page 7 4 Must be terminated with an ASCII Carriage Return CR Hex 0D Must be sent complete to Polycold Cryochiller under 10 seconds from the to the CR for the...

Page 147: ...below to find the decimal values in the hexadecimal bitfield value Convert the hexadecimal value to binary Determine the value of each set bit by counting the binary bits starting from the least sign...

Page 148: ...ecksum and Carriage Return CR C Language example for checksum calculation Function CtiChkSum Purpose Calculate the checksum for a given NULL terminated command unsigned char CtiChkSum unsigned char pC...

Page 149: ...he Visual Basic program opens If a Module window does not open click Insert in the Visual Basic tool bar and click Module 4 Copy the command strings below and paste it into the Macro window Sub Calcul...

Page 150: ...wants to set a parameter value for DEFR_SETPT using the RS 232 connection In the RS 232 terminal the user must Send a command to set SYSTEM_CONTROL_MODE to 2 RS 232 port Send a command to set DEFR_SE...

Page 151: ...Rapid BP Check Security Level 3 Some Configuration Maintenance manager access Contact Brooks Poly cold for password Access to service menu for Zero Line Loss function to allow disconnect and installa...

Page 152: ...3 Commonly Used Host Software Commands Purpose Describes the purpose of the command Parameter s List of parameters Return Value Lists information the system returns for this command A nn nn nn nn Defa...

Page 153: ...current alarms RESET_ALARMS Acknowledge Alarms Clears alarms if the condition causing the alarm is resolved OPERATING_MODE Get Set the system Cool Defrost modes and Standby mode SW_VER Get the curren...

Page 154: ...ENDOR_ID Interface RS 232 Ethernet Purpose Get set the IP Address for the system Parameter s or nnn nnn nnn nnn nnn nnn nnn nnn is the IP address Return Value A or A nnn nnn nnn nnn Default Value 0 0...

Page 155: ...s the Network Mask address Return Value A or A nnn nnn nnn nnn Default Value 0 0 0 0 Security Level Get 1 Set 3 Example NETWORK_MASK 255 255 255 0 Set the subnet mask for host port Interface RS 232 Et...

Page 156: ...0k 6 1 5M 7 3M 8 6M 9 12M address is 1 125 Return Value A or A speed or A address Default Value speed 0 address 7 Min speed 0 Read Only address 1 Max speed 9 Read Only address 125 Security Level Get 1...

Page 157: ...n off input signal Monitor Data N A Parameter s or n n 0 Compressor controlled by Legacy Remote compressor input signal Equivalent to J11 jumper being removed from PFC system control board 1 Compresso...

Page 158: ...eing in Local or Remote control Monitor Data N A Parameter s or n n 0 Remote output signal will be Low when compressor is Off in Local Control High when compressor is Off in Remote Control Original Ma...

Page 159: ...input signals are both High the unit will switch to Cool operating mode Monitor Data N A Parameter s or n n 0 When both Cool and Defrost input signals are High system will switch to Standby Mode Origi...

Page 160: ...DI DO Remote 5 remote DeviceNet 6 remote Profibus Return Value A or A n Default Value Base Units 2 Units with Ethernet 1 Security Level Get 1 Set 3 Example SYSTEM_CONTROL_MODE_DEF 0 Set the system de...

Page 161: ...bit 7 PRESS SENSOR FAULT bit 8 Not Used bit 9 LOW SUCT PRESSURE bit 10 Not Used bit 11 C1 C2 COOL TEMP SETPT bit 12 C1 C2 DFR TEMP SETPT bit 13 SYSTEM DATE Not supported bit 14 C1 C2 COOL VLV CYCLE bi...

Page 162: ...C21 bit 21 Not Used bit 22 Not Used bit 23 OPTION4 TC FAULT TC20 bit 24 Not Used bit 25 Not Used bit 26 DSCHRG PRESS SENSOR PT2 bit 27 SUCT PRESS SENSOR PT1 bit 28 Not Used bit 29 Not Used bit 30 Not...

Page 163: ...d Default Value N A Security Level Get 1 Set N A Example ALARM_STATUS 0 40000 returns the alarm status of the cool tem perature ramp monitor alarm Interface RS 232 Ethernet Purpose Get the current act...

Page 164: ..._STATUS hex encoded bit 0 DSCHRG TEMP SENSOR bit 1 LQD LN TEMP SENSOR bit 2 CLD JUNCTION SENSOR bit 3 Not Used bit 4 Not Used bit 5 Not Used bit 6 DSCHRG PRESS SENSOR bit 7 SUCT PRESS SENSOR bit 8 Not...

Page 165: ...Deviation bit 4 Not Used bit 5 Trend Cool Deviation bit 6 Not Used bit 7 Defrost Performance bit 8 Trend Defrost bit 9 Not Used bit 10 Not Used bit 11 Not Used bit 12 Not Used bit 13 Cooling Under bit...

Page 166: ...ant Return temperature Parameter s or nnnn nnnn is target temperature Return Value A or A nnnn Data Type Integer Default Value 120 Min 190 Max 70 Units Degrees Celsius signed Security Level Get 1 Set...

Page 167: ...a Type Integer Default Value 1 Min 0 Max 1 Units N A Security Level Get 1 Set 3 Example E_MGMT_ENABLE Get the enable state of energy management Interface RS 232 Ethernet Purpose Get a snapshot of the...

Page 168: ...Suction Pressure Transducer value Param 32 Not Used 0 Param 33 Not Used 0 Param 34 Not Used 0 Param 35 Not Used 0 Param 36 is bit field for Valve states hex encoded 1 valve open bit 0 Fault Relay bit...

Page 169: ...0 indicates the valve is closed Parameter s n n is Valve identifier 0 Buffer 1 Not Used 2 Not Used 3 Cylinder Unloader 4 Freeze Out Prevention Return Value A n Default Value N A Security Level Get 1 S...

Page 170: ...Example COLD_JUNCT_TEMP Interface RS 232 Ethernet Purpose Get the buffer line temperature TC16 Parameter s Return Value A nnn n Default Value N A Units Degrees Celsius signed Security Level Get 1 Set...

Page 171: ...s N A Return Value A Default Value N A Security Level Get N A Set 2 Example RESET_ALARMS Interface RS 232 Ethernet Purpose Get set the system security level Parameter s or n cccccc userID n is securi...

Page 172: ...n or cccccccc n is 0 Refrigerant compressor 1 Nitrogen compressor cccccccc is serial number string 32 character max Return Value A or A cccccccc Default Value N A Security Level Get 1 Set N A Example...

Page 173: ...nt compressor motor on off state Parameter s n or n1 n is 0 Refrigerant compressor 1 Not Used n1 is motor state 0 motor off contactor open 1 motor on contactor closed Return Value A or A n1 Default Va...

Page 174: ...is 0 Refrigerant compressor 1 Not Used Return Value A nnn n Default Value N A Security Level Get 1 Set N A Example COMP_DISCHRG_TEMP 0 Interface RS 232 Ethernet Purpose Read the compressor liquid lin...

Page 175: ...mpressor discharge pressure sensor value Parameter s n n is 0 Refrigerant compressor 1 Not Used Return Value A nnnn Default Value N A Security Level Get 1 Set N A Example COMP_DSCHRG_PRESS 0 Interface...

Page 176: ...d by each relay Monitor Data Setpoint Type Parameter s SETPOINT_RELAY 1 2 SETPOINT_RELAY 1 2 Setpoint Type Relay Logic Setpoint Deadband Parameters Relay 1 2 Setpoint Relay 1 or Relay 2 Setpoint Type...

Page 177: ...Max Setpoint Type 21 Relay Logic Setpoint 200 Deadband 600 Units Security Level Get 1 Set 3 Example SETPOINT_RELAY 1 Get the external vacuum device set point for Relay 1 SETPOINT_RELAY 2 3 1 30 5 Set...

Page 178: ...number 1 or 2 or for all circuits nnn n is the setpoint Return Value A or A nnn n Data Type Double Default Value 20 Min 40 Max 100 Units Degrees Celsius signed Security Level Get 1 Set 3 Example DEFR_...

Page 179: ...RS 232 Ethernet Purpose Get set the alarm setpoint for the External Thermocouple if enabled Alarm is raised if difference between External TC temperature and Return temperature of circuit is greater...

Page 180: ...t number 1or 2 mode is 0 COOL 1 Not Used 2 Not Used 3 Not Used 4 Not Used 5 Not Used Return Value A mode Default Value N A Security Level Get 1 Set 2 Example OPERATING_MODE_ DEF_COOL 1 Get the current...

Page 181: ...is 1 INACTIVE Note Cannot Set this mode 0 STANDBY 1 cool default use the default cool mode 2 defrost default use the default defrost mode 3 COOL 4 Not Used 5 Not Used 6 Not Used 7 Not Used 8 Not Used...

Page 182: ...alue N A Security Level Get 1 Set N A Example CIRCUIT_VALVE_STATE 1 0 Get circuit 1 cool valve state Interface RS 232 Ethernet Purpose Read the circuit inlet temperature sensor value TC9 TC11 Paramete...

Page 183: ...Purpose Read the circuit feed temperature sensor value TC13 TC14 Parameter s n n is circuit number 1 or 2 Return Value A nnn n Default Value N A Security Level Get 1 Set N A Example CIRC_FEED_TEMP 1...

Page 184: ...on 7 40 214072 Revision B CIRC_PROC_CTL_TEMP Circuit Process Control Temperature Purpose Read the circuit process control temperature sensor value TC7 TC8 Parameter s n n is circuit number 1 or 2 Retu...

Page 185: ...on options and the associated commands are listed in this section For clarity the letter P is used in place of the actual command checksum See Checksum Calculation on page 7 4 to determine the actual...

Page 186: ...y period defined by the command POWER_MGMT_STANDBY_DELAY E_MGMT_ENABLE 1P Enables cylinder unloading get the status 0 disable 1 enable POWER_MGMT_STANDBY_DELAY 300P Sets Cylinder Unloader to activate...

Page 187: ...eci fied set point The default defrost termination set point is 20 C on all models The defrost termi nation set point is configurable from 40 C to 20 C OPERATING_MODE 1 9P DEFR_SETPT 1 10P sets the De...

Page 188: ...o relays via software This allows the user to select the sensor to be associated with each relay the set point deadband and relay logic See 24V DI DO Remote Interface on page 5 17 for more information...

Page 189: ...ycold authorized service personnel Benefits of Polycold preventive maintenance include Improved system reliability Decreased cost of replacement Decreased system downtime Preventive maintenance activi...

Page 190: ...iate Power cycle the system leaving it off for minimum of 10 seconds Replace Fan Filter as appropriate Annual Perform Quarterly Maintenance Replace fan filter mandatory and check fan operation Replace...

Page 191: ...hat have the problem and those that do not Determine when the problem first occurred and how often it occurs Determine the state of the system when the problem occurred or occurs Reduce the list of sy...

Page 192: ...e HMI display automatically goes to the Fault State screen and displays the fault and two lines of the available 3 lines of fault data using the format below Line 1 Fault State menu selection header L...

Page 193: ...set Faulty component in the power or control circuit Contact authorized service No HMI message No LED indicators CB1 occasionally trips Power consumption too close to CB1 maximum rated value Refer to...

Page 194: ...Remote EMO signal open at remote device Check continuity on pins 3 and 4 on remote EMO connector Correct remote EMO condition Remote EMO wiring insufficient Must be 16AWG and less than 15M 50 feet Ch...

Page 195: ...rify control transformer tap settings are correct for supply voltage Verify transformer output voltage is in the correct range If all voltages are in spec con tact authorized service ABUSIVE COMP ON A...

Page 196: ...PRESSURE SWITCH NO RECOMMENDATION Fault LED is Red Refrigerant Discharge Pressure Switch has activated Contact authorized Service LOW SUCTION PRESS REFRIGERANT LEAK CHECK BALANCE PRESSURE Fault LED i...

Page 197: ...k installed polarity of cus tomer installed thermocouple Check TC terminal connection tightness Torque Spec is 0 34 N m 3 lb in Check thermal bonding of sen sor to tube Thermocouple junction not prop...

Page 198: ...t LED is Amber Motor thermostat has tripped Contact authorized service CB1 has tripped Check for cause of excessive thermal load on the cryocoil Check if supply voltage is below nominal conditions If...

Page 199: ...o to cool Fault LED not lit Date and Time rolled back Cryosurface full and requires defrosting Defrost the cryosurface Contact authorized Service Problem HMI Display Possible Cause Corrective Action N...

Page 200: ...rent Alarm Status on page 7 18 For assistance in decoding bitmask values see 32 Bit Numbered Bitfield on page 7 3 Bit Mask Value Listing Bit Mask Value Problem Possible Cause Corrective Action Bit 0 C...

Page 201: ...ut TC installation and operation Bit 3 Not used N A N A Bit 4 Differential Pressure Fault LED Amber Compressor OFF PT1 PT2 Differential 20psi PT1 Suction Pressure Trans ducer PT2 Discharge Pressure Tr...

Page 202: ...sure Check Valve Cycle Count Fault LED Amber Compressor ON Rapid Balance Pressure Check Valve Cycle Count has exceeded limit CRYO_VALV_OPEN_CNT for Rapid Balance Pressure Check Valve VALVE_CYCLE_WARN...

Page 203: ...rant Liquid Line Temp TC2 before and during oper ation Fault LED Amber Compressor OFF Cooling water is poor Before Comp start TC2 85C Comp will not start After Comp start TC2 85C for 14 seconds then A...

Page 204: ...ntactor Bit 16 Not used N A N A Bit 17 Not used N A N A Bit 18 Not used N A N A Bit 19 Not used N A N A Bit 20 Buffer Valve Cycle Count Fault LED Amber Compressor ON Buffer Valve cycle count has excee...

Page 205: ...Bit 28 EMO Switch Fault LED Amber Compressor OFF EMO switch is open Alarm L1 Check EMO switch Twist EMO switch CW to reset Bit 29 Cooling Fan Fault LED not lit Compressor ON One or both of the 2 E Box...

Page 206: ...Troubleshooting Polycold Cryochiller Remote Monitor Troubleshooting Installation and Operation Manual Brooks Automation 10 16 214072 Revision B This Page Intentionally Left Blank...

Page 207: ...Polycold Cryochiller Part Number Description and Use 166937 O Ring Removal Tool part of shipping kit as required Table 11 2 Recommended Tools and Fixtures for the Polycold Cryochiller Part Number Des...

Page 208: ...Kit Insulation kit Components dependent on the system configuration Table 11 5 Polycold Cryochiller Maintenance Items Part No Description Frequency 171705 01 Fan Filter one per unit covers 2 fans Annu...

Page 209: ...500 Terminal Block Accessory Kit 183933 Cryochiller Caster Kit Contact Brooks Refrigerant Line Set 2 lines 840305 Gauge Relay Kit 4 pin 11 CPC 20 to 24AWG 207104 Remote EMO Kit 4 pin 11 CPC 16 to 18AW...

Page 210: ...Tools and Parts Polycold Cryochiller Parts Installation and Operation Manual Brooks Automation 11 4 214072 Revision B This Page Intentionally Left Blank...

Page 211: ...12 20 Appendix J Material Safety Data Sheets MSDS 12 21 Appendix A Contact Brooks Information When contacting Polycold Division of Brooks Automation for Technical Support please follow the pro cedure...

Page 212: ...ooks com Customer Support Information You can reach Polycold and Brooks Global Customer Operations Teams around the world at the times and phone numbers below For additional contact information please...

Page 213: ...equipment when lifting the unit Heavy Object Hazard Electrical Equipment Safety guideline IEC61010 1 and UL61010 1 CI 7 5 3 require that the lifting sling have a safety factor SF of at least 4 times...

Page 214: ...inimum strength as required by local regulations but not less than the weight of the item being lifted The length for each strap between the lift ring bolt and the lifting point must be greater than 7...

Page 215: ...side L2 and L3 of CB1 This wiring change decrease the load on CB1 and will not affect the system safety or performance When the CB2 is wired in the excepted method wire and label in accordance to loca...

Page 216: ...rcuit between this contact pair indicates that the compressor contactor is on and the compressor is probably running EMO Remote Control Pins 3 and 4 of J11 allow a remote device to interrupt the power...

Page 217: ...s the cable Check for proper cable restraint Adjust the cable clamp as required System EMO Connection 4 pin Connector female pins Cable Connector 4 pin Cable Connector male pins Amp CPC 11 206429 1 Ca...

Page 218: ...t The right hand column of Table 12 1 gives the temperatures at which zero pumping occurs at the stated pressure To find the best cryosurface temperature for a vacuum application find the pressure at...

Page 219: ...2 7E 02 81 5 75 8 71 2 66 4 61 4 56 1 53 1 1 0E 02 1 3E 02 85 6 80 1 75 8 71 2 66 4 61 4 58 4 5 0E 03 6 7E 03 89 6 84 3 80 1 75 8 71 2 66 4 63 5 2 0E 03 2 7E 03 94 6 89 6 85 6 81 5 77 2 72 7 69 9 1 0...

Page 220: ...ng the diameter of the barrel of the feedthrough that fits into the hole in the vacuum chamber wall P N 409054 00 has copper tubing P N 409053 00 has stainless steel tubing Additional feedthrough mode...

Page 221: ...and Operation Manual Appendix F Feedthroughs Brooks Automation 214072 Revision B 12 11 Figure 12 6 Polycold s Two Inch 50 mm Feedthrough with Port Requirements Figure 12 7 Close up Detail of Feedthrou...

Page 222: ...yochiller Appendix F Feedthroughs Installation and Operation Manual Brooks Automation 12 12 214072 Revision B Figure 12 8 Feedthrough Version 2 and 03 Figure 12 9 Feedthrough Version 04 Figure 12 10 F...

Page 223: ...ted below Service Bypass Line with hand valve pressure gauge and 1 1 4 T adapter and 2 1 4 evacuation lines Three Port Refrigeration Manifold a Tee adaptor and 4 evacuation lines Four Port Refrigerati...

Page 224: ...re 4 Open the valve box Close the Cold Gas Feed Hot Gas Feed and Common Return hand valves 5 If using a Service Bypass Line Close the hand valve on the service bypass line by turning the handle fully...

Page 225: ...r the circuit to be evacuated 8 For Three Port Refrigeration Manifold Connect the 1 4 service line from the high pressure port to the evacuation port in the valve box for the circuit to be evacuated I...

Page 226: ...For Service Bypass Line Connect the 1 4 service line from the hand valve on the service bypass line to the Low Pressure Service Suction Port on the back of the compressor For Three or Four Port Refri...

Page 227: ...ss line to bleed the pressure After the pressure equalizes fully open the valve For a standard Three Port Refrigeration Manifold Slowly open the High Pressure Hand Valve on the manifold to bleed in th...

Page 228: ...over from step 3 If the pressure does not rise after 2 minutes turn the compressor suction service valve fully out to the back seated position For a Three or Four Port Refrigeration Manifold Observe...

Page 229: ...e cryosurface is not in a vacuum environment may cause excessive heat loss and the process may not be able to complete When Rapid Balance Pressure check is completed some service functions may be perf...

Page 230: ...damaged contact Brooks Automation for replacements Electrical Hazard Contact with energized equipment can cause electric shock and result in death or serious injury Avoid contact with electrical circu...

Page 231: ...and package them for shipment 3 Disconnect all external wiring and facilities connections 4 Lock down the compressor to the frame by installing the double lock down nuts on each of the 4 compressor bo...

Page 232: ...o EINECS No R Phrases Proprietary blend of HFC hydro fluorocarbon refrigerant gases N A N A R36 37 Inert gas N A N A R36 37 HAZARD IDENTIFICATION Symptoms of Exposure by Route Inhalation The most sign...

Page 233: ...r other severe health effects including central nervous system depression heart attack and sudden death Direct skin or eye contact with rapidly released gas may cause frostbite and severe tissue damag...

Page 234: ...basements tanks Stay upwind and avoid low areas Ventilate closed spaces prior to entry If possible turn leaking containers so that gas escapes rather than liquid Water spray may be used to reduce vapo...

Page 235: ...use the formation of a vapor cloud The gas may be odorless or have a very slight sweet odor pH Not applicable Freezing Point Less than 100o C Boiling Point Less than 128o C STABILITY AND REACTIVITY St...

Page 236: ...e should be directed at the control of symptoms and the clinical condition Exposure to fluorocarbon pyrolysis products should be considered in the diagnostic evaluation of occupationally related fever...

Page 237: ...the above information to prepare Canadian shipments REGULATORY INFORMATION U S SARA Reporting Requirements None U S SARA Threshold Planning Quantity Not applicable U S CERCLA Reportable Quantity RQ No...

Page 238: ...on skin or clothing Cylinder temperature should not exceed 52o C 125qF Use in accordance with the Material Safety Data Sheet FIRST AID If inhaled administer fresh air immediately Administer oxygen if...

Page 239: ...no ingredients requiring disclosure under regulatory hazard criteria for this jurisdiction See Section 11 for additional details 4 First Aid Measures Eyes Flush with water at least 30 minutes Get med...

Page 240: ...and for large spill clean up sites Consult with an industrial hygienist to determine the appropriate respiratory protection for your specific use of this material A respiratory protection program com...

Page 241: ...may present a carcinogenic hazard Mutagenicity No data available to indicate product or any components present at greater than 0 1 are mutagenic or genotoxic Reproductive Toxicity No data available t...

Page 242: ...bstances and Hazardous and Nuclear Wastes Control Act of 1990 R A 6969 China All components of this product are listed on the Inventory of Existing Chemical Substances in China Taiwan May require noti...

Page 243: ...control we do not assume any responsibility and expressly disclaim any liability for any use of this product Information contained herein is believed to be true and accurate but all statements or sug...

Page 244: ...Appendices Polycold Cryochiller Appendix J Material Safety Data Sheets MSDS Installation and Operation Manual Brooks Automation 12 34 214072 Revision B This Page Intentionally Left Blank...

Page 245: ...ompressor are equal and the system is at room temperature This is the same as the balance pressure Coldest liquid The portion of the refrigerant circuit that obtains the lowest temperature prior to ev...

Page 246: ...om the refrigeration unit to the cryosurface Field replacement charge A refrigerant mixture that replaces the refrigerant in the cryopump GUTS Brooks acronym standing for Guaranteed Up Time Service Hu...

Page 247: ...Refrigeration unit The machine containing the compressor condenser and stack that cools the refriger ant mixture to cryogenic temperatures Return Line The copper tube in the refrigerant line that carr...

Page 248: ...Glossary Polycold Cryochiller UL Installation and Operation Manual Brooks Automation G 4 214072 Revision B This Page Intentionally Left Blank...

Page 249: ...g Water 3 6 Cooling Water Purity 3 7 3 9 D Declaration of Conformity 1 13 Dimensions 3 2 E Electrical Hazards 2 14 H Hazards Electrical 2 14 Mechanical 2 12 L Limitations 1 16 Limited Warranty 1 16 M...

Page 250: ...Index Polycold Cryochiller T Installation and Operation Manual Brooks Automation I 2 214072 Revision B...

Reviews: