34
V. 1.3-24-04-19
brookvent.co.uk
T: +44 (0) 28 9061 6505
7.6 PCB Module Replacement
In the unlikely event of an electronic PCB failure, the Aircycle 1.3
’s PCB module can be
disconnected and replaced.
Step 1.
PCB replacement should only be completed by a qualified Electrician.
Step 2.
Ensure all circuits are isolated before working on the unit.
Step 3.
When handling the PCB’s ensure the devices are grounded to prevent
electrostatic discharge from damaging the components.
Step 4.
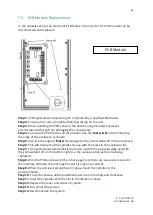
To locate the PCB in the correct position; line the
feet A & B
on the PCB along
the edge of the enclosure as shown.
Step 5.
Also line the edge of
foot A
shown against the yellow stand-off in the enclosure.
Step 6.
This will ensure that the spindles line up with the holes in the enclosure lid.
Step 7.
For inverted units (white label) line foot A up with the opposite edge and with
the yellow stand off on the bottom right (i.e. the same position as the one being
replaced).
Step 8.
Wire the PCB as shown on the other page (note there are two sensors wired in
the interface terminal, the unit may not work if only one is wired).
Step 9.
When the unit is wired and fixed in place; insert the spindles in the
potentiometers.
Step 10.
To do this ensure all the potentiometers are turned fully anti-clockwise.
Step 11.
Insert the spindles with the slot in the direction shown.
Step 12.
Replace the cover and screw it in place.
Step 13.
Re-connect the power.
Step 14.
Recommission the system.
PCB Module


