background image

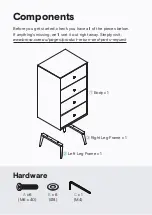
Components

Before you get started, check you have all of the pieces below.
If anything’s missing, we’ll sort it out right away. Simply visit:
www.brosa.com.au/pages/product-return-and-parts-request

Hardware

Body x 1

Left Leg Frame x 1

Right Leg Frame x 1

A

 x 6

(M6 x 40)

B

 x 6

(Ø8)

C


x 1

(M4)

Summary of Contents for Frank Tall Boy

Page 1: ...Frank Tall Boy A S S E M B LY G U I D E V2...

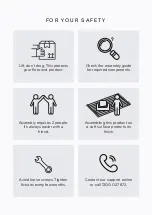
Page 2: ...duct Avoid loose screws Tighten xtures every few months Assembly requires 2 people It s always easier with a friend Contact our support online or call 1300 027 672 Check the assembly guide for require...

Page 3: ...you have all of the pieces below If anything s missing we ll sort it out right away Simply visit www brosa com au pages product return and parts request Hardware Body x 1 Left Leg Frame x 1 Right Leg...

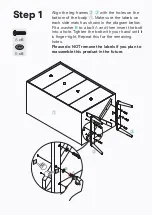
Page 4: ...s shown in the diagram below Fit a washer B to a bolt A and then insert the bolt into a hole Tighten the bolt with your hand until it is nger tight Repeat this for the remaining holes Please do NOT re...

Page 5: ...ighten all bolts with the Allen key C Take care when forcing the bolts into the holes as it might split the timber underneath Please contact our customer support if the hardware doesn t t Step 2 A A B...

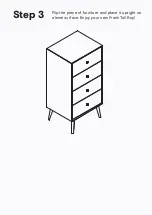
Page 6: ...Flip the piece of furniture and place it upright on a level surface Enjoy your new Frank Tall Boy Step 3...

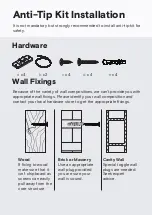
Page 7: ...rd as screws can easily pull away from the core structure Brick or Masonry Use an appropriate wall plug provided you are sure your wall is sound Cavity Wall Special toggle wall plugs are needed Seek e...

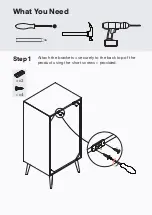
Page 8: ...What You Need Attach the brackets a securely to the back top of the product using the short screws c provided Step 1 a x 2 c x 4 a c...

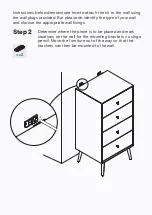
Page 9: ...a using a pencil Move the furniture out of the way so that the brackets can then be mounted to the wall Step 2 Instructions below demonstrate how to attach the kit to the wall using the wall plugs pr...

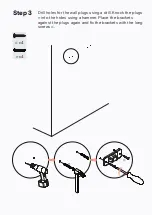
Page 10: ...Drill holes for the wall plugs using a drill Knock the plugs e into the holes using a hammer Place the brackets against the plugs again and x the brackets with the long screws d Step 3 d x 4 e x 4 d e...

Page 11: ...Lace the nylon strap b down through the brackets Slide the thin end of the strap through the receiving end on the nylon strap Pull to tighten the piece of furniture snug against wall Step 4 b x 2 b...

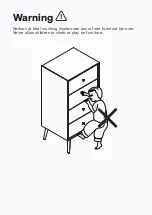
Page 12: ...Serious or fatal crushing injuries can occur from furniture tip over Never allow children to climb or play on furniture Warning...

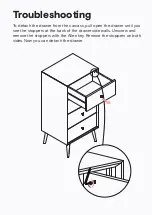
Page 13: ...he carcass pull open the drawer until you see the stoppers at the back of the drawer side walls Unscrew and remove the stoppers with the Allen key Remove the stoppers on both sides Now you can detach...

Page 14: ...eated with PU lacquer to help reduce the risk of tarnishing Placement 1 Keep furniture on at level ground Placing it unevenly may cause deformation 2 Do not place heavy objects on furniture 3 When rep...

Page 15: ...for hot items on the furniture 2 Keep furniture away from intense direct sunlight Exposure can cause cracks or discolouration 3 Severe changes in temperature and humidity can accelerate ageing Keep fu...

Reviews: