background image

ASSEMBLY GUIDE

Josie Console Table

v1.0

Summary of Contents for Josie TV Unit

Page 1: ...ASSEMBLY GUIDE Josie Console Table v1 0...

Page 2: ...have the separate pieces shown below Follow the steps on the next pages to assemble your new storage Drawer Bottom x 2 Drawer Back Wall x 2 Side Wall Side Wall Table Top Drawer s Dividing Beam Side B...

Page 3: ...Hardware What you need H x 12 A x 14 8x30 G x 4 6x30 E x 4 12xH9 D x 4 6xL28 F x 8 3 5xL35 B x 14 7xL30 C x 14 15xH12 I x 1 10g J x 2 L350 K x 28 3 5xL11 L x 4 4xL16...

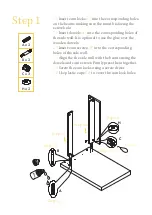
Page 4: ...o use the glue over the wooden dowels 1 3 Insert cam screws B into the corresponding holes of the side wall 1 4 Align the the side wall with the beams using the dowels and cam screws Firmly press them...

Page 5: ...es of the beams It is optional to use the glue over the wooden dowels 2 3 Insert cam screws B into the corresponding holes of the beams 2 4 Align the the side wall with the beams using the dowels and...

Page 6: ...optional to use the glue over the wooden dowels 3 3 Insert cam screws B into the corresponding holes of the beams 3 4 Align the the divider wall with the beams using the dowels and cam screws Firmly p...

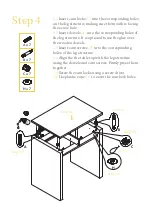
Page 7: ...nal to use the glue over the wooden dowels 4 3 Insert cam screws B into the corresponding holes of the leg structure 4 4 Align the the table top with the leg structure using the dowels and cam screws...

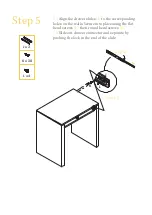
Page 8: ...the corresponding holes on the walls Secure into place using the flat head screws K then round head screws L 5 2 Slide out drawer connector and separate by pushing the lock in the end of the slide J x...

Page 9: ...o the back side secure them with screws F Repeat for the second drawer F x 4 Step 6 Slide the drawer bottom into place by fitting it into the grooves in the walls of the formed drawer structure Repeat...

Page 10: ...use the glue over the wooden dowels 8 3 Attach cam screws D into the corresponding holes of the drawer front 8 4 Align the drawer front with the drawer body using the dowels and cam screws Firmly pres...

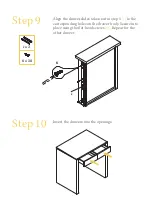
Page 11: ...rawer slides taken out in step 5 J to the corresponding holes on the drawer body Secure into place using the flat head screws K Repeat for the other drawer Step 10 Insert the drawers into the openings...

Page 12: ...Step 11 Enjoy your new table...

Reviews: