background image

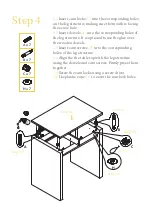
Step 4

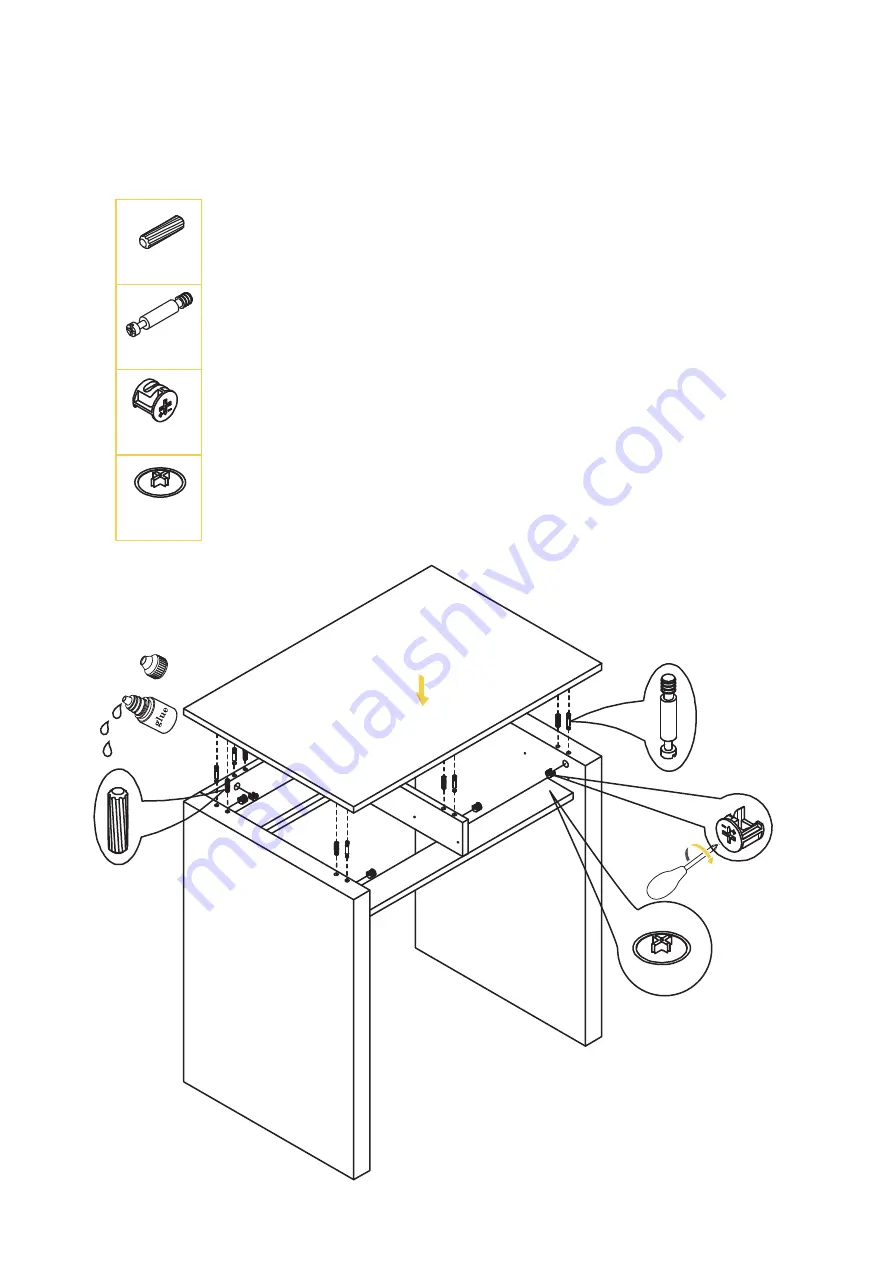
4.1 

Insert cam locks 

(C)

 into the corresponding holes 

on the leg structure


making sure the mouth is facing 

the screw hole.

4.2 

Insert dowels 

(A)

 into the corresponding holes of  

the leg structure. It is optional to use the glue over 

the wooden dowels. 

4.3 

Insert cam screws 

(B)

 into the corresponding 

holes of the leg structure. 

4.4 

Align the the table top


with the leg structure 

using the dowels and cam screws. Firmly press them 

together.

4.5 

Screw the cam locks using a screw driver.

4.6 

Use plastic caps 

(H)

 to cover the cam lock holes.

A x 7

B x 7

C x 7

H x 7

C

B

H

Step 4.2

Step 4.6

Step 4.5

Step 4.1

Step 4.3

Step 4.4

A

Summary of Contents for Josie TV Unit

Page 1: ...ASSEMBLY GUIDE Josie Console Table v1 0...

Page 2: ...have the separate pieces shown below Follow the steps on the next pages to assemble your new storage Drawer Bottom x 2 Drawer Back Wall x 2 Side Wall Side Wall Table Top Drawer s Dividing Beam Side B...

Page 3: ...Hardware What you need H x 12 A x 14 8x30 G x 4 6x30 E x 4 12xH9 D x 4 6xL28 F x 8 3 5xL35 B x 14 7xL30 C x 14 15xH12 I x 1 10g J x 2 L350 K x 28 3 5xL11 L x 4 4xL16...

Page 4: ...o use the glue over the wooden dowels 1 3 Insert cam screws B into the corresponding holes of the side wall 1 4 Align the the side wall with the beams using the dowels and cam screws Firmly press them...

Page 5: ...es of the beams It is optional to use the glue over the wooden dowels 2 3 Insert cam screws B into the corresponding holes of the beams 2 4 Align the the side wall with the beams using the dowels and...

Page 6: ...optional to use the glue over the wooden dowels 3 3 Insert cam screws B into the corresponding holes of the beams 3 4 Align the the divider wall with the beams using the dowels and cam screws Firmly p...

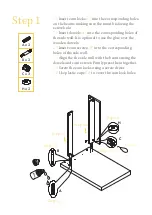
Page 7: ...nal to use the glue over the wooden dowels 4 3 Insert cam screws B into the corresponding holes of the leg structure 4 4 Align the the table top with the leg structure using the dowels and cam screws...

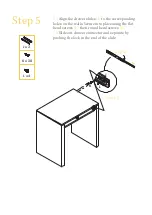
Page 8: ...the corresponding holes on the walls Secure into place using the flat head screws K then round head screws L 5 2 Slide out drawer connector and separate by pushing the lock in the end of the slide J x...

Page 9: ...o the back side secure them with screws F Repeat for the second drawer F x 4 Step 6 Slide the drawer bottom into place by fitting it into the grooves in the walls of the formed drawer structure Repeat...

Page 10: ...use the glue over the wooden dowels 8 3 Attach cam screws D into the corresponding holes of the drawer front 8 4 Align the drawer front with the drawer body using the dowels and cam screws Firmly pres...

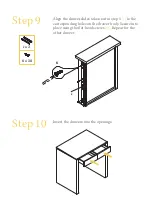
Page 11: ...rawer slides taken out in step 5 J to the corresponding holes on the drawer body Secure into place using the flat head screws K Repeat for the other drawer Step 10 Insert the drawers into the openings...

Page 12: ...Step 11 Enjoy your new table...

Reviews: