background image

© 2007-2008 Broseley Fires Ltd 

TECHNICAL INFORMATION 


NATURAL GAS 

PROPANE 

G20/I2H  


G31/I3P 


Heat Input (Gross) 


 6.2 Kw/Hr  


6.0 Kw/Hr 

 
Supply Pressure  


20 Mbar  


37 Mbar 

 
Gas 

Rate 


   0.59 

M

3

/Hr  


0.23 M

3

/Hr 

 
Injector 

Size 


   C.A.T. 

28/420 


 C.A.T. 

16/160


CONTENTS 
 

ARRANGING THE LAYOUT OF THE COALS 

. . . . . . . . . . . . . . . . . . . . .  . . . . . . . . . . . . . . . . . . . . . . . . . . . . . . . . . . . . . . .

DIMENSIONS & DETAILS 

. . . . . . . . . . . . . . . . . . . . . . . . . . . . . . . . . . . . . . . . . . . . . . ………….. . . . . . . . . . . . . . . . . . . . . . . . . . . . . . . .

EXTINGUISHING THE STOVE BACK TO PERMANENT PILOT SETTING 

. . .. . . . . . . . . . . . . . . . . . ...

EXTINGUISHING THE STOVE FULLY 

. . . . . . . . . . . . . . . . . . . . . . . . . . . . . . . . . . . . . . . . . . . . . . . . . . ….. . . . . . . . . . . . . . . ...

FLUE CONNECTION 

. . . . . . . . . . . . . . . . . . . . . . . . . . . . . . . . . . . . . . . . . . . . . . . . . . . . . . . . . . . . . . . . . . . . . . . . . . . …………... . . . . . . . .

GAS CONNECTION 

. . . . . . . . . . . . . . . . . . . . . . . . . . . . . . . . . . . . . . . . . . . . . . . . . . . . . . . . . . . . . . . . . . . . . . . . . . . . . . . . . . . ……………. .

GUARANTEE 

. . . . . . . . . . . . . . . . . . . . . . . . . . . . . . . . . . . . . . . . . . . . . . . . . . . . . . . . . . . . . . . . . . . . . ..

OUTSIDE BACK COVER 

IGNITING THE PERMANENT PILOT LIGHT 

. . . . . . . . . . . . . . . . . . . . . . . . . . . . . . . . . . . . . . . . . . . . . . . . . . . . . . . . . . . . . .

IMPORTANT INFORMATION 

. . . . . . . . . . . . . . . . . . . . . . . . . . . . . . . . . . . . . . . . . . . . . . . . ………. . . . . . . . . . . . . . . . . . . . . . . . . . . .

NOTE TO THE INSTALLATION ENGINEER 

. . . . . . . . . . . . . . . . . . . . . . . . . . . . . . . . . . .. . . . . . . . . . . . . . . . . . . . . . . . . . .

10 

OPERATING THE STOVE 

. . . . . . . . . . . . . . . . . . . . . . . . . . . . . . . . . . . . . . . . . . . . . . . . . . . . . . . . . . ……….. . . . . . . . . . . . . . . . . . . . . .

PRESSURE TESTING 

. . . . . . . . . . . . . . . . . . . . . . . . . . . . . . . . . . . . . . . . . . . . . . . . . . . . . . . . . . . . . . . . . . . . . …………... . . . . . . . . . . . . .

RUNNING THE STOVE AT A HIGHER OUTPUT 

. . . . . . . . . . . . . . . . . . . . . . . . . . . . . . . . . . . . . . . . . . .. . . . . . . . . . . . . .

RUNNING THE STOVE AT LOW SETTING 

. . . . . . . . . . . . . . . . . . . . . . . . . . . . . . . . . . . . . . . . . . . . . . . . . .. . . . . . . . . . . . . .

SERVICING INSTRUCTIONS 

. . . . . . . . . . . . . . . . . . . . . . . . . . . . . . . . . . . . . . . . . . . . . . . . . . . . . . . . . . . . . . . . . . . . ……….. . . . . . .

13 

SITING THE APPLIANCE 

. . . . . . . . . . . . . . . . . . . . . . . . . . . . . . . . . . . . . . . . . . . . . . . . . . . . . . . . . . . . . . . . . . . . . . . . . . . . . …………. . .

SPILLAGE MONITORING SYSTEM 

. . . . . . . . . . . . . . . . . . . . . . . . . . . . . . . . . . . . . . . . . . . . . . . . . . . . . . . . .  . . . . . . . . . …….. .

11 

STOVE ASSEMBLY 

. . . . . . . . . . . . . . . . . . . . . . . . . . . . . . . . . . . . . . . . . . . . . . . . . . . . . . . . . . . . . . . . . . . . . . . . . . . . . …………….. . . . . . . .

TEST FOR SPILLAGE 

. . . . . . . . . . . . . . . . . . . . . . . . . . . . . . . . . . . . . . . . . . . . . . . . . . . . . . . . . . . . . . . . . . . . . . . . . . . . . …………… . . . .

10 

TROUBLESHOOTING 

. . . . . . . . . . . . . . . . . . . . . . . . . . . . . . . . . . . . . . . . . . . . . . . . . . . . . . . . . . . . . . . . . . . . . . . . . . . . . . . …………… . .

12 

VENTILATION 

. . . . . . . . . . . . . . . . . . . . . . . . . . . . . . . . . . . . . . . . . . . . . . . . . . . . . . . . . . . . . . . . . . . . . . . . . . . . . . . . . . . . . . . ……………….... . .


Broseley Fires Ltd. 

Knights Way, Battlefield Enterprise Park, Shrewsbury, Shropshire SY1 3AB 

Tel: 01743 461444 Fax: 01743 461446 

Summary of Contents for York Midi

Page 1: ... 2007 2008 Broseley Fires Ltd The Installation and Operation Manual York Midi Gas Stove Revision TJ09b ...

Page 2: ...THE STOVE FULLY 9 FLUE CONNECTION 6 GAS CONNECTION 7 GUARANTEE OUTSIDE BACK COVER IGNITING THE PERMANENT PILOT LIGHT 9 IMPORTANT INFORMATION 3 NOTE TO THE INSTALLATION ENGINEER 10 OPERATING THE STOVE 9 PRESSURE TESTING 7 RUNNING THE STOVE AT A HIGHER OUTPUT 9 RUNNING THE STOVE AT LOW SETTING 9 SERVICING INSTRUCTIONS 13 SITING THE APPLIANCE 4 SPILLAGE MONITORING SYSTEM 11 STOVE ASSEMBLY 5 TEST FOR ...

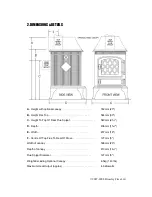
Page 3: ... 584mm 30 C Height To Top Of Rear Flue Spigot 540mm 211 4 D Depth 406mm 153 4 E Width 457mm 18 F Centre Of Top Flue To Rear Of Stove 127mm 5 Width of canopy 508mm 20 Depth of canopy 413mm 161 4 Flue Spigot Diameter 127mm 5 Weight Excluding Optional Canopy 65kg 143 lbs Maximum Heat Output approx 4 6 kilowatts ...

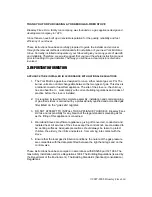
Page 4: ...y flue and hearth etc must comply with current building regulations and codes of practice before the stove is installed 2 It is required by law that the complete assembly installation and commissioning of gas fired stoves is carried out by a professionally qualified and accredited gas fitter listed on the gas safe register 3 DO NOT ATTEMPT TO INSTALL THIS APPLIANCE YOURSELF Broseley Fires Ltd take...

Page 5: ...res thick The hearth must at least 300mm at any angle in front of the incandescent heat source i e the burner surface of the stove and requires a clearance 150mm each side 2 On all stove installations no combustible material should cover the hearth To prevent this from happening the hearth should be at least 50mm above the level of the floor or a fender kerb of a similar height should be placed ar...

Page 6: ...g the stove ensure the gas to be used i e natural mains gas or LPG corresponds with the identification plate on the burner Carefully lay the stove on its back and fit the four legs using the nuts bolts and washers provided Loosen the grub screw situated in the side of the brass T handle unscrew the T handle and open the main stove door Next stand the stove upright and insert the burner control fir...

Page 7: ...imney block pre cast flue block and ridge tile vent Ideally it is recommended that a minimum height of 610mm from the stove should be established before any significant change of the direction of the flue Horizontal or negative gradients should be avoided The flue must have a minimum height of 3 metres to ensure adequate draught Prior to installation the installer should ensure that the flue is fr...

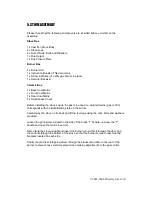
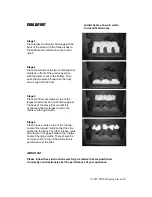
Page 8: ...tion to the stove with the appliance in the full rate position 3 Ensure that the gas pressure to the stove is maintained when it is operating at the same time as other appliances in the building and that a suitable pressure gauge is used i e a manometer Any service call as a result of incorrect gas pressure will be chargeable 8 ARRANGING THE LAYOUT OF THE COALS Only the ceramic coals supplied with...

Page 9: ...tage 3 Place the final coal matrix on top of the largest coal matrix and push firmly against the back of the stove Ensure that it is central and the two largest coals in the matrix are facing forward Stage 4 Place 3 loose coals on top of the 3 large coals of the largest matrix so that they are pushed to the back The other 2 loose coals are placed in the gaps between the 3 large coals of the large ...

Page 10: ...i Gas Stove operates with a traditional permanent pilot light The knob for ignition and power control is located on the lower right hand side of the stove The pilot light is located at the front middle of the coal matrix If the Flame Supervision Devise Actuating Flame the pilot light is extinguished either by intention or not no attempt should be made to re light until 3 minutes have elapsed A IGN...

Page 11: ...ilot position Release E EXTINGUISHING THE STOVE FULLY 1 From any heat setting or the permanent pilot depress control knob and turn clockwise to OFF Position Should the Glass door become broken or damaged in any way turn your stove off and do not attempt to re light it Contact your dealer to organise for a replacement to be fitted before re lighting the appliance ...

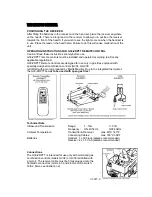
Page 12: ...le regulations G30 ZRPTT Remote Controls are designed for use only in gas fires equipped with specially designed combination controls GV34 or GV36 retrofitted with a motor produced by Mertik Maxitrol Due to the integrated thermostat the G30 ZRPTT is not to be used with open gas fires Technical Data Ultrasound Transmission Range 1 10m 3 33ft Frequency ON 40 5kHz OFF 40kHz Ambient Temperature Transm...

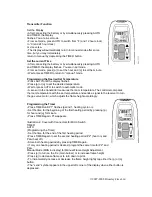
Page 13: ... controller compares the room temperature with the set temperature and sends a signal to the receiver to turn the gas valve motor which adjusts the flame height accordingly Programming the Timer Press TIMER until P1 flashes period 1 heating cycle on Set the time for the beginning of the first heating period by pressing p for hour and q for minute Press TIMER again P1w appears Illustration 2 Cover ...

Page 14: ...me height can be adjusted by manually turning knob B see illustration 2 Note Please note the placement of the transmitter temperature sensor is important to assure proper temperature regulation Generally a more contstant temperature will be assured if the transmitter is not too far from the gas appliance Before switching to AUTO or TIMER mode press either button p or q to verify the reception when...

Page 15: ...STEM This appliance is fitted with an atmospheric sensing spillage monitoring system in the form of an oxygen depletion sensing pilot This is designed to shut down the fire within a safe period if there is an excessive build up of products of combustion within the room space This would usually only occur if the flue path suffered severe blockage and or ventilation was severely impeded THE FOLLOWIN...

Page 16: ...hermocouple probe so that it is evenly encircled The pilot should have three flames one directed towards the thermocouple one towards the bed of the fire and the third towards the igniter valve Any whistling sound you hear is normally caused by dirt obstructing the pilot This is normally cured by carrying out the cleaning process outlined in the next section entitled Servicing Instructions After a...

Page 17: ...tallation engineer Improper installation adjustment alteration service or maintenance can cause personal injury and or damage to property If you are in the slightest doubt about any aspect of your stoves performance or you require additional information then please contact you stove supplier a qualified installation engineer or call our technical help line on 01743 461444 Please do not store keep ...

Page 18: ...r appliances All on Gas rate Natural Gas Time for 1 cubic foot in seconds Type and size of flue Approx height is a register plate fitted How much area of flue is left Is there any spillage is the draught excessive Is there any ventilation in the room Has the room double glazing is the door close fitting Has the pilot sufficient heat to open the FFD Is the aeration of the pilot correct Is the FFD P...

Page 19: ...e is void if The appliance is not installed and operated in accordance with our instructions or The appliance is not serviced by a CORGI registered engineer annually or Repairs of modification have been carried out by the purchaser or any third party not authorized by us or The appliance has been misused or accidentally damaged or Damage is due to fair wear and tear or The appliance or defective c...

Reviews: