5-54
Confidential
1.4.25 Sensitivity adjustment of density sensor (Function code 72)
<Function>
This function allows you to print the patch data for density sensor sensitivity adjustment on the
belt unit and measure the density with the density sensor. The characteristics of the density
sensor are calculated based on the value measured by the density sensor, and the parameter
is adjusted upon color density adjustment.
<Operating procedure>
(1) Press the
7
and
2
buttons in this order in the initial state of the maintenance mode.
"PLEASE WAIT" is displayed on the LCD.
(2) When the parameter is obtained without errors, the machine returns to the initial state of
the maintenance mode.
When an error message is displayed on the LCD, take the measures described in the
table below.
* # indicates the toner color (Y, M, or C) of which cartridge became empty.
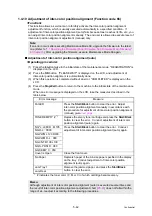
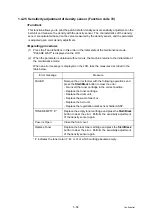
Error message
Measure
FAILED
Remove the error factors with the following operations and
press the
Start/Black
button to clear the error.
- Re-insert the toner cartridge in the correct position.
- Replace the toner cartridge.
- Replace the drum unit.
- Replace the waste toner box.
- Replace the belt unit.
- Replace the registration mark sensor holder ASSY.
TONER EMPTY # *
Replace the empty toner cartridge and press the
Start/Black
button to clear the error. Perform the sensitivity adjustment
of the density sensor again.
Cover is Open
Close the front cover.
Replace Toner
Replace the black toner cartridge and press the
Start/Black
button to clear the error. Perform the sensitivity adjustment
of the density sensor again.
Summary of Contents for 09055CDN
Page 22: ...Confidential CHAPTER 1 SPECIFICATIONS ...
Page 37: ...Confidential CHAPTER 2 ERROR INDICATION AND TROUBLESHOOTING ...
Page 47: ...2 8 Confidential ADF part A4 model Fig 2 6 Left side Right side Document feed path Face up ...
Page 48: ...2 9 Confidential ADF part Legal model Fig 2 7 Left side Right side Document feed path Face up ...
Page 180: ...Confidential CHAPTER 3 DISASSEMBLY AND ASSEMBLY ...
Page 211: ...3 28 Confidential 8 DISASSEMBLY FLOW Disassembly Re Assembly second ...
Page 212: ...3 29 Confidential Disassembly Re Assembly second ...
Page 416: ...Confidential CHAPTER 4 ADJUSTMENTS AND UPDATING OF SETTINGS REQUIRED AFTER PARTS REPLACEMENT ...
Page 436: ...Confidential CHAPTER 5 SERVICE FUNCTIONS ...
Page 445: ...5 7 Confidential Black and white scanning First side Front Fig 5 1 ...
Page 446: ...5 8 Confidential Black and white scanning Second side Back Fig 5 2 ...
Page 447: ...5 9 Confidential Color scanning First side Front Fig 5 3 ...
Page 448: ...5 10 Confidential Color scanning Second side Back Fig 5 4 ...
Page 475: ...5 37 Confidential Cover page sample Fig 5 18 End page sample Fig 5 19 ...
Page 482: ...5 44 Confidential Inter color position alignment adjustment chart Fig 5 23 ...
Page 491: ...5 53 Confidential Color test pattern Fig 5 28 MCYK Y C K M YCMK_ _A ...
Page 512: ...Confidential CHAPTER 6 CIRCUIT DIAGRAMS WIRING DIAGRAM ...
Page 514: ...6 1 Confidential 1 CIRCUIT DIAGRAMS High voltage Power Supply PCB Circuit Diagram 1 3 ...
Page 515: ...6 2 Confidential High voltage Power Supply PCB Circuit Diagram 2 3 ...
Page 516: ...6 3 Confidential High voltage Power Supply PCB Circuit Diagram 3 3 ...
Page 517: ...6 4 Confidential Low voltage Power Supply PCB Circuit Diagram 100V ...
Page 518: ...6 5 Confidential Low voltage Power Supply PCB Circuit Diagram 200V ...
Page 519: ...6 6 Confidential NCU PCB Circuit Diagram U S A Canada ...
Page 520: ...6 7 Confidential NCU PCB Circuit Diagram Europe Oceania ...
Page 521: ...6 8 Confidential NCU PCB Circuit Diagram China Asia South Africa Gulf ...
Page 523: ...Confidential CHAPTER 7 PERIODICAL MAINTENANCE ...
Page 581: ...Confidential APPENDIX 1 SERIAL NUMBERING SYSTEM ...
Page 585: ...Confidential APPENDIX 3 INSTALLING THE MAINTENANCE DRIVER ...
Page 589: ...App 3 4 Confidential 10 Alert warning message appears click Continue Anyway to proceed ...

