


5
1
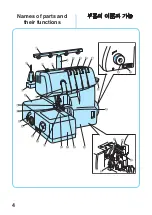
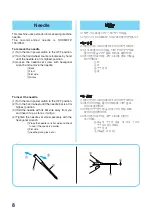
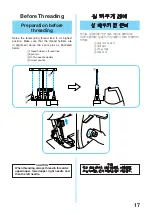
Thread tree
2
Handle
3
Presser foot pressure adjustment screw
4
Spool pin
5
Spool support
6
Thread take-up cover
7
Needles
8
Upper knife
9
Presser foot
0
Material plate cover
A
Spool stand (thread tree support)
B
Left needle thread tension dial
C
Right needle thread tension dial
D
Presser foot lifting lever
E
Hand wheel
F
Upperlooper thread tension dial
G
Lowerlooper thread tension dial
H
Front cover
I
Material slide plate (for overlock stitch)
J
Main power switch and light switch
K
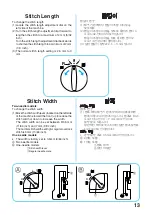
Stitch length adjustment dial
L
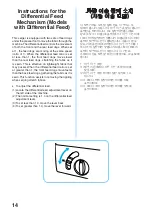
Differential feed ratio adjustment lever
M
Lowerlooper threading lever
N
Stitch finger
O
Stitch width lever
P
Upperlooper
Q
Lowerlooper
R
Free-arm cover
S
Bed extension
T
Knife lever
1
실걸이
2
손잡이
3
노루발 압력 조절 나사
4
실패꽂이
5
실패 받침대
6
실채기 커버
7
바늘
8
윗칼
9
노루발
0
원단판 커버
A
실패 스탠드(실걸이 봉)
B
왼쪽 바늘 실 장력 다이얼
C
오른쪽 바늘 실 장력 다이얼
D
노루발 올림 레버
E
풀리 다이얼
F
윗루퍼 실 장력 다이얼
G
아랫루퍼 실 장력 다이얼
H
앞커버
I
원단 미끄럼판(오버로크 스티치용)
J
메인 전원 스위치 겸 조명 스위치
K
땀길이 조절 다이얼
L
차동 이송비 조절 레버
M
아랫루퍼 실 끼우기 레버
N
스티치 핑거
O
땀폭 레버
P
윗루퍼
Q
아랫루퍼
R
프리암 커버
S
확장 작업대
T
칼 레버
Summary of Contents for 2034D
Page 2: ......
Page 11: ...3 ...
Page 33: ...25 2 3 4 5 6 7 2 1 2 3 6 7 6 4 5 ...
Page 35: ...27 2 3 5 6 4 7 2 1 2 3 4 3 6 7 6 7 6 4 5 ...
Page 72: ...English Korean 2034D XB2073 001 Printed in Taiwan ...


